Jump to content
3" rattle ko
 
© Reelentless

3" rattle ko


Reelentless
 Share


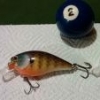
Slowly trying to add more details and work on techniques & topcoats.Createx paint.Epoxy topcoat.Got a million microscopic bubbles

Copyright

© Reelentless

 Share


Recommended Comments

Since I switched to a good artists brush I've had a lot less problems applying epoxy. My personal preference is a soft, natural hair brush. On smaller baits I use an angled brush. Think it's called an "angled shader". For larger baits a regular squared ended brush  gets the call. The angled brush allows me to get into the areas around the lip on a small bait easier than the larger brush.


When mixing the epoxy I don't use heat to pop the bubbles in the mix. It will pop the bubbles, but it also speeds up the curing process and cuts way back on the amount of time you have to apply the epoxy. I use the little graduated medicine cups to mix epoxy in. After it's thoroughly mixed I hold it up to my mouth at an angle and exhale onto the epoxy while slowly turning the cup. Turning the cup lets the epoxy "roll" inside the cup continually exposing what lies under the surface. And I'm talking about "exhaling". Not blowing. Exhaling carries more heat from your body than blowing does. The combination of carbon dioxide and warmth is what pops the bubbles. Any bubbles that are left after doing this for a few seconds will look more like a fog, or haze, than actual bubbles and this is where the soft bristled brush comes into play. The soft bristles will pop any remaining bubbles in the epoxy.


Something else that will help you is don't try to "paint" the epoxy on. My first goal is to get the area around the lip covered without getting it out on the lip. This is the only "finesse" step. After the area around the lip is covered I keep loading the brush and "glob" it onto the bait until I think there is enough epoxy on the bait to cover it. Just don't "glob" it all in one place. Turning the bait as your putting the epoxy on will keep it from running to the bottom and dripping off. Once you've got a goodly amount of epoxy on the bait then it's time to start brushing it out working toward the tail. If you end up with an excessive amount of epoxy on the bait all you have to do is wipe the brush on a paper towel to remove some of it and then continue leveling out the epoxy.


A good artists brush can be fairly expensive, but you can usually find a sale on them. I clean my brushes by dipping them in denatured alcohol and then working the brush on a folded paper towel. I keep doing this until I have used up all the "clean" areas of the paper towel. Just keep dipping the brush into clean alcohol and scrubbing it on the towel until the towel is used up. Using an artists brush that you might have paid $20 for might seem a little crazy, but I've been using the same brushes for over 2 years by cleaning it after each use.


If you want to try doing it this way and have any questions just shoot me a PM and I'll try to help.


good luck,


Ben

Link to comment

Join the conversation

You can post now and register later. If you have an account, sign in now to post with your account.
Note: Your post will require moderator approval before it will be visible.

Add a comment...

×   Pasted as rich text.   Paste as plain text instead

  Only 75 emoji are allowed.

×   Your link has been automatically embedded.   Display as a link instead

×   Your previous content has been restored.   Clear editor

×   You cannot paste images directly. Upload or insert images from URL.

Loading...
×
×
  • Create New...
Top