Kasilofchrisn Posted February 22, 2013 Report Share Posted February 22, 2013 So I am going to make my fluid bed with Vibration (there is another thread on this in this forum) and I got to thinking about how deep to make my cups. I have some 8" tall cups now and they work pretty good. My new jigs are butterfly style and the longest one is 10 and 1/2 inches long. The question I have is should I make my cups 12" tall and dip once or stick with my 8" length but dip the jig halfway then flip it and dip the other half ? I was thinking I would use less paint dipping half then flipping and have a reduced risk of getting too much paint on the jigs. If I make the taller cups the bottom of the jig may be in the paint too long and get too much paint on that half. The jigs have a stainless #3 eye on each end and I have bent some tig welding wire so I have some hooks with handles to use for the dipping process. So I would dip ~half then put another hook tool in the other side remove the first tool and quickly dip the other half. Any thoughts/ideas on this? Quote Link to comment Share on other sites More sharing options...
makokeith Posted February 23, 2013 Report Share Posted February 23, 2013 That's a lot of jig to dip at once. I would do one side then the other. I have heard people talk of a long rectangular fluid bed. Maybe that would be a better choice? Either way post up your results, I was thinking of doing some butterfly type jigs myself. Quote Link to comment Share on other sites More sharing options...
Kasilofchrisn Posted February 23, 2013 Author Report Share Posted February 23, 2013 I have considered the rectangular fluid bed. The problem is the fluidizing plate I have is only 8"x8". So I would have to splice two pieces together. I worry the joint may be a problem area for the paint to fluidize properly over the whole length of the jig. That and the whole idea of fluidizing that much paint in general. If I do make a rectangular one I may have a buddy with a good wood shop make the base and router in some channels so the plate will just slide in . I don't know for sure more to think about I guess. I think at least for starters I will flip and dip. Thanks for the advice. Quote Link to comment Share on other sites More sharing options...
mark poulson Posted February 23, 2013 Report Share Posted February 23, 2013 (edited) Has anyone tried using a flour sifter to apply powder paint over large pieces, instead of dipping them? Edited February 23, 2013 by mark poulson Quote Link to comment Share on other sites More sharing options...
BLT Posted February 23, 2013 Report Share Posted February 23, 2013 If just doing a "base" color and then other colors on top......this is a perfect case for the air brush to apply the powder. That's what I wold do. To answer your original question, I would flip and dip again. Quote Link to comment Share on other sites More sharing options...
Kasilofchrisn Posted February 23, 2013 Author Report Share Posted February 23, 2013 (edited) The plan I have is to do the base color in the fluid bed then the accent color/colors with the spray gun. White with a green or blue back are a couple of popular patterns up here. Edited February 23, 2013 by Kasilofchrisn Quote Link to comment Share on other sites More sharing options...
andy1976 Posted February 26, 2013 Report Share Posted February 26, 2013 I flip mine when I run a little low on a color and it works great, but if you are going to be doing a lot I would make taller beds. I hang mine in the oven and heat them to 400. I like bending coat hangers to hang them. I would dip the tail end first then stick a hanger in the tail eye and flip the jig upside down while pulling out the hanger from the head. Then dip the head and stick it back in the oven to cure. Quote Link to comment Share on other sites More sharing options...
andy1976 Posted February 26, 2013 Report Share Posted February 26, 2013 Thought about it and it might be easy to just extend your existing cups as long as you have square cuts PVC cement should bond two pieces together. There's going to be no actual stress on the bond so it should work. Quote Link to comment Share on other sites More sharing options...
Kasilofchrisn Posted February 27, 2013 Author Report Share Posted February 27, 2013 I already have the PVC bought for the taller cups so it will be easy to cut them. I hve a bigger than usual Aquarium pump so I hope I have enough air. If not I guess they make bigger ones. Like I said this will mainly be for a base color and possibly a UV blast coat. The accent colors will be with the powder paint airbrush. Quote Link to comment Share on other sites More sharing options...
Kasilofchrisn Posted March 14, 2013 Author Report Share Posted March 14, 2013 So I tried the dip flip then dip the other half. It worked OK but on some of them it definetly left a seam because I couldn't be precise with the overlap. so part of it in the center had more paint then the other parts. Then I made some 12" tall cups and I was really happy with how that worked. So I guess taller cups was the best answer. 1 Quote Link to comment Share on other sites More sharing options...
Paul D. Posted March 15, 2013 Report Share Posted March 15, 2013 Thanks for putting up this question and your outcome. I plan to paint up some longer jigs this weekend and was wondering if I could extend my cups. I made up some 2" beds for the longer stuff as they need less paint to stay full. Quote Link to comment Share on other sites More sharing options...
makokeith Posted March 15, 2013 Report Share Posted March 15, 2013 So I tried the dip flip then dip the other half. It worked OK but on some of them it definetly left a seam because I couldn't be precise with the overlap. so part of it in the center had more paint then the other parts. Then I made some 12" tall cups and I was really happy with how that worked. So I guess taller cups was the best answer. Glad to here it worked. What size PVC are you using? Quote Link to comment Share on other sites More sharing options...
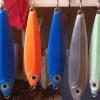
Kasilofchrisn Posted March 15, 2013 Author Report Share Posted March 15, 2013 (edited) I was using 2" PVC mainly because it requires less paint. The jigs I am doing are longer and skinnier and I don't have problems doing them in a 2" cup. I did some accent colors using the spray gun and brush tap methods and after doing a few jigs I can see where I would not want to do the whole jig with either of those two methods. Too much waste and hassle(yes I did build a box and recycle some of the paint). I dont mind using them for accents though. Here are some pics of the longest ones I made. They are in the 10" range or so and weigh 25.5oz with paint and hooks. These were made for fishing bottom fish in Alaska's Cook Inlet home of the worlds second highest tides. Big jigs and weights are standard fare here. This jig is called Cook Inlet Candy. Oh and for the record I did switch these to one assist hook setups. Edited March 15, 2013 by Kasilofchrisn 1 Quote Link to comment Share on other sites More sharing options...
BLT Posted March 16, 2013 Report Share Posted March 16, 2013 Looks nice, glad you found a way to do it. Quote Link to comment Share on other sites More sharing options...
andy1976 Posted March 20, 2013 Report Share Posted March 20, 2013 Those look great. After making a bunch the other day I realized my cups should be at least 2-3 inches higher than I need the paint level to be. That should save wasted paint for me. Quote Link to comment Share on other sites More sharing options...