
Leaderboard


Popular Content
Showing content with the highest reputation on 06/07/2013 in all areas
-
I wouldn't take anything for my HiLine....1 point
-
I have the Hi-Line from Iwata as well and I love it, but like 152nd said I do need to thin some of the paints to get them to shoot like I want. And I like the MAC valve as well. It allows you to fine tune the spray without having to adjust your air pressure at the regulator. I don't have any experience with the other brush you listed, but the Hi-Line is a great airbrush and spare parts are readily available anywhere the airbrush is sold. hope this helps, Ben1 point
-
I have that brush and it is a great brush. I also have a couple of Eclipse CS. The difference is the Hi-line's parts are a bit more precision made and i believe the seals are impervious to solvents. The only downfall that i see (for me anyways) is the hi-line has a .03mm nozzle and the Eclipse has a .035 nozzle. I do not have to thin ANY pearls, irricdecents, colors shifts with the Eclipse. I just stay away fro Createx white and use Poytranspar Super Hide. I do not have to thin any paints with the Eclipse.I guess you can say I'm lazy and/or i don't like the extra work. This is what works for me....1 point
-
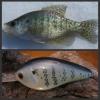
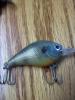
White Crappie 1. Clean/strip your bait to be painted. (This one was a Store bought lure that I Sanded/blasted the paint off) 2. Undercoat the lure with a Flat white. I use Americana Snow (Titanium) white. I also Spray multiple light coats flashing each versus one heavy coat. 3. I sprayed the sides (Lightly) with FolkArt 662 Metallic Silver Sterling for my Scale Pattern. It does not take much to achieve a good scale undercoat which will become apparent later. Flash all coats. 4. Then mixing DecoArt dazzling metallic DAO79 Bronze with Anitas All Purpose 11139 Tangerine produced a light metallic "Orange" Spayed the forward belly area for my belly scale. Flash all coats Now the fun starts, I need to add here, having a computer set up where I shoot really helps. Zooming in on the bait fish pictures for the tiny details and color shifts really makes it easier to see what colors you need and the shading areas. 5. Wrap your lure with the scale material. Ok we are gonna stop here for a minute and go off on a different tangent. I fought and fought scale patterns for quite a while trying to figure out how to keep them straight and not bunching up or curving too much. The important thing I found was I had to stretch up and down straight very tautly. I use of all things CHOPSTICKS from Panda Express. Without breaking them apart, I tape the part where the wood is still together so I can open and close them as needed.I use two sets, one on top to hold the netting straight up and down, and one on the bottom to pull the netting tight. The netting is folded in half with the scale pattern in the direction you want and place the first set of chopsticks through the folded netting. Make sure the netting is straight and not bunched up anywhere. Lay the lure inside the folded netting halves on its back, then using the second set of chopsticks pull both sides of the netting through very tight to hold the lure in place and this will give you your scale masking. After you arrange the netting straight and tight use something to hold the netting in, I use a 12" set of hemostats clamping the netting below the second set of chopsticks. Once your lure is stationary and wrapped then you are ready to move on. 6. Spray body and head with FolkArt 569 Metallic Pearl white. Here it is VERY important, Light coats and flashing each coat. If you spay too much it will produce excess buildup on the netting. You may want to mix a little base white with the metallic here, depends on how much you thin, and your gun. If you mix the base white with the metallic you will only need two or three very light coats. Flashing each. DO NOT REMOVE THE NETTING YET! 7. Now to paint the Vertical bars. You can spray your bars if you wish but for more detail I prefer to hand paint the individual marks. To hand paint, Using FolkArt 661 Metallic Sequin Black, thin the paint in a cap or saucer,(It will not take much, but you need to be able to see the tip of the applicator.) I use both a GOOD detail brush that I trimmed to only a few hairs, or a needle. your paint needs to be thin enough that when it dries it does not dry lumpy. Once again the computer lets me see the details for the bars. 8. I use the netting pattern to paint the individual marks keeping them looking like they are in a fish scale pattern. 9. Once your vertical bars are on, and the paint is dried you can remove the netting. 10. Shading... a. Gills, I used Base white mixed with a couple of drops of pearl white and a couple of drops of FolkArt 670 Metallic Blue Pearl. You will want to thin a little base white and pearl white to shooting thickness, then add the blue one drop at a time to get the shade you want. Shoot your gills and any shading areas you want but do not throw away the blue. b. Upper Body shading, Using the same blue you just shot add a little 1-2 drops DecoArt Metallic DAO75 Ice blue and thin accordingly. From front to back or vice versa, shoot a soft shade slightly above the lateral line. This is all personal preference, but you will be shading not coloring or painting. in other words you want to spray very light amounts not producing lines but shades, make sense? One or two passes is all you need. c. Upper Body shading Higher, Still using the same paint you have mixed now, add FolkArt 669 Metallic Periwinkle, only a drop or two, then add DecoArt DA124 Metallic Purple Pearl one drop at a time. You are looking for that bluish purple color. Spray one or two passes high up on the upper body. This you can shade up onto the back with this as you are fixing to spray the back. 11. The back... I would suggest masking the lower body to prevent over spray. Using the FolkArt Metallic black, spray light coats from Front to back moving your gun away from the lure as you go towards the tail, or reduce your paint if as you move if you have a double action gun. You want to Shade the back and very upper side slowly one layer at a time to get that blended color/shade effect. Flashing between passes to insure color fades are as you want. 12. The Belly.. Here once again is shading, but now you want to get that fish gut effect. Mix your base white with the pearl white and a tiny bit of silver if you wish. Once again light coats and flashed between coats till your shading is complete. 13. After all touch ups are completed and the lure colors are complete I use DecoArt DS48 Pearlizing Medium for my last spray. I thin it wayyyy down, so it is very watery, and shoot it about 10-12" away from the lure, moving the lure or gun so it is just misting the paint. The pearlizing is only to give it a shimmer, not to coat.... Too much will hide the paint. 14. I do my gold dusting which is another very subtle shimmer effect. 15. Clear Coat. Remember as you paint, what you see when painting my seem not enough, but once you clear coat the lure, everything will brighten up and stand out.
 1 point
 -
Heres a green craw pattern thats really easy and can be done with other colors as well white base coat dirty orange(red,10 drops yellow 6 drops and a few drops of black just to tint) cut grass green black after the base coats dry spray dirty orange all but the front of the belly,before drying blot with slight damp rag to take away some paint but not too much,dry with heat gun or blow dryer. spray green lightly over bait it will turn the bait a molten green dry with heat gun /blow dryer lay stencle on side of bait hit with black for the body segments then lightly along edges of segments, dry as above turn bait on it back so you can see the white belly you left in the begining with a peice of paper/plastic spray lines letting the black fade as you work down the belly from one line to the next so it looks like the belly/tail of a crawdadwith the white showing thru
 1 point
 -
i just finished a bluegill pattern gos as white basecoat black along the back and stripe along the sides(i paint three stripes on the sides) not to heavy just so its darker for the next color, light green shot thru small mesh over the black and on the stripe also the top 2/3rds of the gills Let dry move the mesh a little and spray gold lightly over the bait leaving about a 3rd of the belly white just behind the bill of the bait(this will be painted orange) then i mix some yellow with a few drops of red to get orange (just add a drop of red at a time till it looks right) paint the lower belly orange cut out a plastic spot for the gill tab holding next to the gills( spray black ) light blue on lower 1/3 of the gills and done
 1 point
 -
chartruse perch white base coat chartruse over everything mesh netting over bait light spray of silver for scales over chartruse along back and sides(just so it shows light spray of black along back also spraying stripes on the side from the black top down (a light mist to start with then spray over again till it looks good and last a transparent purple along the black just letting the purple overlap a little bit sorry no pictures havent learned to upload here yet1 point
-
Tried several of these cookbooks as you call them and really like them.But no one has posted any new ones in quite some time. why so tight lipped. Ill post a blue gill color ive done real well on tonight. One ive had a hard time with is a bar fish anyone tried this one. looks something like a white bass. bigtime forage fish on southern lakes like lake fork.Any ideas please post.1 point
-
Try this My link1 point
-
1 point


