Leaderboard


Popular Content
Showing content with the highest reputation on 05/30/2016 in all areas
-
What I used to do (and will go back to doing if/when I start building lures again) is warm the epoxy resin and catalyst separately with a hairdryer, then mix them together. The epoxy mixes better that way. One other trick - warm the lure body itself with a hairdryer when you're ready to start brushing on epoxy. Don't warm the epoxy. If the lure body is warm, it'll heat the epoxy as it is applied and thus the epoxy will spread more easily. Without heating up the mixed epoxy and shortening the work-life. Otherwise, yes, those are air bubbles from inside the balsa. Two coats of thin superglue prior to epoxy will take care of that issue. The superglue soaks into the lure body and seals the pores - I found two coats were necessary because some wood can be very porous. Plus the superglue helps harden the wood and strengthen it in a way epoxy doesn't.2 points
-
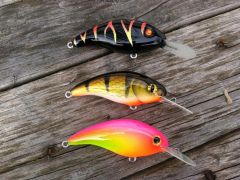
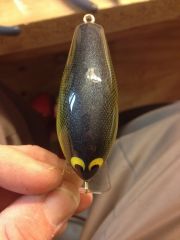
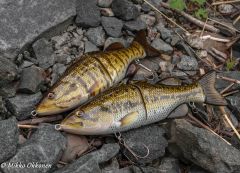 Well i have not posted anything in here for a really long time i've been enjoying the finnish summer and going fishing which i have been doing alot. anyways i decided to paint some bass themed baits and attempt to make them as realistic as possible with combining hand painting and airbrushing, the results should speak for them selfs.1 point
 -
1 point
-
I think I'm starting to get the hang of pouring and painting slabs! If you see white and chartreuse in the same compartment it's because those are white on one side and chartreuse on the other.1 point
-
If the flake melts at all it will harden the plastic.1 point
-
I have a couple colours that use a ridiculous amount of flake and don't notice them to be any weaker.1 point
-
I don't see how more flake would weaken the bait.........unless you added a TON of flake..............1 point
-
Try a couple drops of black colorant.1 point
-
I shot at 315, and held pressure for ten seconds each, and all three cavities made dent-free baits! I did find that I need to have a full cup of plastisol, or I get air in my injector, no matter how I try and avoid it. I think it has to do with the injector bottoming out in the silicone cup, and the filling being interrupted, but that's just a guess. I will make sure I have enough plastic to fill my 6oz injector without hitting the very bottom of the cup from now on. The baits came out great with the 4/1/1 mix of plastisol, salt, and blasting sand. They are soft (BJ soft plastic) but seem to be tougher than the GYCB senkos I have been using. They came out more green than the originals, so I'll be playing around with how much color I use, but that green color gets bit.1 point
-
Over 100 more drying in the rack today.1 point
-
Foam is mostly air anyway. Doesn't suprise me that both would swell when full of hot air. Insert political joke here.1 point
-
Since one of the cavities didn't dent, I'm thinking it's a matter of holding the pressure longer, even if it means I can only inject two cavities at a time. Or I may try pre-heating the injector, to give me more working time. It those don't work, I'll add some vents in the mid section.1 point
-
 createx paint
© iRaC
1 point -
I was thinking about this thread. You people who have been doing this in for awhile, please chime in if I'm wrong it can help me to. I'll call this rules to create a crank lure. Depth= A: Ballast amount and where it is located. Head down, tail down or level in the water. B: Lip/Bill associated to the Y centerline, the length and width. C: Body shape as far as the head of the lure (lipless or a modified shape). D: Ballast must add all hardware also (hooks, hangers, rings and lip). E: Tow line location, I will put this here but this can effect some of these if not all. Action= A: Shape of the lure B: Ballast can change the action C: Lip also can change action (to wide with to light ballast the lure action "blows up") Stability & Hunting= A: Ballast needs to be low as possible in the belly of the lure for stability. B: Bring the ballast up above the the Y centerline and you get a pitch and yaw. "Swag" I call it. This creates the "hunting action". As Dave and others have stated in the past. Change one of these in a significant way and you have changed the lure. That's why I keep all info and any change in information as I learn. I am really interested in all feedback, Dale1 point
-
I use the casting jig that is sometimes listed as a grass jig, it comes in 2 molds but I only use the 1/8oz, 3/16oz, and 1/4oz mold. It uses the 32886 Mustad 30 degree hook so it pulls from the front and the slight angle allows it to run true and level. Where I get confused is you want the jig to be pulled from the front with an Owner 5318 hook which is a 90 degree Aberdeen style hook that is light wire with a needle point. Anyway, if you go to the weedless molds on Barlows site, look at the grass jig mold, I think it is a great design, it is very basic but does an excellent job.1 point