Leaderboard


Popular Content
Showing content with the highest reputation on 12/07/2016 in all areas
-
I think the following graph might help some regarding densities. Sorry I have been off the site for so long. I know that the answers below are pretty random, but I am trying to answer the questions above the best I can. I have given the density on the side of several woods, but you can look up the average density up yourself. Remember, wood is far more variable then any plastic or foam, no matter what you have or are being told. No amount of microballons will get Alumilite White to balsa (and still be strong and pourable), and Alumifoam will be much heavier then balsa as well, but a lot less dense then microballons and Alumilite White. The 610 foam matches balsa, but it will require through wires for most applications in my opinion. Alumifoam does not require through wire. In fact, it can and will hold screws on Muskies or Saltwater fish. Tough stuff, but densities about .47 g/cc. Consistent density results come from careful measurement and large vent holes. It is much harder to use then other foams because it has a lot of expansion force. Firm molds, like ones made out of Alumilite Quickset or VacMaster 50 are best. Developing your pouring method with Alumifoam, it might take some time to develop YOUR proceedure. The density of white pine ranges from .35 to .50, so Alumifoam is on the heavier side of white pine ranges. Yellow pine is about .42, a little lighter then Alumifoam. Yes, the foam does indeed expand inside the mold. You will need to pour less then the full amount and let it expand to fill the mold. I prefer about half full with Alumifoam and have a large vent so that the excess can expand out and be trimmed later. I think that when I closed down my YouTube account that my videos were lost, but I had a video of how tough Alumifoam was. You could hit it with a hammer and use a rod and smash it into concrete and do little damage to it. It is not the easiest stuff to get use to, but I have never found a fish that could hurt it yet. Hope this helps some, and again, sorry I have been gone so long.
 3 points
 -
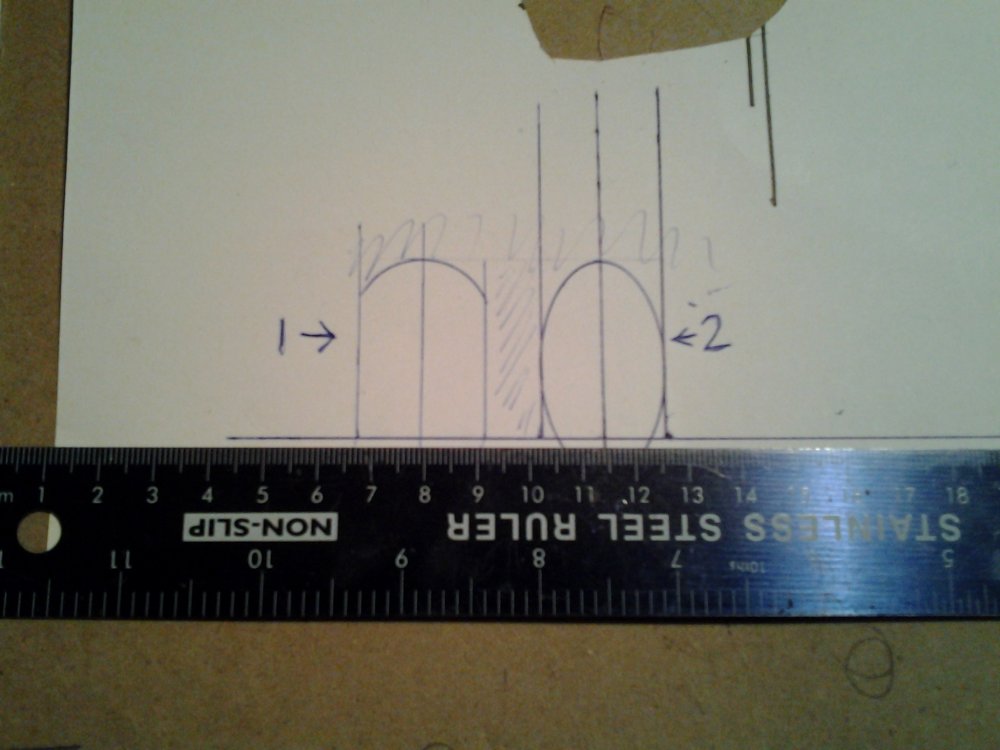
I've heard that a leaf shaped lip on a deep diver with its narrower waist near the bait body makes for a bait that's easier to pull through the water. If true, the downside of that might be that a bait that is easier to pull also makes less turbulence as it swims. In my limited experience with leaf shaped lures, they seemed to be harder to tune than normal. That's just an impression I have from the few commercial lures with this lip shape I have fished. considering both lips, a 2" long lip on a shallow bait seems very long to me, if that is the length that will be exposed after mounting. If it's too long, the bait may spin. Just my impressions. On-the-water results are the only real arbiter of design.2 points
-
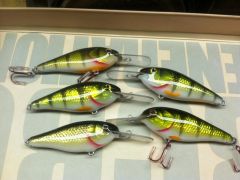
The foam is hard to get the same results with each lure, that's why I use the white resin with micro balloons and I get within 1 gram of the wood lure that I copied each time I pour, but your measurements must be right on, with just enough resin to come to top with out wasting it. That will take a little experimenting. In my case it was about 40 grams of resin and the same of the hardener with 15 grams of micro balloons, it took awhile, about 4 times to get it right but when I got it goes 1 2 3. Wayne2 points
-
1 point
-
Hey guys,I've been messing about with some different bib shapes on a particular lure,pretty much shad shape,cedar 6inch,shallow runner. Seeing what i can get from it with different shapes. Assuming overall surface area of 2 in pic below is equal, what would you expect the difference in action if any , to be ?
 1 point
 -
Some good possibilities there stretcher 66,looked at nail stuff before but seen nothing i fancy, spotted couple of definite possibles there though, good stuff ! , I have another just about done with different method , scales applied after 1st qnd 2nd topcoat, then more clear. This time the base is holo foil, with silver and holo scales over this. My aim was a damaged knocked about sardine type effect . As this is varying from original post slightly because I also added some silver scales I am jot sure if i should post pic here or put in gallery. If the powers that be advise, i will post pic shortly to illustrate, thanks .....glider1 point
-
Just make sure you drink the alcohol AFTER you've made the mold.1 point
-
Welcome to the most rewarding hobby, and most frustrating hobby, in existence. First, I am sure you will get a lot of differing answers out there. There is no one answer to your questions. 1) You might need to search out hardware suppliers if you are not finding the screw eyes you want. Just do your best internet search and good luck. 2) Cutting V joints are a matter of your own skill level. Depending on the size of the lure, I have done well with band saws, properly set up and done with a jig, but I cannot free hand the joint. I can only suggest practice on this...... there is no easy solution. 3) Oval split rings keep the know from getting caught in the gap and cutting off. Round split rings work great with attaching hooks. Best I can tell you. 4) Water based paints are fine for painting lures. They get a clear coat that is water proof so most of us use water based paints in our air brushes. 5) Carving is a talent and as such not everyone can do it well. I CANNOT DO IT WELL. What I do is make lots of templets, keep fitting the templets to the carved piece, remove a little at a time, until I get it even. Again, practice, practice, practice. 6) Basswood is great, but it is not a cure all. Prices are subject to what is available to you. 7) http://www.makelure.com/store/pg/54-How-To-Videos.aspx This is a good source to learn how to make molds, and lots of other things. Alumilite tries to teach you all you need to know and it is actually very simple. Hope this helps, good luck, and HAVE FUN.1 point
-
Check out some of these videos done by Marling Baits on YouTube. https://www.youtube.com/channel/UCa-xsrfvLmgaUfPFE1TK7OQ/videos I don't work with wood so unfortunately I don't have much to contribute myself. For the O rings, the circle o rings will be used on the hook hangers. The oval o ring is used for the line tie. It keeps the knot from getting in the middle of the split ring and rubbing; I don't know what kind of utility this has on a big swimbait as I have never thrown them. Best of luck!1 point
-
You could mark,you could, but then you'd miss out on the fun i had making those wee scales and applying one at a time onto uncured envirotex !1 point
-
I have not done it yet, but the next pop mold I make I will increase the amount of yellow carpenter's glue, to see if it will also seal the pop. Someone here said they also added some portland cement to the pop. I may try that, too.1 point
-
I would look for some fingernail polish with holo glitter.1 point
-
Watermelon with a drop or two of green pumpkin. .035 black flake with .015 red, purple and gold flake.1 point
-
O.k dale,life's to short and I would like to try and develop this scale effect further,so if yourself or anyone else can chip in some idea's it's appreciated. Till now i have only used what I had handy- I think an adhesive backed holo material would work better than transfer foil i had to hand. On latest proto which will be finished tomorrow, i have used silver venture tape and holo scales over holo foil. Showing promise. What I would like to figure out is some way of achieving mixed lines of scales like some lucky craft lures have without having to apply each scale individually. ..any ideas guy's?1 point
-
Travis, It was a lack of patience that made the oven idea intriguing. I can see the mod podge transferring brush strokes but in my experience, if do with very light coats, it does a pretty good job. I'm a bit worried about using epoxy because ti can fill in the details I want to keep. I'm talking very small ridges in a Senko like mold. I may try the diluted elmers glue trick on my next mold. Ben, Yep, I've been making hard lures for some time and I have a whole bunch of Homer mistakes in a box somewhere!1 point
-
You can practice tapping by hold a cold lure over a piece of plastic, like a big baggie, and tapping your loaded brush over it. Each brush loads different, and taps different, so practicing without losing your powder is a good way to go. When you finish, just use the plastic to slide the powder back into it's container.1 point
-
Eric, I just got a variety pack from Hobby Lobby and also used some acid brushes I bought in bulk. You really just need something to hold a little powder. I'll try to dig up some examples and post some of what I was able to do. In the end though, I went ahead and set up for airbrushing because the results are better IMO.1 point
-
DOH!!!! Thanks for clicking on my links I spend the time and effort to help and it just goes unnoticed it seems... I'm not sure why I even bother.1 point