Leaderboard


Popular Content
Showing content with the highest reputation on 03/13/2017 in all areas
-
Congratulations to the winners, I missed being in the top three fly patterns but hope to tie a killer submission for next year. A lot of talented tiers out there the flies all looked great.2 points
-
Congratulations to the winners.......and all participants. The talent here is OFF. THE. CHARTS!!2 points
-
WOW!!! With all of the beautifully tied flies that were entered in TU's contest I can't , WOW, 1st place, I don't know what to say !!! Considering the amount of talent displayed by the other tiers I feel honored, thank you very much! WOW, I still can't believe it! Congratulations to all the winners, of the various categories, you deserve it! Wow, this is so cool, thanks!!! john2 points
-
Let them sit the full cure time, then wash with Dawn dish soap to get any release agent off of them. Use a high grade primer.2 points
-
1 point
-
I'm getting alot of air pockets (mostly in the tail section) and random dents in my injection senko style baits. I've tried holding pressure up to 10 seconds which has helped some but not totally . Actually having this problem with most of my molds . Is this a temperature issue or something else ? Thanks , Brad1 point
-
Thats what I was wondering mark,kind of like a grizzle hackle on some fly patterns. When I say older lures A.Z , i suppose its relative !Woodieb8 I just seen your other post about frog type pattern,thats kinda what I remember, was it just another one day wonder to catch fishermen or did/do they have anything about them in terms of hard results ?1 point
-
I use powderless gloves. Just make sure you do some fact checking that it is fully cured in 10 mins.1 point
-
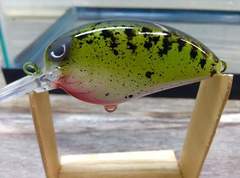 A Little John crankbait that I painted in createx lime, white, black, and acrylic lipstick red. Thanks.1 point
 -
Thanks! And good luck next year!1 point
-
You are correct, make sure you read the instructions on the full cure time. But washing the bait will help remove anything that comes to the surface.1 point
-
Wear rubber gloves, make sure the bait is clean, and dont get grease or oils from your hands on the bait. that will help. Most guys that use epoxy clears will put them on a bait turner to keep the epoxy from running.1 point
-
I suggest it if you want proper paint adhesion. I have heard of people spraying primer into silicon molds before they pour them but I have not tried it yet.1 point
-
Would putting them in a vacuum chamber, like the ones used to pull gases out of soft plastics, help speed the process, or is it just that the chemicals continue to create gas as the resin cures over time?1 point
-
I think they need to off gas a while from what I have read or you'll get blisters or bubbles in the finish. Thought I read where someone let them sit a week before painting, Someone with more experience will chime in soon.1 point
-
Amazon, bought two so I can keep them rotated and clean. Tight seal around the face to keep the fumes from the eyes and just in case I have a splash.1 point
-
OK, I have poured dozens, maybe more, molds with Alumilite Silicone. You have far more options for different stiffness's, strength, etc. Some require degassing, some don't. All benefit with degassing but if you pour slowly from a corner, or paint the surface with a thin coat before pouring, you get excellent results. http://www.alumilite.com/ This will get you to where it all begins, including the How To videos. http://www.alumilite.com/store/pg/47-Mold-Making-Alumilite-Mold-Making-Casting-Materials.aspx This will get you to the basic mold making materials, of which most will probably work for you. http://www.alumilite.com/store/p/918-QuickSet.aspx This is a pretty basic material, stiff enough to hold its shape well, available at Hobby Lobby, available at other sources as well. It has a link to the technical sheet. https://www.alumilite.com/PDFs/New TDS/QuickSet.pdf Max temperature of 395 degrees, but I find that it will handle more for a short period. http://www.alumilite.com/store/p/1029-Alumilite-s-High-Strength-1.aspx More flexible, more tear strength, awesome material. See link to technical data sheet https://www.alumilite.com/PDFs/New TDS/High-Strength-1.pdf 395 degree max extended temperatures. http://www.alumilite.com/store/p/921-Alumilite-s-High-Strength-3.aspx Best for making one piece molds, but not good for foam pours or injection because it is so flexible. http://www.alumilite.com/store/p/927-Plat-55.aspx My favorite for injection molds and for foam pours. Very dimensionally stable. http://www.alumilite.com/store/p/1081-TRANS-40-Translucent-Silicone.aspx An interesting option I have not tried yet. Alumilite has videos, a help forum, technical support, etc. It all boils down to determining what you need. As for where to buy it? Well, some of it is available from hobby stores, all from their web site, and much of it from Amazon.1 point
-
a good blower and a boxed in spray area will give good results. just up here in Canada the heat goes with the air draw,out the venting. in summer months heat gets pulled from the attic and becomes an inferno. in summer months we squirt early mornings..a company I paint for installed a osha approved booth. 15 grand 10 years ago..but that's not a fun hobby application.,guys just don't use a shopvac for a draw. the motors really are sparky..1 point
-
1 point
-
Linmar makes a good "pork trailer" mold for soft plastics.... works pretty good..... can't beat a good ole' uncle josh jig and pig though....1 point
-
If you can live without the fat part, you can use pieces of chamois. You can cut it to any shape, you can dye it any color, it holds scent and when it dries out, just get it wet again and it comes right back. Just a thought.1 point