Leaderboard


Popular Content
Showing content with the highest reputation on 05/19/2017 in all areas
-
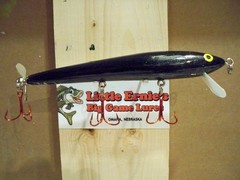
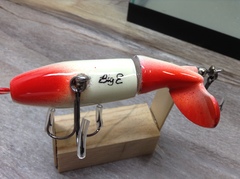
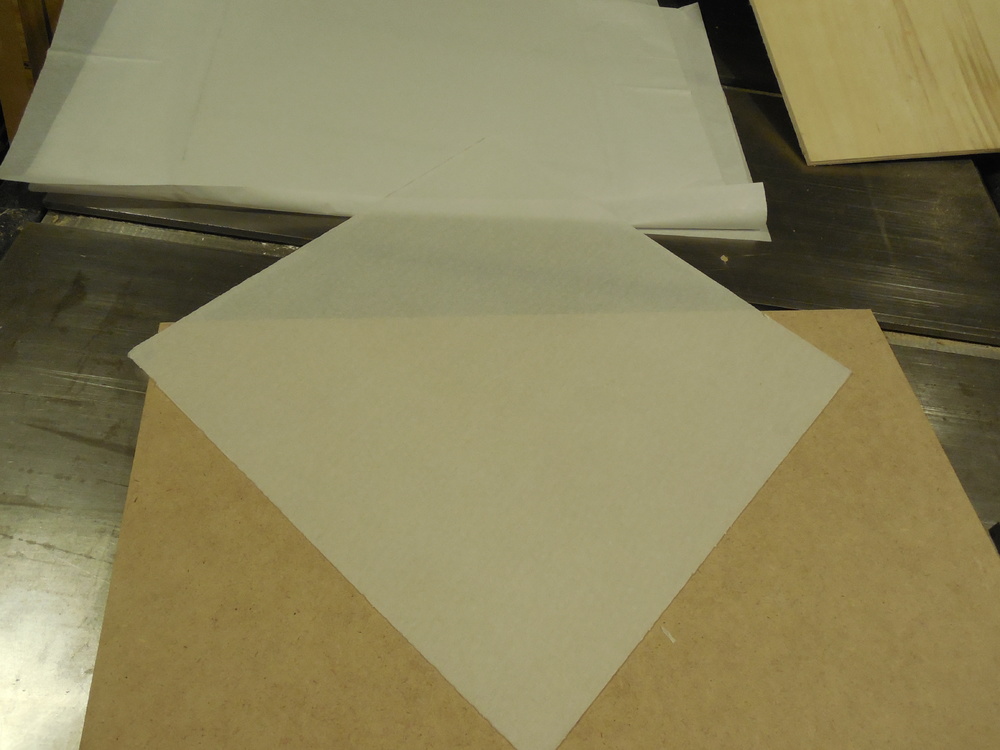
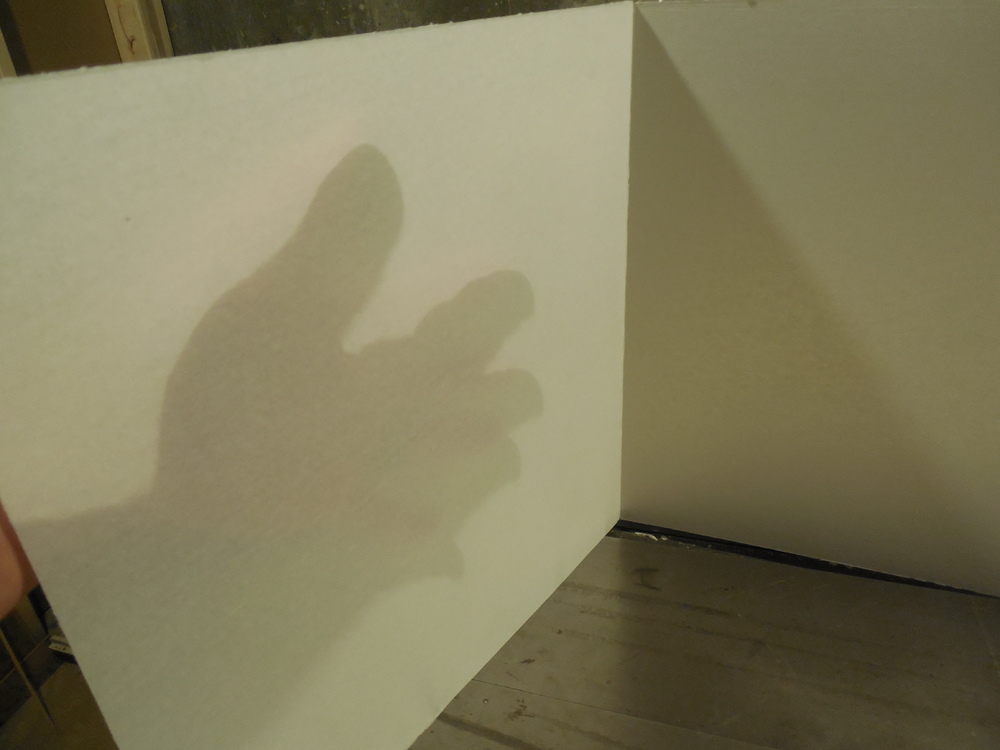
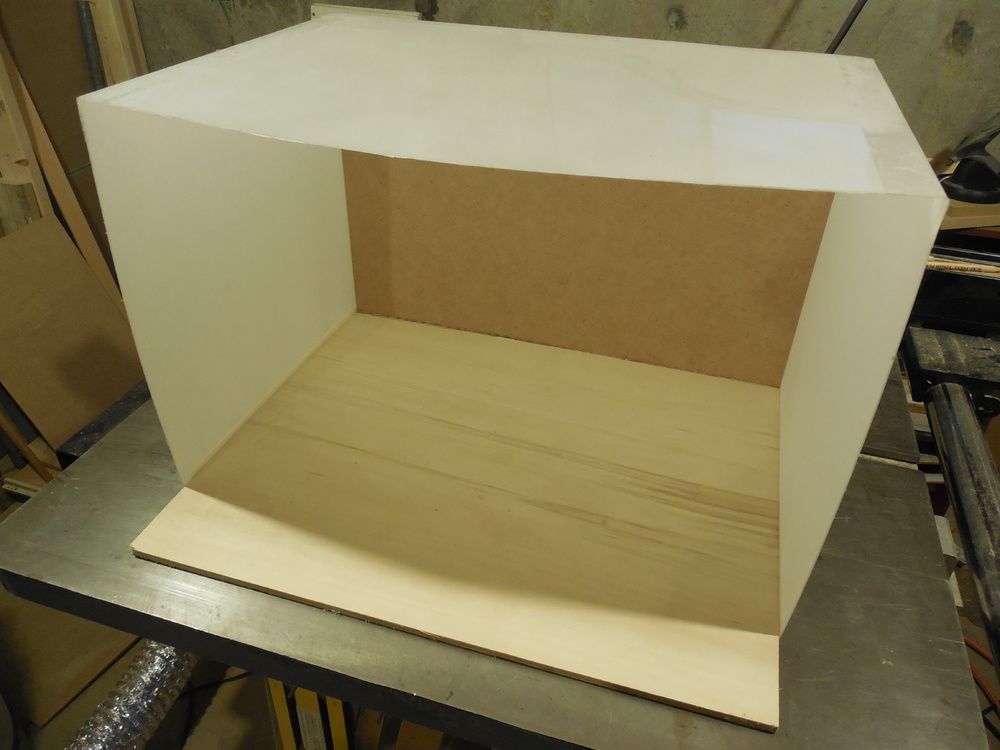
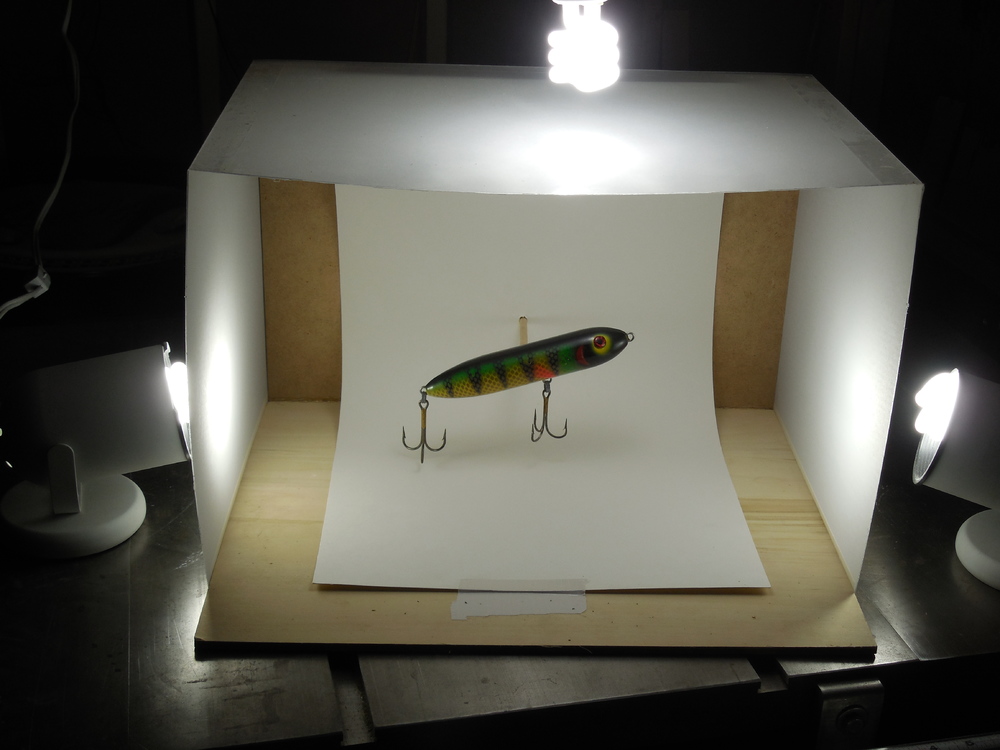
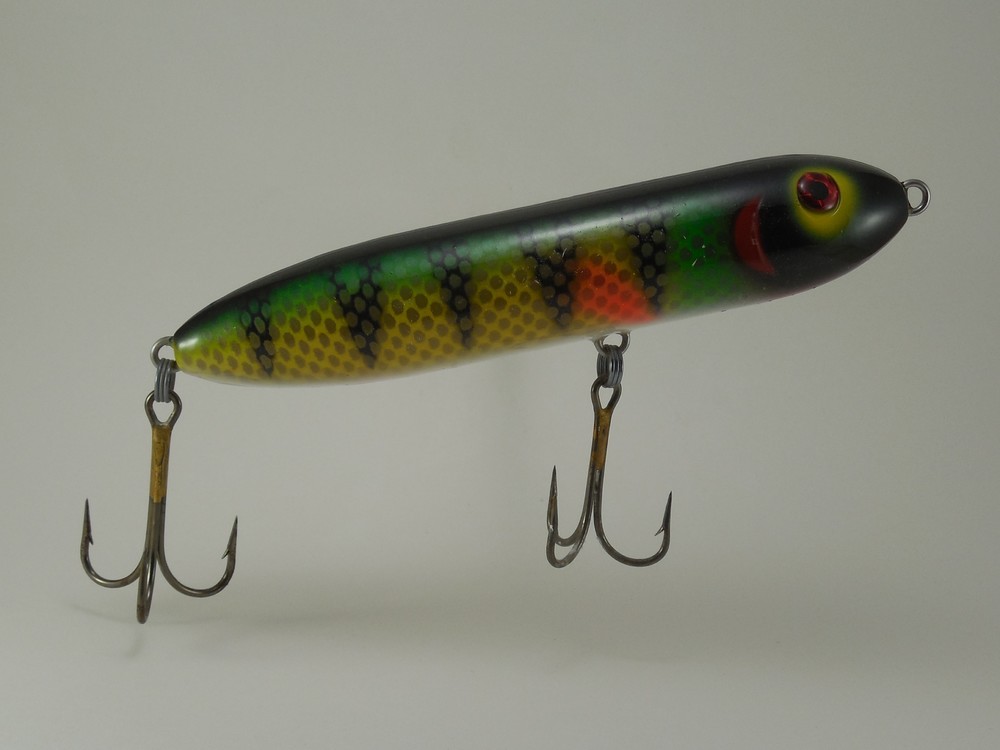
First, a disclaimer: I used a store bought lure in my photos. Blasphemy, I know, but I'll explain why later on. Anyway, I wanted better photos of my lures. I'm tired of 'posing' them on the tabletop, pile of rocks, in my hand, waiting for the sun to come out, etc. So, I built this photo booth out of some scrap wood, ultra thin plastic sheet, tissue paper, and a piece of poster board. I had all this laying around, so the cost was almost nothing. I cut the wood and plastic to size to make a roughly 12x12x20 inch 5-sided box. I used spray adhesive to stick the tissue on the plastic sheets. Clear packing tape holds most if it together so more light will come through (hopefully that'll hold for more than a day). The tissue helps to diffuse the light. When assembled, the 'tissue plastic' goes on the sides and top. I wedged in a piece of poster board and taped it in place when the curve looked nice. I decided I wanted the lure to look like it was floating. So, I drilled a hole through the back of the box, hot glued a dowel to the lure, and stuck the dowel through the hole. I'm not sure I want to use this concept going forward. Not in a hurry to see how my top coats will react to the hot glue (thus the reason I used the store bought lure). I used 3 fluorescent 'daylight' bulbs to light the top and sides. I turned off every other light to avoid any orange glow. Here's how it looked with the fluorescent lights: And here's how it looked in direct sunlight, at just about noon: So, there's a tiny difference between the artificial and sun light, but nothing too significant, in my opinion. Anyway, I hope this may help anyone looking to get more consistent pics of their work.

 1 point
 -
I just wanted to start by saying you guys have been a tremendous help since I started pouring a year ago,thank you guys! GP candy laminate craw my cooling table some gp hues my pouring station
.jpg.ac89bb7041b50e636851e3b68a20621b.jpg)
.jpg.68a978e413305485b29e74b6319dcfda.jpg)
.jpg.2e3d4a96913586e4b5b3b52c5c47d9f6.jpg)
.jpg.306524d62530232bcbc2a57ccab11a10.jpg)
.thumb.jpg.8c45d881d6cd2a0f33e0aa6a3680d565.jpg)
.thumb.jpg.02d6042ba892a030ef2dc1719b3f531f.jpg)
.jpg.20271ab8b8e6713ad562b765518d8bd8.jpg)
.thumb.jpg.3c2d548296f194d8c16407302f62ae47.jpg)
.thumb.jpg.4cc2b107e98fefcf65742e91dcc4cbbb.jpg)
.thumb.jpg.0877af6221ec67a645753eb265fe6c7e.jpg)
.thumb.jpg.21ea29848fc075a0aa2a51fe112814fa.jpg) 1 point
1 point -
We discourage customers from using bottom pour pots when using molds with wires that protrude from the top of the mold. Generally speaking, you simply won't be able to get the mold close enough to the pot to avoid losing too much heat when you pour. As mentioned above, a Hot Pot or a ladle will solve a lot of your problems.1 point
-
For me, a great example of how density works is seeing steel hooks floating on top of molten lead. The lead is heavier/more dense, so the steel is forced up as the heavier molten lead moves down past it, and the steel then floats on top of the molten lead.1 point
-
Take some plumbers putty and put it in the slot for the hook and the other slot for the wire. Just a little amount, this will hold your hook eye and wire form in the very center of the mold. Otherwise it can slip down in the mold. Put a hook/wire in there and close it. Trim out any excess that squeezes into the cavity. I've also heard of people using a small adhesive backed, thin magnet to hold the hook down by the bend but I'd think once the mold got hot the sticky would give up. Keep the eye in the center/biggest part of the mold, this applies to any mold with wire forms. I close the hook of the wire form around the eye of the hook. I can see that your lead is cooling too quickly before the pour is complete. Gaps and wrinkles are a sign of too cool of lead. A bottom pour isn't the answer for spinnerbaits or buzzbaits. You can't get the spout close enough to keep the lead from cooling before flowing properly into the cavity. Either get a small ladle like suggested above or I just use a Hot Pot (pours from top) for all of my pouring. Pour quickly and as close to the mold as possible. I never liked dealing with the problems of a bottom pour so it just sits on the shelve. Just have to add lead more often with a Hot Pot but it is quicker for me without additional problems. Flux your lead with wax to clean out as much impurities as you can. That helps pours also. Heat your mold before pouring if you don't already. Lay it on the top of your pot while it is heating up. By the time the lead is ready, your mold is hot and this makes pours much better. After the mold is hot, lay your hook and wire in there and give it about 30 seconds before pouring. This will warm the hook and wire a little which also helps sometimes with difficult molds. On your dud pours, use a propane torch to melt the lead back off over your pot. This will give you a clean hook and wire form. Good luck, it seems like every mold has certain characteristics that are unique to that mold and sometimes it takes pouring a good number of heads to figure out what/how works best. Have fun and ask any other question you have, someone here has likely had the same problem at one time or another and figured out a way around it!1 point
-
Depends on how high your high spots are. Next coat will improve it but if there is a fair size bump you might want to improve the situation by using some fine grit abrasive paper on a craft stick. The reason to use a craft stick is to try and hit the bump only. Don't try and get it all the way flush you will wind up going thru and damaging your paint work. If you try to sand with a soft backing on the grit, it will touch the thinner areas and damage the paint right away. Next time you have to touch up the epoxy and it is beginning to cure just like when you could see a bump, take your heat gun and warm the lure a little and it will help the epoxy spread out evenly. Just like everything else...don't overdo it.1 point
-
Rhallman, I hate to say it, but we would almost, actually definitely would, need to actually see your steps from start to finish. I have been using Alumilite White for about 10 years now and I have never had the paint separate after it was top coated. I have topcoats of Etec, D2T, Solares, and Alumilite UV. No issues with any of them. Even more, I don't seem to be doing near as much as you are. I suspect there is something little, but terrible, something you are doing that you aren't even noticing. 1) I never wait for "off-gassing". Resin cures, not dries, so it is not necessary after the 24 hour cure. Cure it for another day if it is in a cool room. I do wait if I am making the lure from Alumifoam, it does off-gas due to the foam expansion, but only a 2nd day. 2) I never wash with Dawn. Sometimes I hit it with a damp acetone cloth if I have dirty hands. It sure won't hurt though. Make sure you rinse well. 3) Priming makes the other coats go on better, but if I don't it does not cause separation. I have primed with Createx, with Krylon rattle cans, with Taxidermy paints, with Wicked, and probably others that I don't remember. 4) I have never ever used more then a single Etec coat, nor more then two D2T coats. You asked for a suggestion, and the best suggestion I have is to film your process from the mold preparation to the pour to the painting to the clear coat. Then either put it on YouTube and give us the link, or store it on the cloud and again, provide the link. I am quite sure that a lot of us looking at it will discover the subtle, little, simple thing that is making all the difference. You seem to be doing it all correctly, but your results are quite opposite of mine. This is the only thing I can think of to tell you. Good luck. But, if worse comes to worse, assuming you are using a silicone mold, paint the inside of your mold with Cretex or any of your other primers. Pour with resin, such as Alumilite White. The resin will bond with the primer, chemically and mechanically, and it will never separate. Unless the paint separates from the primer. Ouch.1 point
-
My prayers for a speedy recovery are with him also..1 point
-
MF MANUFACTURING is the best quality in my opinion.1 point
-
Great article in the June issue of In-Fisherman about wood fishing lures. Talks about the early handmade lures by James Heddon and the newer lures from guys like Phil Hunt owner of PH Custom Lures. Worth a read.1 point
-
its gas-off issue..try a lacquer primer after wash and 7 day curing. we stopped using envirotex on urethane baits.1 point
-
Guys, I have locked this thread because it should have been posted in the classifieds section.1 point
-
Baz--I think you may be starting at the wrong end of the process ?? Get the required amount your medium (I'm assuming it's water based) and add DISTILLED water until your medium is close to thickness you want for spraying, then add green pigment (or paint ) and mix in until you get the color you like--you may need to test this at stages, simply take samples and dry them (with a heat gun) to get the color intensity you want--thin again to desired viscosity for your brush and spray away. It's the same with any medium for C/Colors, add the color to the medium, NOT the medium to the color, this makes the colors semi opaque or ''clear''. Pete1 point
-
1 point
-
Agree. Ive reached out to Baitjunky's, Do-It, AI, and Bass Tackle at one point or another and all of those guys have gotten back to me in a timely manner. Also probably why I only look to them for my molds any more.1 point


.jpg.938415f77de4347bba7b8bd1c668abe3.jpg)
.jpg.abced96158ac8947ad1ad9420406b573.jpg)
.jpg.14a6ade2a370292c3633244988fd6437.jpg)
.jpg.48308a92b9e6de84547ec1d861559a20.jpg)
.jpg.ed1f9f63eb75f84a80615af3ba16884c.jpg)
.jpg.ba4bb7bcfb64295e6da0e17e68e09b1b.jpg)