Leaderboard


Popular Content
Showing content with the highest reputation since 11/10/2018 in all areas
-
Exx1976 - I do not understand you. I have refrained from posting this sentiment before. You put a lot of effort in, making excellent contributions to the TU community, gaining a lot of respect. And then, you seem to have a brain fart and chop someone off at the knees for very little reason. I am not blame free, I too have had my moments of indiscretion. I suggest you think your more acidic replies through before hitting the reply button! Dave11 points
-
Here is the way I see it. You just have to worry about yourself. You cannot stop what you are talking about. So you just need to do it better than everyone else. It is not an easy thing to do. Being the best never is. Bottom line is.....How bad you want it? Skeeter11 points
-
With small lures, members discovered that very thin fiber/circuit board lips were more effective than thicker Lexan lips in creating waggle action. The thinner the lip, the better the action. The reason for this has not been discussed much, if at all. It is all about the sharp edge. Water can flow around a round object with minimum 'peeling off' of the flow, thus minimum disturbance of the water. Conversely, flow cannot negotiate a sharp corner; it cannot change direction that quickly. This causes a low pressure area behind the edge of the lip. Water gets sucked back into this low pressure area and thus the vortex is born. At very slow speeds, the shape of the water flow is symmetrical, the same both sides of the lure. But, as the lure speed increases, a certain speed is reached were the vortices start to interact. There is not enough room for the vortices to exist independently so they take turns. The vortices start to alternate, forming one side then the other. This effect is called ‘vortex shedding’, a ‘vortex street’ or ‘Kármán vortex street’. This alternating vortex is the engine that drives the lure, causing the desirable ‘waggle’ or action of the lure. This also explains why a lure has a minimum speed before the action starts. The sharper the edge is, the stronger the low pressure area, the stronger the vortex and therefore the stronger the action. Larger lures in the range of 8” and larger will require a thicker lip in order to survive bouncing off rocks with all that body weight behind. But the thicker lip is not going to produce as much action as the knife edge lip of the 3” lure. The solution is to cut a chamfer behind the lip face. This reintroduces the knife edge and improves the vortex strength and thus the action. Another way to improve action is to make the face of the lip concave. This causes pressure to build up in front of the lip which further increases the strength of the vortex. Here is a video that shows vortex shedding, and the start transition explaining the minimum speed. Dave10 points
-
A few things going on in regards to light transmission and suspension of salt. First all these salts are the same as in NaCl. Where they differ is purity/additives. Salt by it very nature is problematic in that it picks up water. NaCl is used to calibrate some instruments that measure water uptake based on its very well studied water adsorption. So unless you store your salt properly and dry it you are adding some water to your plastic during the heating process. Adding some cloudiness to the end product if not all removed (not a big issue as often gets boiled off during heating). Additionally to counteract salts water loving tendencies manufactures place anti caking agents in it to avoid it turning into a brick (and iodized typically). So you have impurities playing a role in regards light transmission. Other issues that cause cloudiness are result of tackling the suspension issue.. The salt crystal shape plays a role in suspension. Table salt and others are cubodial. The shape results in crystals that don't suspend readily. So guys grind it to make the particles smaller but in doing so exponentially increase the surface area and further cause issues with transparency (lack of). Sort of like fill a glass with ice and pour a margarita mix over it versus putting that same ratio in your blender. You also are adding defects in the crystal in the process. Think of safety glass: pre and after hitting it with a hammer. Kosher, Maldon, and other salts prized by chefs are different in shape. Kosher typically is forced into a flat shape under pressure to form flakes. So take two cubes the same size/mass. Take the second cube and compress it flat. Drop them in a liquid guess which one hits the bottom first. The shapes vary in regards to displacement. The flat shape will displace more plastic and will sink slower than the cube and is the reason Kosher salts suspend better in comparison to table (cubodial) salt. Cargill uses a process called Alberger process to make some of their salts. It results in concaved plate/flake. These salts Kosher, maldon, the Cargill select products are typically larger particle size to boot so often get the best of both worlds... larger crystals (less defects and less surface area) with a shape but do to the shape suspend better than cubes. Additionally they often don't have anticaking agents.8 points
-
At Rowhunter's suggestion, I'm starting a PVC thread. I use it for all my lure building, for the following reasons: It is totally waterproof, so I can shape a lure, and then test float and ballast it without any sealing. I have a 3 gallon bucket of water in my driveway that I use for test floating. It is buoyant. The Azek PVC decking is as buoyant as poplar, a hardwood I used to build my jointed swimbaits from. The Azek trimboard is even more buoyant, like medium density balsa. I can make really active shallow cranks with it. It is strong. The decking is as strong as any wood, for lure building, and the trimboard, although not as dense, is still plenty strong enough for any crank. And I use it for my smaller two piece jointed lures, too. I caught a 7lb largemouth with a PVC trimboard spybait I made that was 4" long, but only 7/16" thick, and I had drilled several 3/16" holes up from the belly for my ballast. She ate the rear hook, and the bait held up fine. Both are strong enough to hold screw eyes with just a small pilot hole. No need for any reinforcement, or setting into holes filled with epoxy. I usually use the gap filling/brush on super glue alone to set my hardware, and a lot times my bills, too. I use the accelerant (thank you Ben) dripped onto the glue to help it set quickly, once things are positioned. It machines and carves well. Although the sanding dust is nasty, because it sticks to everything, including my sinuses, PVC is easily machined and shaped with the same tools I used for wood. As with any work, sharp tools work best. I cut out my bait profile, and lip slot, with a bandsaw, and try to drill any ballast hole while the bait has the flat sides, so I can drill straight holes with my drill press. I use an oscillating belt sander with an 80 grit belt to do my major shaping, working from a centerline I put on the bait after I've sanded the bandsaw marks off. I "carve" details with a dremel sanding drum, and drill out my eyes with a multi-spur bit on a drill press. I typically sand down from 80 grit to 120 grit with a vibrator sander, and finish up with a small piece of sandpaper to get edges and details softened. Because it has no direction-oriented grain, it carves really well with sharp tool. It can be laminated into bigger lure blanks using the same PVC glue plumbers use for PVC pipe, or you can use super glue. If you use both the PVC primer and the glue, the two pieces actually melt into one solid piece. As long as the two surfaces are flat and mate, you're good to go. It paints well. I can shoot Wicked White as a base coat onto a raw PVC bait, heat set it, and never have any separation problems with my paint schemes. When I've had occasion to remove some paint to modify a bait, I've had to sand down to the PVC to get the paint off. It never peels. Occasionally, heat setting too hot can cause trapped air to bubble up under the seal coat, so I generally seal baits by rubbing crazy glue, or thinned epoxy, over them before I paint, if I want a super smooth bait. But any bubbles that do appear can be popped by the sharp tip of an exacto knife, and they lay right back down when I press them with my exacto knife handle. I've never had any baits with popped bubbles fail. And, because it is totally waterproof, I don't have to worry about nicks and scuffs from rocks and hooks. Any top coat works. I've used epoxies, urethanes, and concrete sealers, with no problems. In short, it make lure building faster and easier, and that make it even more fun, so why I use it.8 points
-
As I do not build gliders or jerk baits, all that I can do is throw a lot of theory out there, to help you understand how the lure works. Understanding the theory helps the builder to design a lure to take advantage of the forces accordingly. Of course, experienced glider builders will have already figured this stuff out even if they do not know the reasons why their lures work. Experience is a valuable tool, theory only gives you a ‘leg up’ at the start. As you have already figured out, this is a very complex issue with multiple factors to be taken in to consideration. The apparent ideal solution for a lure to swim a long distance with efficiency is an arrow with all the weight at the front. But we already know that this would not work in water as it does in air because of the nose down attitude, like I said; multiple factors. Also, the super aerodynamic shape of an arrow is designed NOT to produce vortices. When we fire an arrow in air for maximum distance, we apply great force and we aim up at 45°, and due to air resistance, the arrow falls at 70°+. Target sports for darts and archery only use the top of the flight arc. Also the arrow is designed not to swing from side to side, a definite requirement of the lure. As for the lure; we want it to travel in a straight line as far as possible, then on the next pull, we want the same again only in a different/opposite direction (left/right). So, what causes this desired change of direction? The answer is vortices, my favourite subject. A waggling lipped lure generates a rapid series of vortices that cause the lure to waggle left and right. The sharp lip causes vortices to be created at a relatively low speed, and the theory of the ‘Kármán vortex street’ causes the vortices to rapidly alternate left/right. But still, the lipped lure requires a minimum speed to operate. The lipless glider still creates vortices but has a much higher minimum speed to create the vortex. The operation of the lure is to tug or jerk the lure. A single vortex is created and no more as the lure is already slowed below the vortex threshold. This swirling vortex sucks on the rear half of the lure body causing it to change direction. The next jerk causes the vortex to form across the back of the lure and sucks it in the opposite direction. As the lure slows down, that single vortex is still there, working on the lure, sucking it further around. This effect can be seen on multiple section swim-baits; a steady, constant retrieve causes alternating vortices that act on the rear of the lure causing that beautiful snake action. BUT, if you jerk the jointed swim-bait, the lure curls around even 90° and beyond. Check out the video, you can almost see the vortex sucking the lure around in the jerk sections with a little imagination. The above is the basic mechanics of what is going on. Now we have to figure out how to use the mechanics, the theory, to make the glider lure swim how we want. To start with, I use an analogy that I have talked about many times; Grab a 2 feet length of dowel in the middle in your fist. Rotate your wrist rapidly left and right. The dowel swings fairly easily. Now add ¼ pound of lead at each end of the dowel and repeat. The dowel is much more difficult to swing left and right. Now put the two weights at the center of the dowel and repeat. Once again, the dowel swings easily. This is the effect of inertia. We want the glider to change direction but we want to resist the continuing change of direction. The solution is to increase resistance to direction change by increasing inertia. By placing weight at the front and rear we increase inertia and resist the change of direction. But as always, design is a compromise. If the inertia of the lure is too great then the change of direction will be minimal or even nonexistent. You may end up with a straight swimming torpedo. Another feature is the depth of the lure body that the suction of the vortex acts upon. You may think that a deeper body with a larger surface area would resist the side movement, this would be incorrect at least according to theory; the suction force of the vortex acts on the side surface area of the lure, reduce the area and reduce the force. But yet again, design is a compromise. If you reduce your lure to a torpedo cylinder, no vortex will be created in the first place. If your lure swings excessively as it slows down then consider reducing the body depth. The reduced depth will also reduce resistance to forward motion. Once the glide motion clears the vortex, it will travel aerodynamically like a torpedo. We only require the vortex sucking effect at the initial tug of the lure, if the glider can swim clear of the vortex then it will continue in a straight line for more distance. If the glide distance is short and the lure continues to turn; reduce body depth and/or extend the weights to front and rear. If the lure does not change direction then no vortex has been created, you have a torpedo. You can add a flat to the top of the nose to help the vortex form, or increase the depth on the next build. Gliders need to naturally float horizontal, but the rest is a compromise between body depth and ballast distribution. Dave7 points
-
Possibly inspired by divine intervention or alien telepathic communication, you come up with a great idea for a lure. You spend several hours shaping the body. It comes out perfectly symmetrical. The lip slot is perfectly straight. You seal the bait and get the perfect ballast placement in your test tub. You drill the ballast hole and have no wood splintering. After installing the ballast, you re-seal the lure for added protection. You are so excited about your creation you decide to take the lure to the unfrozen portion of a small river on a cloudy dreary 30 degree day to test the action. You brave walking over slippery rocks to get to the shore, nearly face planting several times. The sun breaks through the clouds as you tie the lure on. You feel the warmth on your face as you make the first cast. The lure performs better than you imagined. As you watch the lure’s amazing action, a huge bass comes up from the depths and blasts your lure despite the lure being unpainted and the near freezing water temperature. You get no hook up because you are testing with bent over trebles to prevent a snag. You are ecstatic about all of the monsters that will fall to the lure when it is finished in all its glory. The action is so good that on the next cast a bald eagle takes a dive at the lure. You frantically reel the lure in to prevent the eagle from stealing your precious. After your lure’s lucky escape, you get back to the shop and wait for the lure to dry for painting. After resisting the urge to paint the lure too soon, you are finally able to continue your masterpiece. With great skill and effort, you apply an incredibly detailed paint job with gill plates, fins, scales, 32 different colors, perfect shading and blending, the works. It comes out flawless. The ghosts of Michelangelo and James Heddon appear before you and inspect the lure. They simultaneously say ‘sweet’ as they disappear. You wait for the paint to thoroughly dry. You put the lure on your turner. You mix the epoxy which comes out crystal clear and bubble free. You apply a nice even epoxy coat, not too thin, not too thick. You flip the switch on the rotisserie motor. The lure starts its graceful rotation. Then… Disaster. The lure turns 2 inches before it falls out of the holding clips because you did not set the clips securely. The lure bounces off the table and onto the floor. You are momentarily stunned. You pick the lure up and see that your clear coat is now a gelatinous mess encrusted with vilest shop debris. Saw dust, grit, hair, grease blobs, clipped off fishing line bits, even a small brad nail, yup, it’s all on your bait now. You start to feel grief, but you realize you can scrape off the epoxy and sand the ruined paint, repaint, and maybe salvage the situation. Then, like a lightning bolt from the sky, it hits you; the crushing weight of your own stupidity. You realize the fall also cracked the lure’s lip. Your only solace is cracking a cold beer and weeping in the corner. This is what the beer frig is for.7 points
-
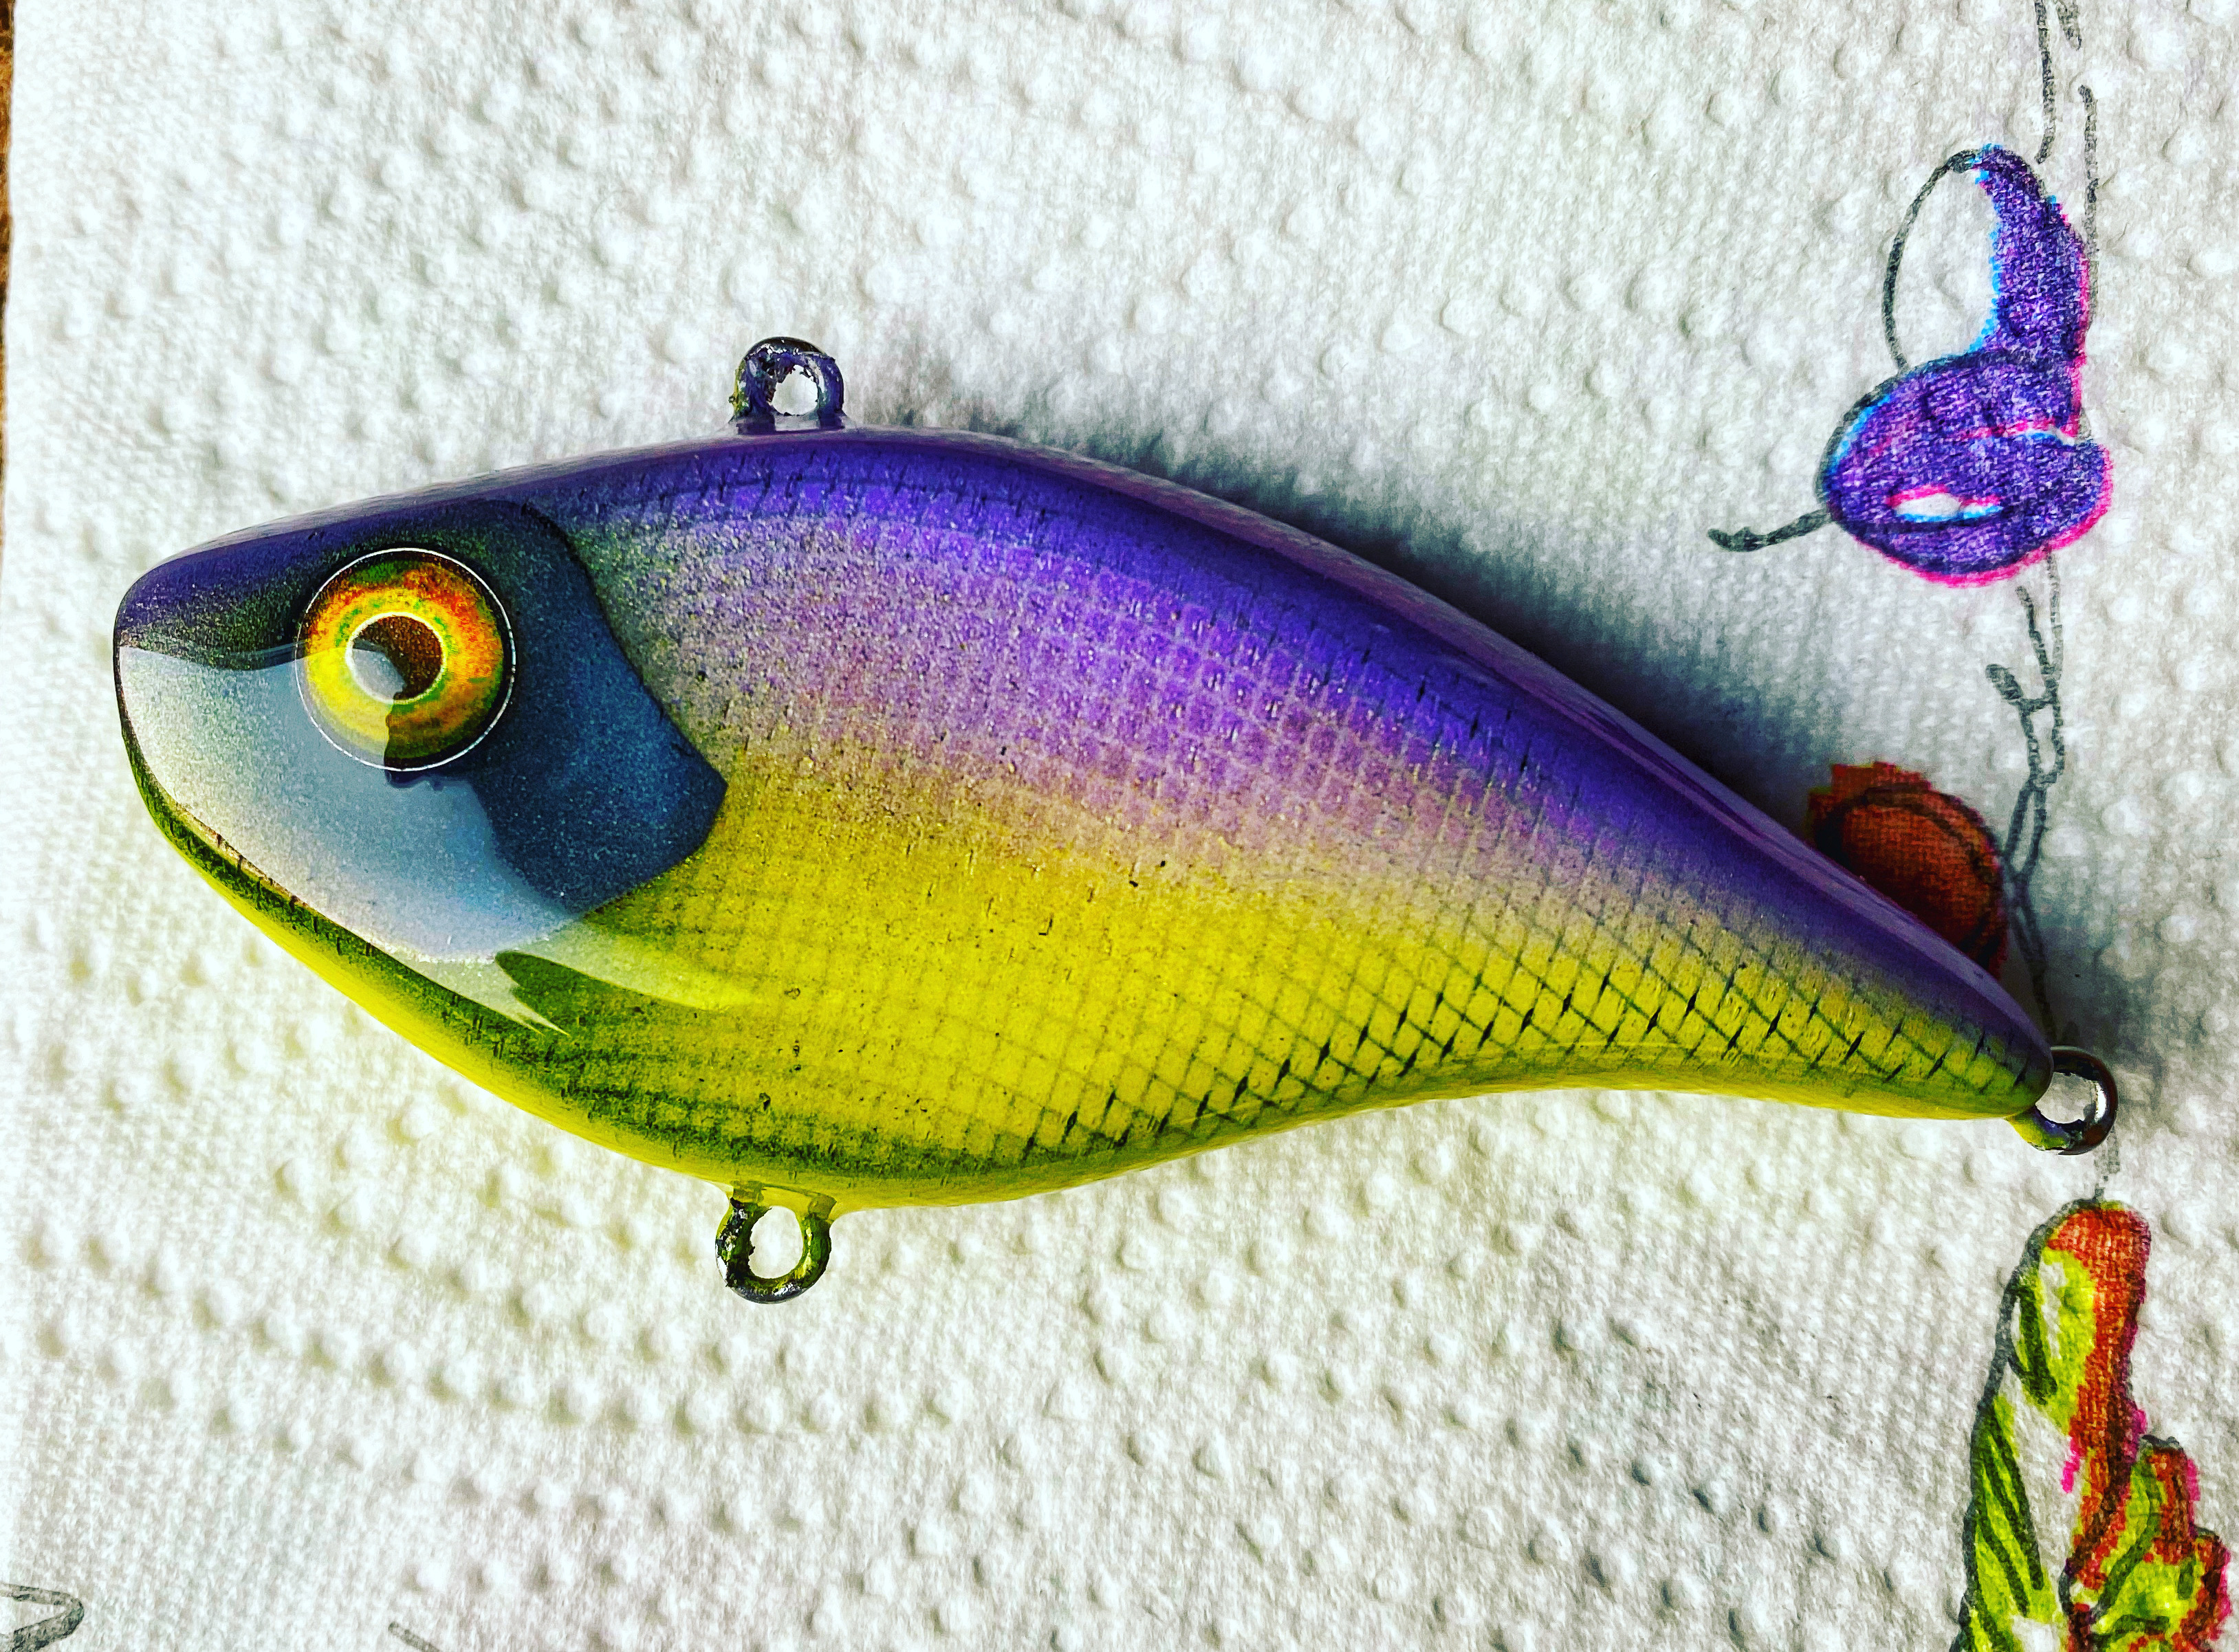
This is my version. This is the first bait I painted after getting an airbrush a bunch of years back. Never thrown it, was just for fun.
 6 points
 -
#6 Don't quit your day job.6 points
-
here are some videos, not the best but you get the idea. https://youtu.be/KPsVzycUTf0 https://youtu.be/YY0KLwPxOkY https://youtu.be/XjENNdaTFR46 points
-
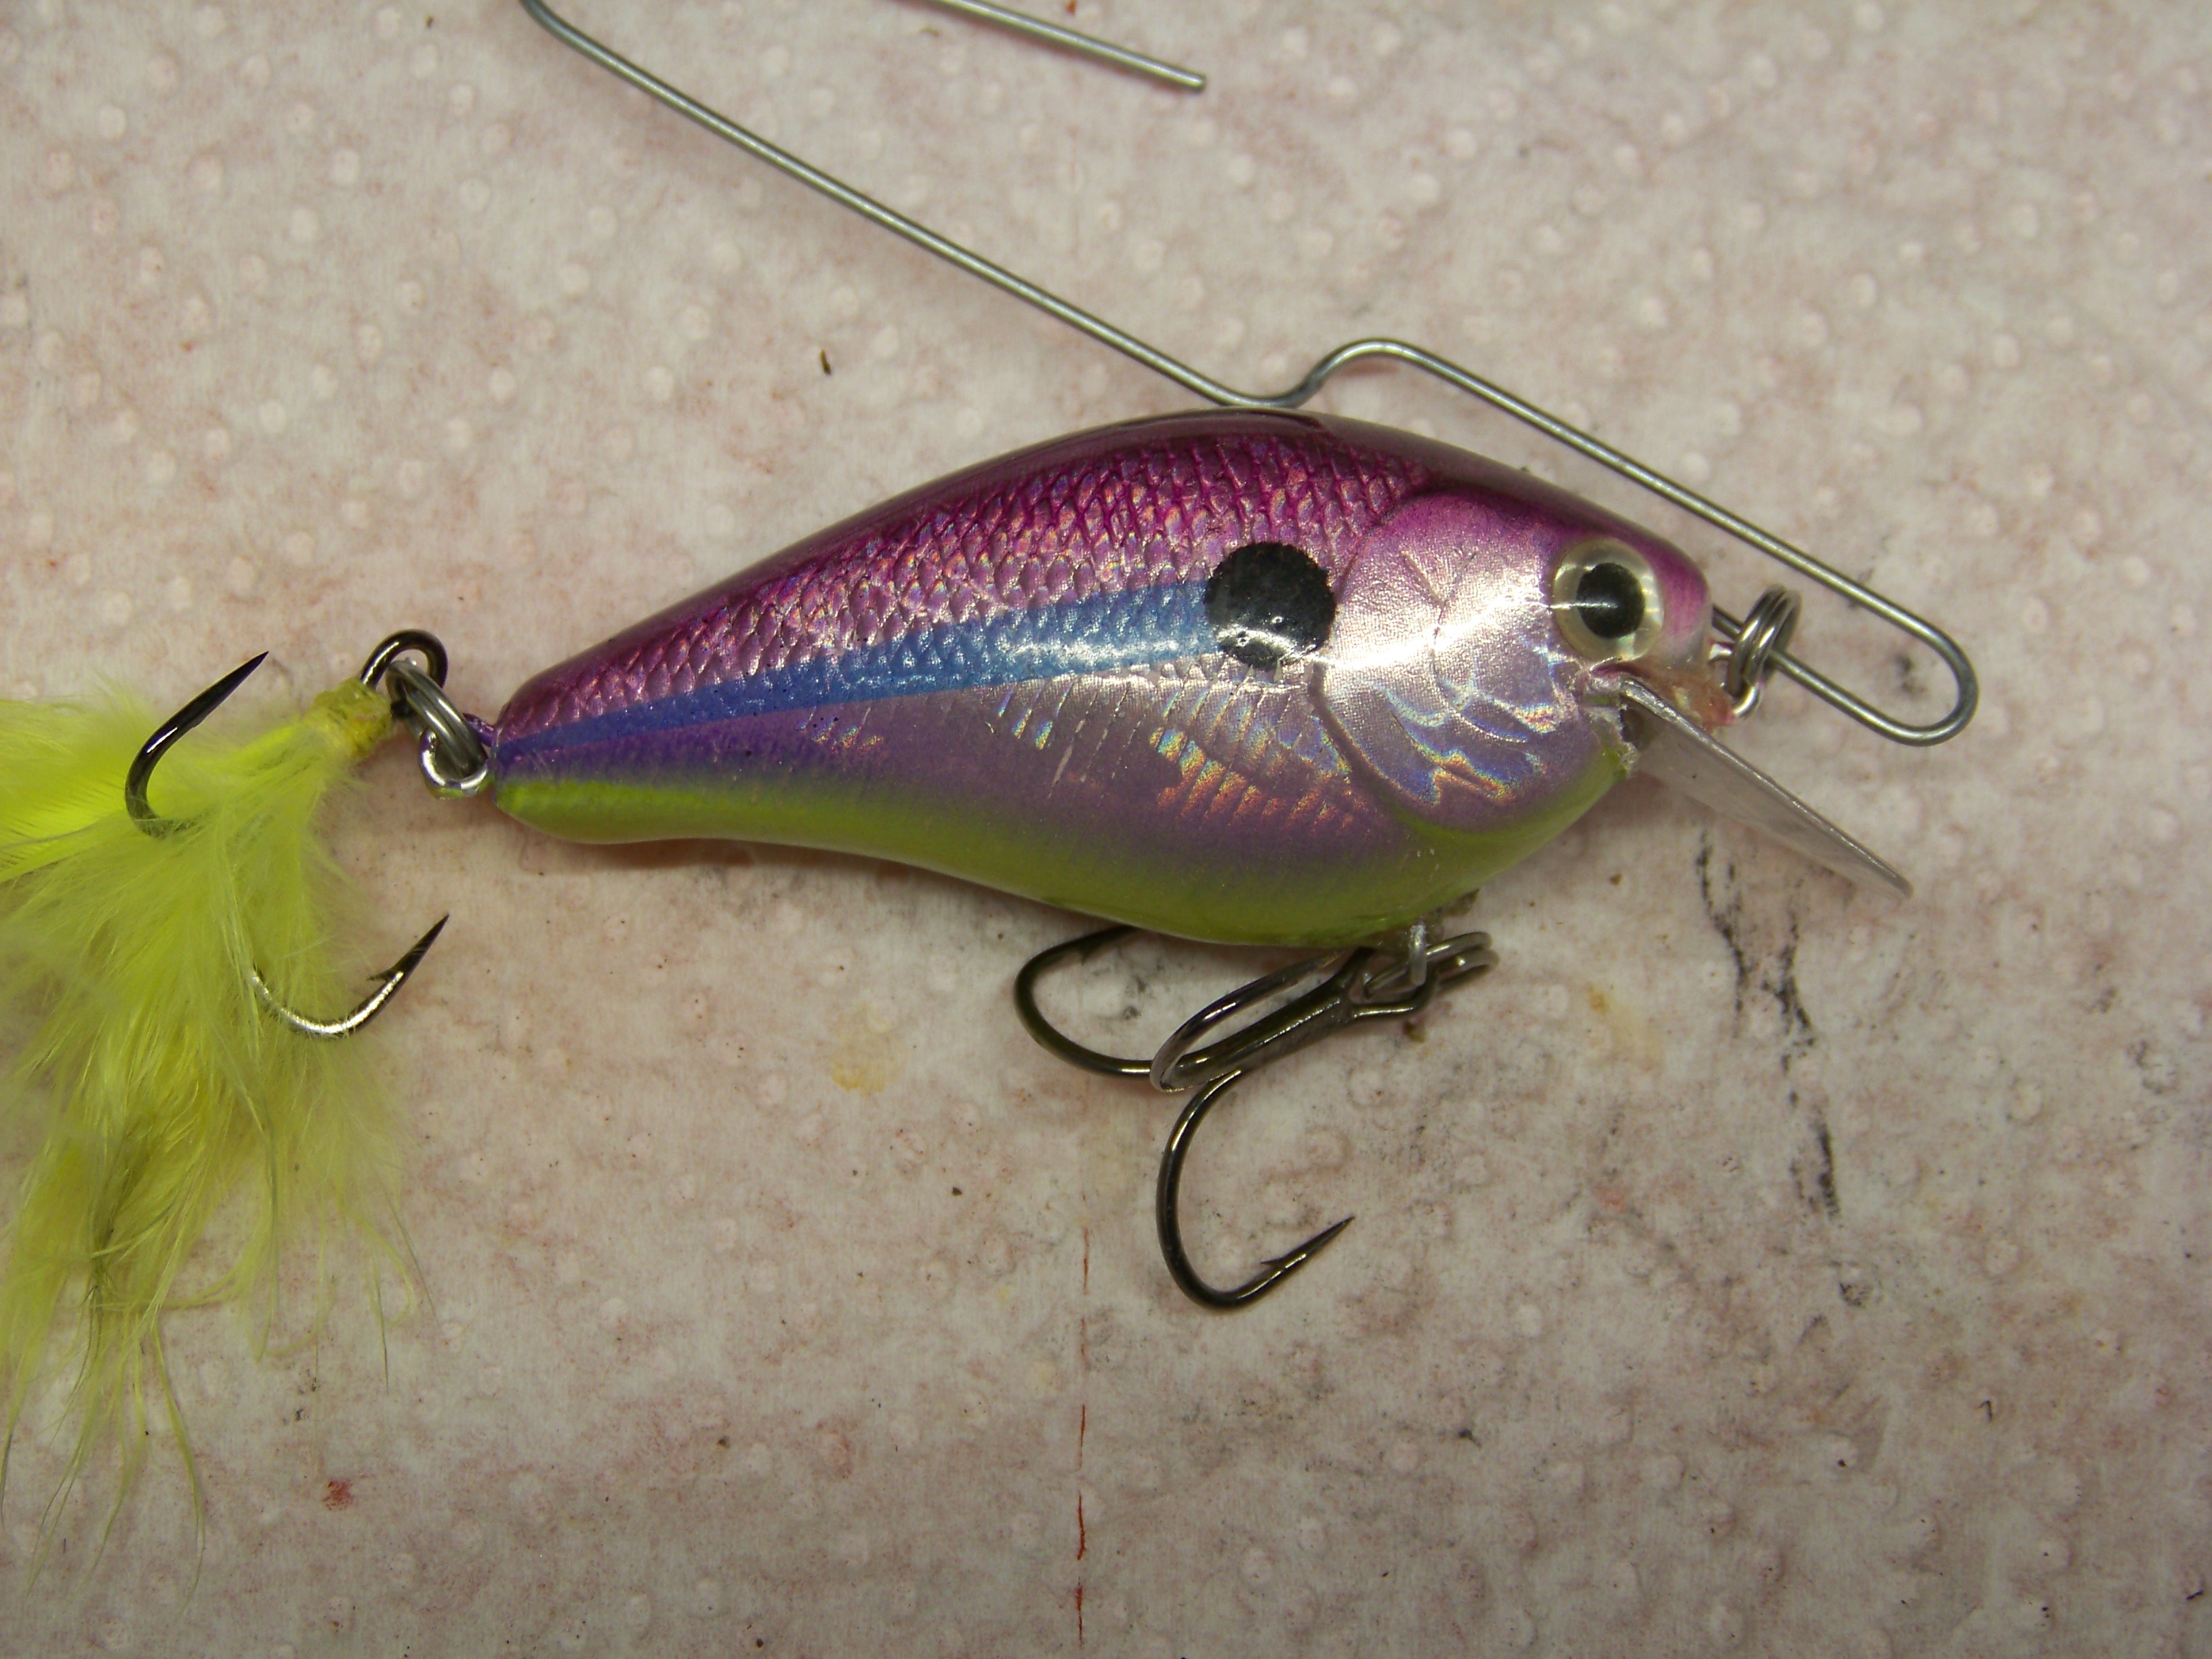
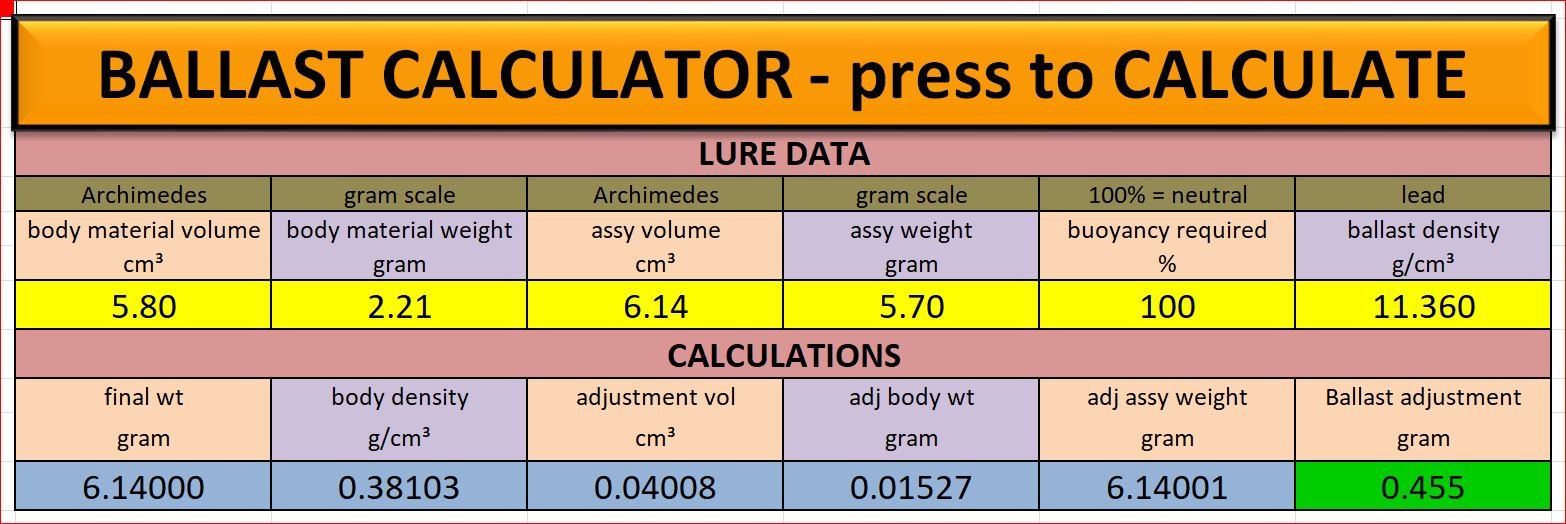
I have done a lot of work on ballast calculators in the past. I have never offered them up for use by TU members because I considered them complicated and clumsy. This one however, I consider to be very slick and versatile. You can enter data from a first prototype and it will calculate how much ballast you need to add or subtract to achieve the buoyancy that you desire, be it slow sink, neutral or float. Boxes 1 and 2 are merely to collect data on the body material in order to obtain the material density. Boxes 3 and 4 are measured from a completed lure with hardware, hooks and topcoat. Box 5 is your desired buoyancy, 100% = neutral buoyancy. Box 6 is the density of the ballast. This can be changed if not using lead. The calculation takes into account the body material removed or added to make room for the ballast. PM your email to me if you would like to try this spreadsheet. Dave
 6 points
 -
I have posted this here because only searching minds would find it. Everyone who ever built his/her own lure, strives to come up with something original, game changing, name in lights, millionaire. There is nothing wrong with dreams, and they are actually possible. You do not need a doctorate or a PHd to have an original game changing idea. I am a perfect example; I have only a humble HND qualification in aeronautical engineering, but I figured out one of the massive enigmas; what the function of fish scales was. Unfortunately, I was not the first to make this discovery, but I did make it independently. I also have other ideas not fishing related that are not proven as yet. My point is that you do not have to be scientifically qualified to make life changing discoveries. As members of the relatively uneducated masses, we have the same level of imagination as the geniuses of this world. Without the constraints of conformity, we have no rules to adhere to. Being a scientist or an expert is a distinct disadvantage. All we have to do is recognize a problem, a deficiency, an improvement, or in our case, a different lure action that will catch fish. One of my biggest bug-bears is people who tell us that there is nothing new, it has all been done before, and you are re-inventing the wheel. This is just not true. I am continually amazed at what past lure designers have come up with, but only now, in this technological age, are we starting to understand how things work. Fluid dynamics is a BIG statement, the study of which requires a mathematical mind of a genius. BUT, the understanding of the basic principles only requires the viewing of a few YouTube videos, no math required. Search for ‘vortex’, ‘vortex street’, ‘Kármán vortex street’, view the videos and you will already have the knowledge required to invent your new lure. Every lure’s action can be explained by vortex technology. Understand vortex technology and you are on your way. ‘Trial and error’ has always been the way with fishing lure design, but it does not have to be that way. The chances of hitting on a solution with trial and error are infinitely small compared with having the simple knowledge of vortex technology. Vortices are the driving force behind ALL fishing lures. Figure out the basics (not difficult) and then apply the knowledge to what you want to achieve (or talk to me). Dave6 points
-
So much butthurt, frankly it cracks me up. Anybody on here whining about Farcebook groups and "too many painters" need to just shut up. Probably angry because when they started the help available wasn't as easily attainable.I wonder how much help this forum has been to them over the years? I guess it's OK to get help and info here but no place else on the internet? And as far as the sale pages, THE CREAM RISES TO THE TOP! Plain and simple. Are there a ton of guys doing crappy work? Yes there is, same as before, always been hacks in every business however. There are also a ton of folks putting out some amazing work, hell yes there is. As I said before, the damn cream rises to the top, the hacks sell few and when they do it is at low prices, the quality folks sell plenty at premium prices. crankbaits, jigs, spinnerbaits, plastics etc. Someone brought up "cheap blanks from china", guess what dude, damn near ALL manufactures source the blanks, painting and packaging from China as well, not much to bitch about here either. Well, if there is a bitch its that it all comes from there, and we are responsible for that as a whole, but discussing that issue further is impossible without it getting political. So, my recommendation is, quit the whining and get painting. If your work is good, it will rise to the top too. let the hacks be hacks, they don't sell hardly anything at much of price anyway. Try embracing the shared knowledge and adding to it, instead of whining about it, after all you are on THIS site and I was under the impression that's what this site is about. Its no different on Farcebook, just more of it. Have a wonderful day and try not to be bitter.6 points
-
no one mentioned the l;ip slot. if crooked it will death spiral5 points
-
Here are some of my old rattle cans paintjobs. I think I might need to go back, I suck at airbrushing

 5 points
 -
I just found this website through a search and it is really user friendly to use for creating or matching existing colors . Wish I had found something like this years ago and it would have saved a lots of plastic experimenting with colors. Online color mixing tool - free color blender tool! (trycolors.com)5 points
-
I like to Texas rig a square of toilet paper on the line ahead of the bait for realism . Big Bass usually slam this rig up as soon as it hits the water with strikes that sound like a toilet flushing .5 points
-
I wanted to give an update on my ordering placed back in late January/early February. Amazingly I received my custom cut aluminum bugmolds.com the end of last week. Dang! Those fellas did an amazing job simply off a few pictures of a bait. I just saw they updated their site stating the shop is back up and running too.5 points
-
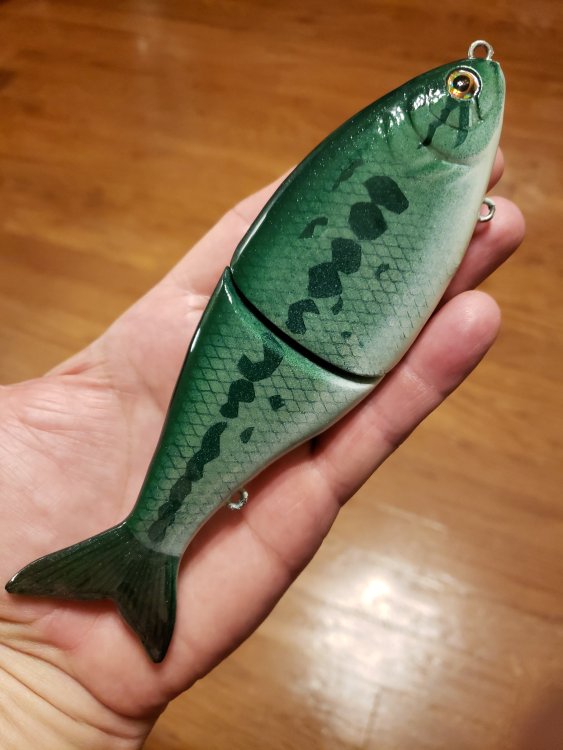
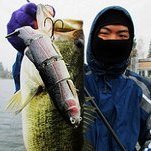
 This 8.75" trout glide has been a long time in the making, but I'm finally getting it to where I want it to be after years of testing and weeding through iterations that I wasn't 100% satisfied with. I actually started working on this particular model about a year and a half ago and only now have enough time on the water with it to feel comfortable pushing it into the final phases of prototyping. The master was carved completely by hand out of a block of basswood using only a utility knife, wood chisel, and sandpaper. I made a two-piece silicone mold of the bait so that I could pour duplicates out of resin. The tail was also carved out of wood and molded with silicone. The casting material is a flexible urethane with black glitter to replicate the trout dots on the body. The bait in the photograph is the first fishable prototype out of my new mold. It was painted with an airbrush and clear coated with KBS Diamond Clear. I did a semi sloppy job with the hand-tied Owner ST-36 feather trebles. Not sure how they will effect the swim, but they add a nice touch. Overall I am very pleased with how this bait came out. I'd love to fish the paint off this thing but will be donating it this week to support the Swimbaits for Autism fundraiser event hosted by Swimbait Culture. Check it out and thanks for looking! Dan5 points
 -
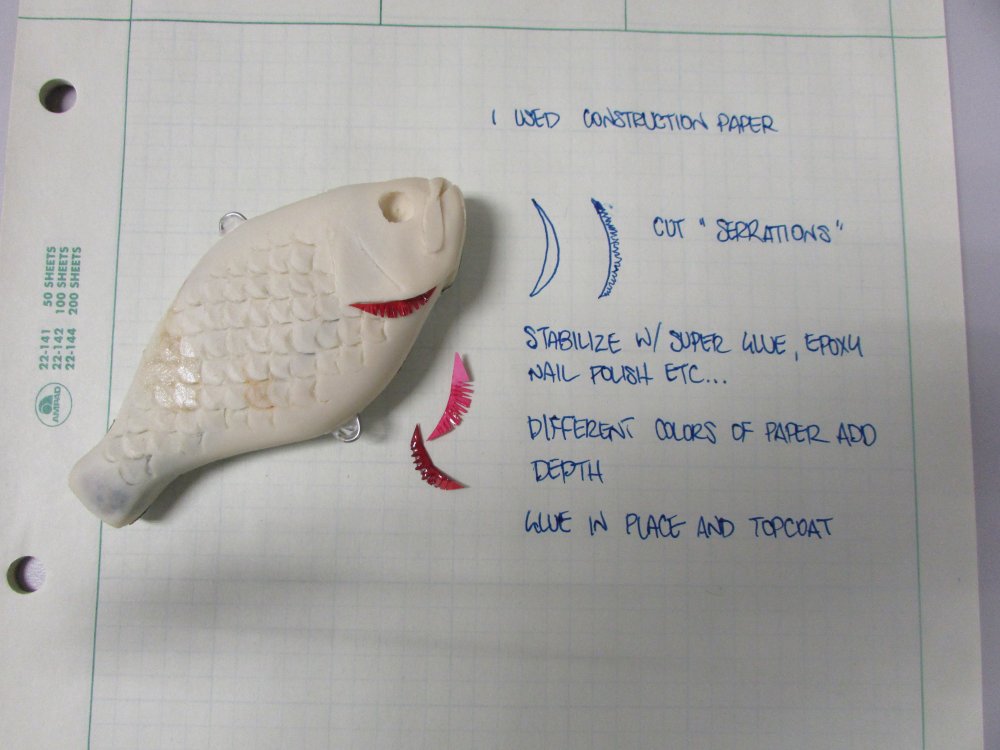
Here is a gill detail I came up with ( at least have not seen before ) , I am making a top water and flat sided crankbait and will be layering a light color next to collar and darker on top for contrast . Think this will be cool detail
 5 points
 -
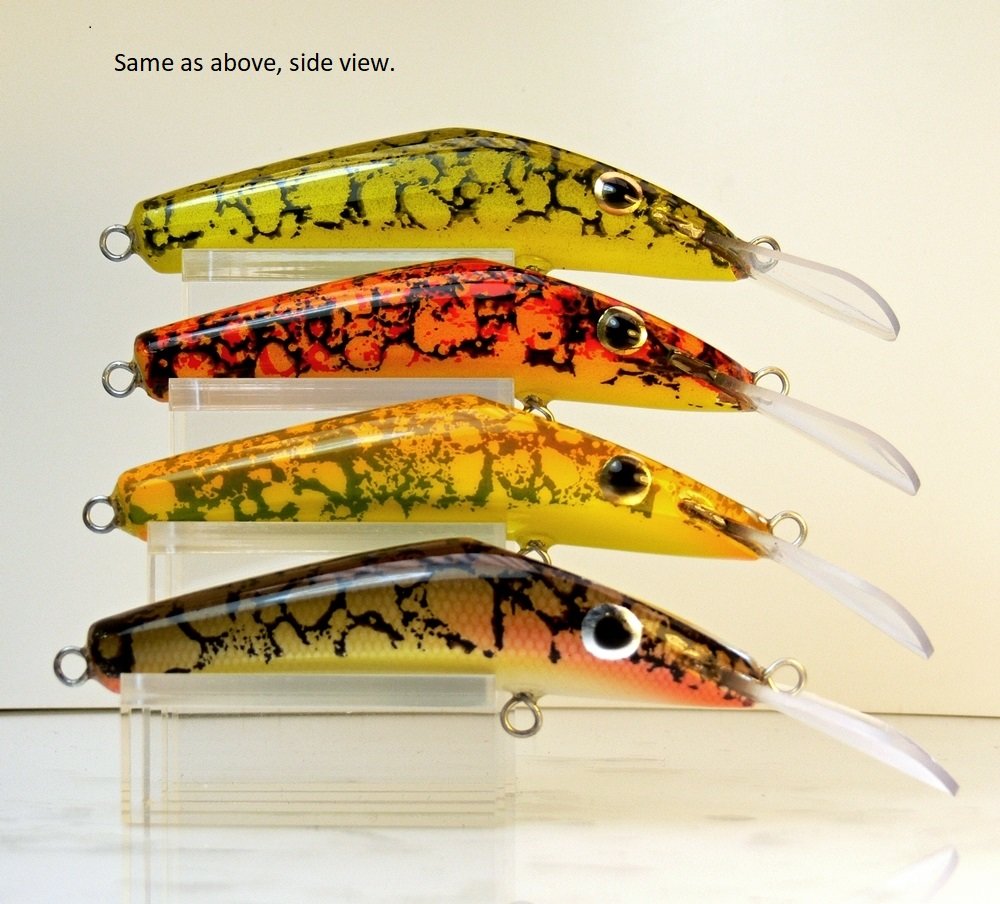
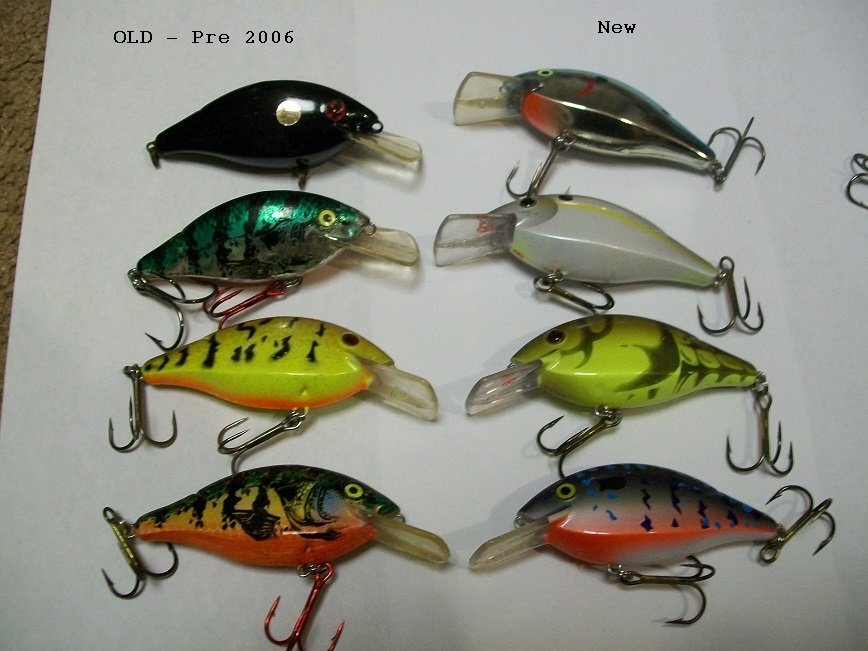
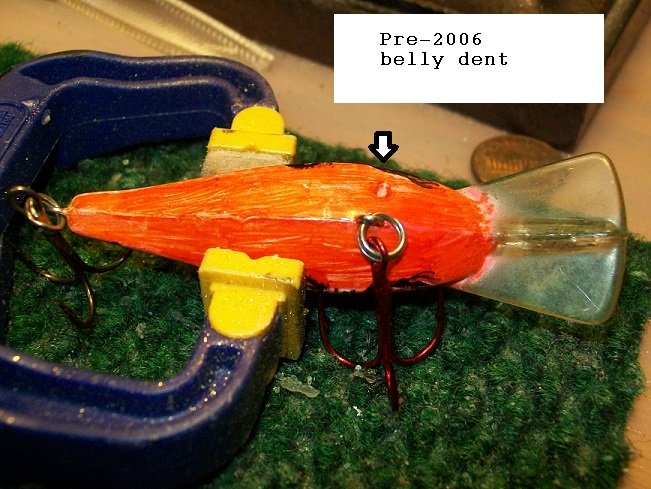
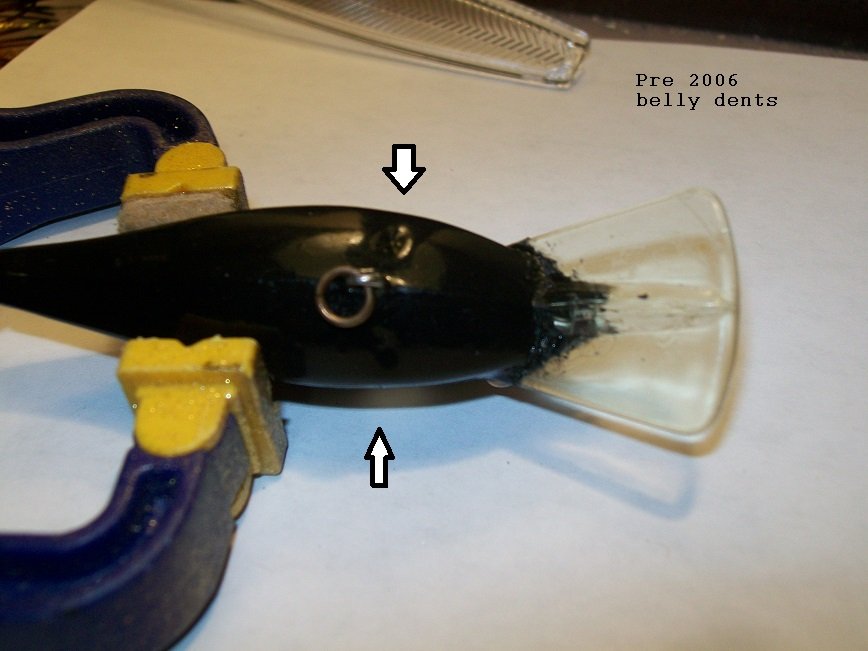
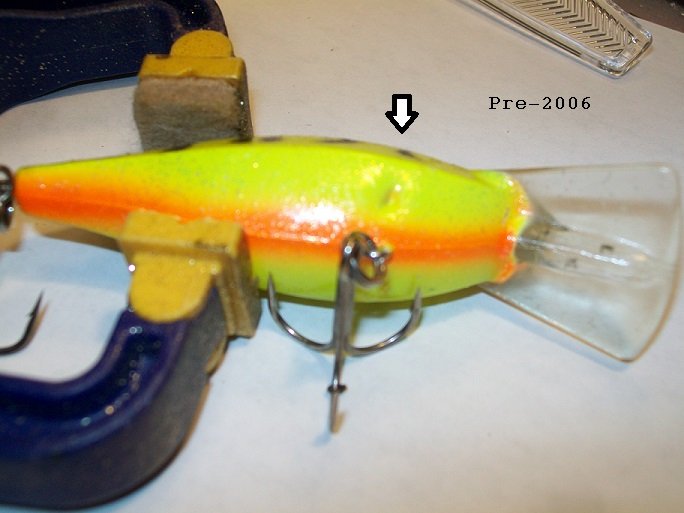
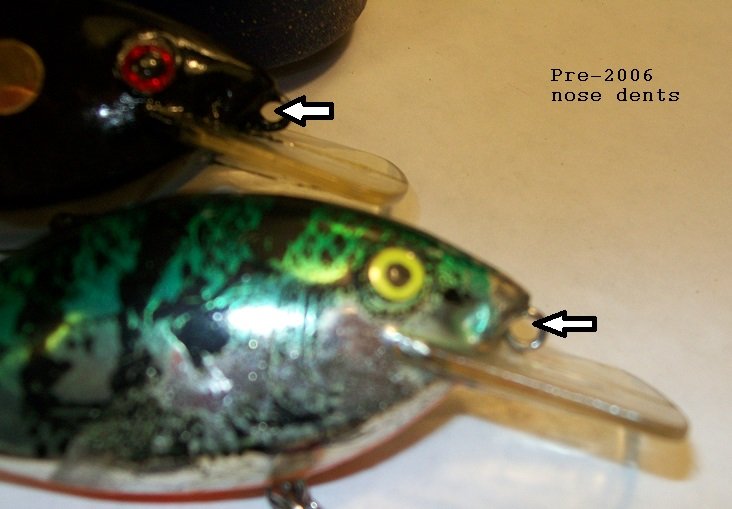
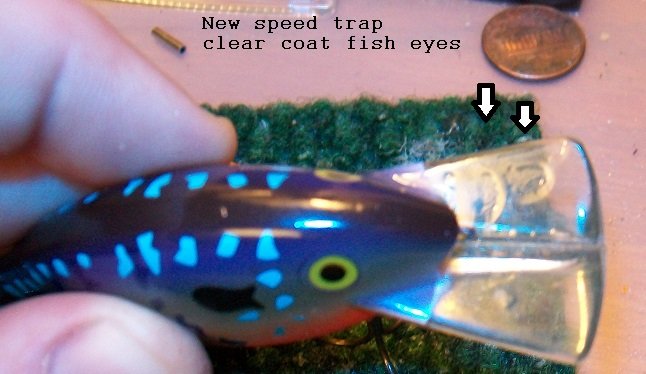
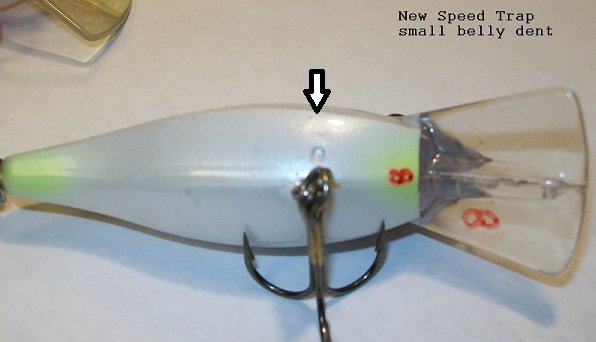
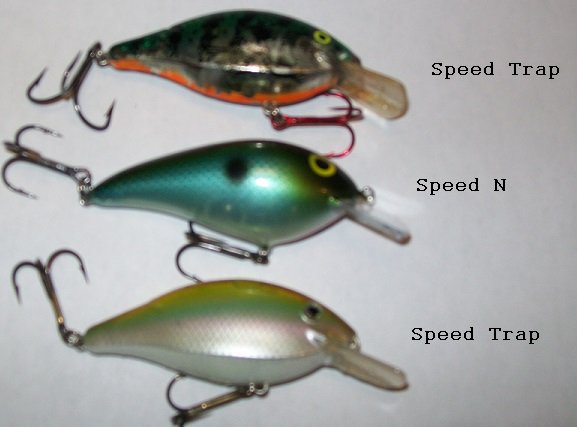
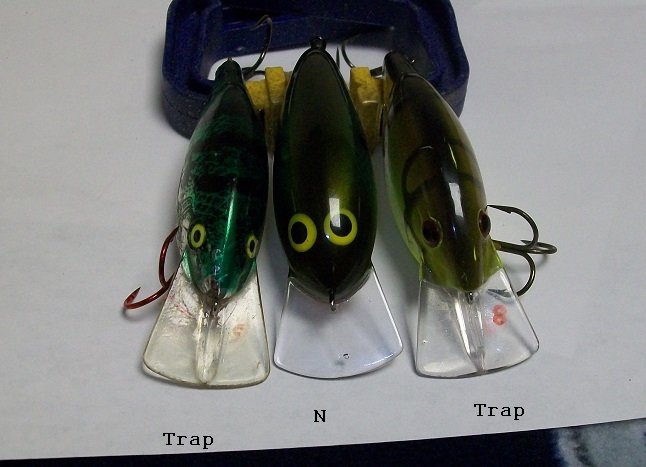
This is an update to an older post. It is long so I made a new post. Luhr Jensen Speed Trap – old vs. new, and the new Norman Speed N. Pre-2006 Speed Traps were made in the USA. The new ones are made in China. I compared 4 old ones to 4 new ones. In my unscientific opinion, I think the new baits are made with the same butyrate plastic and in the same or similar molds. The plastic feels and looks the same. The clear coat on the new baits does appear to be different from the old baits. The clear coat on the new baits is thicker. This resulted in slightly different dimension between the old and new baits. The diving depth for all 8 models appeared to be around 7’ on 12 lb. Yozuri Hydrid Line. The actions of the new and old baits seem identical. I fished all baits on the same rod with the same reel. The vibration from bait to bait was the same. I was fishing in 7 feet and just ticking the bottom. The rattle sound seems similar across all 4 pre-2006 baits. Three of the new bait sounded like the pre-2006 baits. One of the new baits seemed a bit fainter than the old ones. The tone of the rattles in all baits is similar. Molding ‘dents’ All of the old baits and 2 of the new baits have what appear to be small ‘dents’ where the plastic sagged into the body during the manufacturing process. The dents on the older baits were far more numerous and far more pronounced. Two of the new baits had no dents. One new bait had one very slight dent. The other new bait had two very slight dents. (Older baits) Pre-2006 - Black - has two dents on the belly in front of the hook hanger, a dent on the starboard side of the nose, and the starboard side of the tail. Pre-2006 – Metallic Perch - has two dents on the belly in front of the hanger, dents on the starboard side and port side of the nose, a dent on the starboard side of the tail, and a slight dent on the back near the top on the starboard side. This is the oldest bait in the group which I believe was made in the late 90s. Pre-2006 – Crystal Mudcraw - has two dents on the belly in front of the hanger, a dent on the starboard side of the nose, and a slight dent on the starboard side of the tail. Pre-2006 – Bluegill Perch (with orange sharpie on belly) - has one large dent on the starboard side of belly in front of the hanger. This dent is the largest and deepest by far. It looks like and inverted water drop. It also has dents on the starboard side and port side of the nose, a dent on the starboard side of the tail, and a slight dent on the back near the top on the starboard side. (Newer baits) Post-2006 – Blue chrome - has no body dents. Post-2006- Gun Metal Shad – has a very slight dent on the starboard side of the belly in front of the hanger and another very slight dent on the starboard side of the nose. Post-2006 – Breeding Bluegill - has no body dents. Post-2006- Mossback Craw – has a very slight dent on the starboard side of the belly. Because the few dents on the new baits appear in similar spots to where they occurred in the old baits seems to me that they are still made the same. Luhr Jensen must have figured out a way to mold the bodies with far fewer dents/sags. Clear coat On the 4 older baits, the clear coat is thin and uniform with no fish eyes. The clear coat on the newer baits is thicker. There are ‘fish eyes’ in the clear coat on two of the new baits so you can see that it is thicker than the old clear coat. Measuring the length and width of the body and thickness of the lip also indicate the clear coat is thicker on the new baits. The thicker clear coat may increase the durability of the new baits compared to the old ones that would not likely survive an errant cast into an object. This is not a complaint about these baits. I really like the bait. There are usually at least 5 in my tackle bag in different colors. They are very thin walled and were difficult to manufacture. The quality on the new baits has definitely improved. I have fished these baits for 20 years and have caught multiple species on them. The new ones and the old ones both are great fish catchers. The have a very tight wiggle that draws some vicious strikes. They are very stable and don’t blow out even on fast retrieves. The only disappointment I have in the new baits is they discontinued the Metallic Perch color - gold chrome perch pattern with the green chrome on the shoulders and orange on the belly. It doesn’t show well in the pics. It is a deadly bait in the Northeast as it looks like several of the local baitfish. INCHES Lip **** Pre / Post OUNCE Body Body Port Starboard 2006 Color Weight* Length** Width*** Thickness Thickness pre Black 0.334 2.6135 0.7210 0.0845 0.0845 pre Metallic Perch 0.322 2.6040 0.7185 0.0845 0.0845 pre Crystal Mud Craw 0.328 2.6210 0.7220 0.0840 0.0840 pre Bluegill Perch 0.340 2.6000 0.7205 0.0850 0.0850 AVG 0.331 2.60963 0.72050 0.08450 0.08450 post Blue Chrome 0.330 2.6460 0.7440 0.0970 0.0970 post Gun Metal Shad 0.363 2.6395 0.7450 0.0950 0.0955 post Breeding Bream 0.341 2.6395 0.7465 0.0955 0.0950 post Mossback Craw 0.358 2.6390 0.7445 0.0960 0.0955 AVG 0.348 2.64100 0.74500 0.09588 0.09575 Norman Speed N New Evoo 0.463 2.69800 0.82400 0.07300 0.73000 * Weight with no hardware. ** Length of body of plastic measured from above tail loop to noise point *** Body width just behind belly hanger **** Lip thickness on both sides as close as possible to center hump on the bottom side of the lip Norman Speed N vs. Lurh Jensen Speed Trap The Speed N is a new lure very similar to the Speed Trap. The Speed N is close in size to the Speed Trap with a similar action. The Speed N is also made of butyrate. The Speed Trap is available in more colors. The Speed Trap also has some bluegill colors and chrome colors which the Speed N does not. Hopefully, Norman will add more colors in the future. The Speed N is made in Guatemala. The Speed Trap is made in China. The Speed N dove to around 5’ on the same setup that the Speed Trap reached 7’. The Speed N is heavier and casts further than the Speed Trap. The Speed N I purchased had no defects. The Speed N had a tight wiggle very similar to the Speed Trap. They both have a similar lip design. Like the Trap, the N also did not blow out on a fast retrieve. I could feel the action of the Speed Trap a bit more on my rod tip. I guess I would describe the vibration of the Trap as just a bit crisper compared to the N. The Speed N did have a different rattle from the Trap. The Speed N makes more of a thud knock rattle. The Speed N has 2 chambers that run horizontally across the bottom of the bait that each house 1 fairly large ball. The balls have a limited range of motion, they can move and knock side-to-side. The Speed Trap has one medium ball in a horizontal chamber on the belly with very limited moment that provides a very subtle knock and a smaller ball free roaming in the open body that gives off a fairly high pitch rattle. I have only fished with the Speed N one time and caught no fish in 40 degree water so I can’t attest to its ability to catch fish. I have had years of success with the Speed Trap. It would be great to have a successful Speed Trap like lure that can hit shallower water. It will be interesting to see how the Speed N does next year. Neither lure performs well being dragged across 6 inches of ice. Jim

 5 points
 -
This is correct. Unfortunately, with mail order it's simply not possible for us to make much, if any, profit on orders below $15. We run a very streamlined business, but even small orders have to pass through at least 2 to 3 people before they're out the door. Larger organizations can afford to simply take the hit on small orders (or they haven't done the analysis to determine if it's profitable), but we're small (around 15 employees) and plan on staying that way, so we have to be more diligent on issues such as this. We recognize this is frustrating, but we do try to be upfront and honest about it. We're also always looking for ways to better serve all of you, so if we can identify a way to fulfill smaller orders without losing money on every one, we'll certainly make it an option. Matt Barlow5 points
-
I built this lathe to turn my cork handles, out of a $5.00 sewing machine motor, and $6.00 bushings.


 5 points
 -
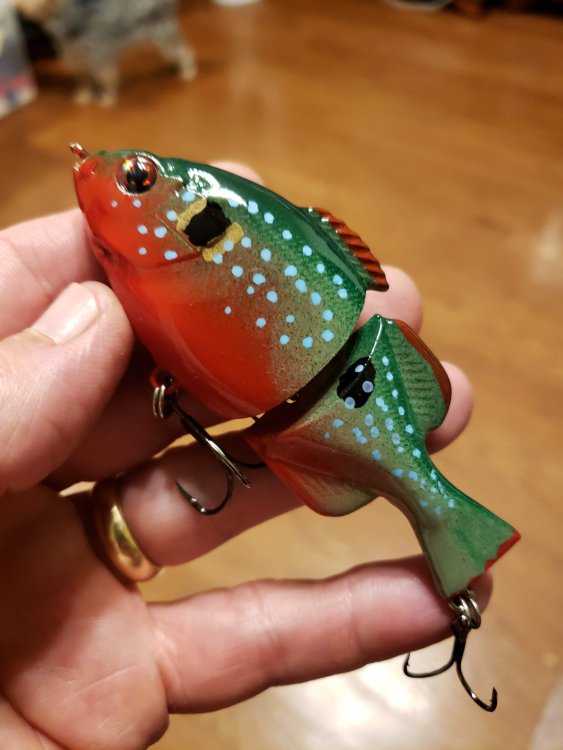
Here is my first attempt , not the most symmetrical . Next time I will glue the two ends of gills before putting in place . Turned out pretty cool , Thanks guys More pics in galley
 5 points
 -
I work for a large company in a product development role. I can tell you this, the bigger the company the less they care if the product "works" right. What they need to do is sell stuff profitably good bad or otherwise. Most have great ideas internally that never see daylight due to timing, market or whatever. Personally if i had a great bait that i could reproduce consistent quality catches and is manufacturable, you'd be better off doing an LLC. There is enough power in social media these days to not need the big companies anymore. Its a great time for entrepreneurs imho.5 points
-
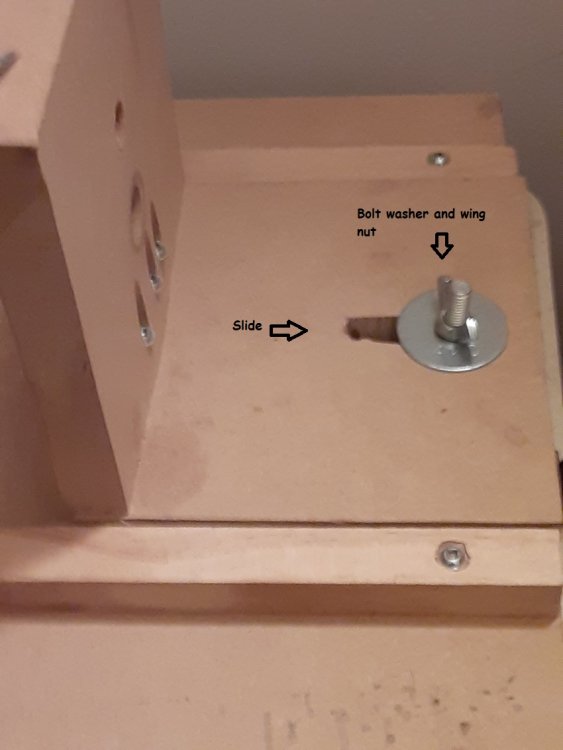
In my post about getting the screw eye holes in the EXACT middle of the lure, I had mentioned a jig I made for use with a flush trim bit on a router table. It occurred to me that some folks might like to see it. So, here it is: Used 1/2" plywood for the base, and did the profile for the back of the lure on the band saw and then the belt sander. Drilled 5/16" holes, then used a forstner bit to recess the heads of the t-bolts so it would sit flat on the router table and the t-bolts wouldn't scratch things up. Used a 3/8" trim bit to route the slots into a piece of 3/4" plywood. Got the t-bolts, the knobs, and the toggles all from Amazon for like $15 or something like that. I can create additional 1/2" plywood templates, and just move the hold down from base to base depending on what lure I want to produce. The base is 24" wide and the back of it is 6" away from the back of the lure (where the router bit would be). The bait this makes is 8" long, so I've got plenty of room to keep my hands away from the router bit. Only change I think I'm going to make it to add some fender washers under the knobs. This particular setup works great for this lure since the belly is flat (all except for by the nose, but that takes 5 seconds on the belt sander to create that small contour). However, if I decide to make one in the future that has a contoured belly, it would be easy to do. I'd just create another base from 1/2" plywood, and if the lure was 8" long again I'd do the back profile maybe 3.5" off one end, and then the belly profile 3.5" off the other end, leaving a 1" gap between the two profiles. Then I would cut another piece of 3/4" plywood, and cut the negative of the back contour into it, then add toggles. I'd use the toggle base shown in these photos with the flat side to get the back profile, and then I'd flip the bait over, move it to the belly profile side of the template, and the back would fit into the toggle base then. Hopefully I explained that well enough. I'll be sure to come back and post pics when I do it. As my buddy says: "I used my tools to make tools to use my tools."
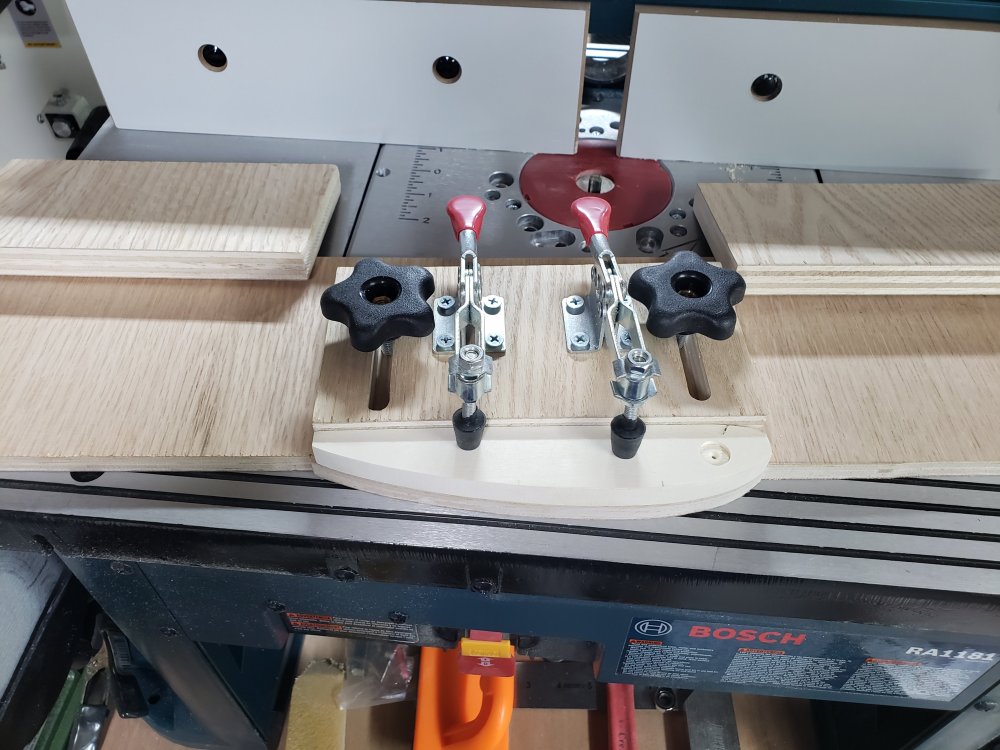
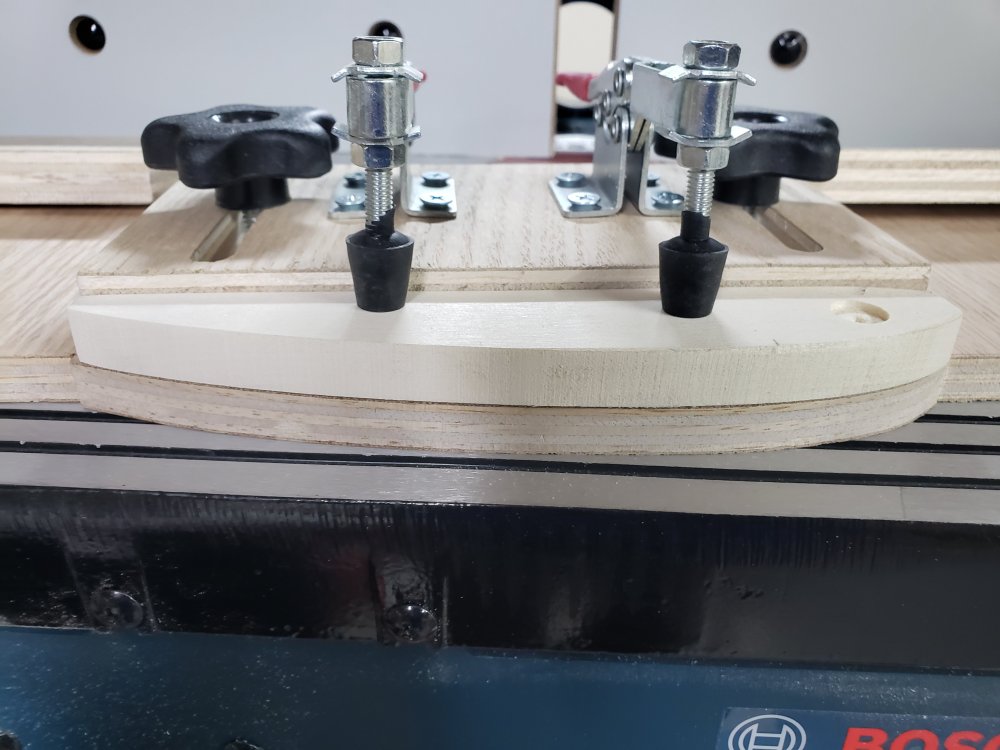 5 points
 -
I have a different opinion on what it takes to do this for a living. If you don’t like what you are doing now then it makes it easier to maybe change. While all the other posts are spot on there is another option. While it’s nice to have your own product and put them in shops you could on the other hand pour for someone who has the task of selling them. Most people here will tell you it is very hard to make a profit making baits but I know some who make a lot of money doing so. And it is much more than you might think. I will not mention exact numbers because you need to know that it is a lot of WORK. Yes that four letter word. Working with small larger company’s can be very profitable. But never let them dominate your time because if they cut you off then you are screwed. Do less work for more company’s and all your eggs will not be in the same basket. You will have to understand how you utilize your time is key to making baits. Waiting is not an option you need to keep doing something to get ahead. Keep your day job for say 6 months. Take the rest of your time investing in to your bait business. Get to a point that you can have enough molds and a system to pour that will get you where you need to be. Whatever system you use to pour you need to be able to change colors fast so you don’t have to wait. With a small guy you have to do smaller runs and multiple colors a day to make it work. For much more on how to do it you can pm me and I can enlighten you for days. Your dream can happen and you can do it if you want to WORK.5 points
-
Gained about $2000 or more in sales last year just by giving away a handful of blemish lures at lakes that cost me maybe $100 in materials. It’s even better when the father of the kid calls me to buy some lures because his kid out fished him that day. Nothing sells lures better then fisherman seeing them catch fish I tell every kid that I give a lure to it’s their lure and Dad is not allowed to use it Think of it as investing in advertisement5 points
-
@Skeeter what I know that is different about it is that it was designed to have no toxic fumes because several well known lure makers had died of cancer and Joe, the guy that developed it, did so as a response to that. As far as anything about the product that makes it more suited to lure making I am not sure. It does work like a charm though. First time using it and I got the best, nearly flawless topcoat I’ve ever gotten:
 5 points
 -
Rubbish, the dolphin showed no interest in the lure what so ever! Just kidding, great work, looks amazing Dave5 points
-
I've been wanting a better way to balance my hard baits instead of guessing where the center of mass is. I built a simple balance to attempt to do this. A quick build with scrap materials.5 points
-
 Poplar crankbait5 points
 -
Usually you can go up or down one size on a Do-It mold. If you need to go really big, take the hook place it in the mold, close the mold and lightly tap the mold with a hammer. This will give you an impression on the mold halves on where you need to cut. The you can use a Dremel as mentioned above or a hand file. The mold is alum. and soft, so go slow and steady.5 points
-
Mark, I wasn't sure if you check back on threads that you've commented in before, so I made this thread just to say, Thank you !! The advice you offered me in my injection mold problem thread was spot on! Trying to keep the story short ... I tried opening the gate up a bit and added a vent channel with a hole drilled at its end, at the nose of the bait. It didn't help at all. In fact it made it worse. The vent wouldn't let me build up any pressure in the mold, and I think it actually caused the gate to cool closed more quickly. So I got the Dremel out again and really went to town on opening up that gate. I didn't quite take it to the entire width of the runner (but I will) but it's almost there. I left the hole I drilled at the end of the nose vent channel plugged with plastic, and shot the mold again. Almost perfect !!! When I opened up the mold, the now funnel shaped gate was actually hollow. Opening it up that much allowed the bait to pull in more hot plastic. Which is what the problem most likely was from the very beginning. Your advice to me tells me you knew exactly what the problem was. And you told me how to fix it. I can't thank you enough for steering me in the right direction. I really wanted this bait to be right. And you made that possible. Once again. Thank you. Your help is truly appreciated.5 points
-
Ok you can do lots of different things messing around with weight placement so your question could really go into an essay. Most common reason for weight placement is leveling the bait so the water catches the lip on the correct angle. Most common is weight place near the front hook to achieve the slight nose down most go for with crankbaits Now you can also impact action by causing the bait to be unstable. Think of the classic belly weighting as creating a keel to stabilize the bait. Move that keel closer to center (top/bottom)it changes the pivot point in the action. Now where you position it from front to back plays a roll as well. Closer to the front has less impact on the action but weight towards the tail tightens things up or robs action Hope at least part of that makes sense I recommend doing what I did years ago it will teach you a lot about impact of weight and placement on action. Make some blanks, drill holes in different locations so you can put weight in different spots and pull it back out. Seal the blanks give them lips( if you want just pressure fit lips so you can try different ones) and go play in the water You will learn a lot about weighting and action by going out and playing around with different placement. It will probably put you way farther a long in knowledge then listen to this redneck ramble lol I learned a ton about action from trying things and some I have a hard to explain. It you think in pivot points, catching water pressure, cutting through the water, and adding/robbing power with weight or poor/good hydrodynamics these are big factors5 points
-
I would not agree at all. If your fisheries are declining you can only blame the gluttony of your local fishermen and a lack of effort to educate them. We all have the ability to give or take when it comes to our fisheries. Just because regulation say you can take does not mean we don’t have a choice not to. We also have a choice to donate, fundraise and lobby to make change The failure of a fishery is not because of some guy selling baits out of his basement. If you don’t like what is happening with you local fisheries do something about it. Look at the big picture and not seek out petty things to blame All fishermen will get more out of their effort if they ask themselves what they can do for their sport rather then point fingers at others Sorry but petty finger pointing excuses piss me off5 points
-
@eastman03 @Big Epp @Apdriver - The tutorial is posted in the "Member Submitted Tutorials" section. If you guys have questions please let me know;)5 points
-
This has been going on forever, whether in fishing or any other hobby or business. I make jigs, and have been doing it for 20 years. When I started doing powder paint it was in its infancy. I then started doing multi-color jigs out of powder paint with the tap brush method, while a good friend of mine on here Smalljaw was doing multi-color jigs using powder paint with an air brush. In 2005 we were the only two at that time doing this with powder paint. The TU community exploded asking us questions on how it was done. I was selling jigs off the wall with multi-color patterns. Myself and Smalljaw literally posted our process on how it was done on TU. This is a teaching site. To this day I do not regret people learning from what I brought to the table. Some guys were able to accomplish what I taught, others struggled and figured it out and others just could not get the hang of it. Fast forward to today. I don't sell nearly as many multi-colored jigs as I did back then because everyone is doing it. In all honesty, it doesn't bother me. This is a hobby for me, it always has been and it will always be . I cannot make a living making jigs. With that said, I try to help people when I can, and if they steal my ideas so be it. This is my perception on the whole thing. Someone will steal your idea if they can figure it out and if he doesn't then China will figure it out and steal it. It's just the way it goes. Life is too short to worry about inconsequential things. JMO5 points
-
LOL! Paint patterns or schemes cannot be owned by any one person or company. I find it ironic that a custom painter is complaining about someone ripping off his paint scheme, when he is putting that scheme on knock-off lures ripped off from other manufacturers.5 points
-
The perfect topcoat is fish saliva..5 points
-
No offence but painting is just that painting. I respect the talent with an airbrush but in the end it’s just decorating a lure that someone else made. There is only so many combinations and if you are matching natural feed things are even more limited Maybe I just don’t get it because my focus is on building and action more than painting. In the end if painting is what you base your business on and competition is hurting you it’s time to find something that makes you stand out from the others. It’s just how business goes Good luck5 points
-
My opinions on painting plastic lure blanks are well documented. I was even reprimanded by the TU management for upsetting paying advertisers. Reprimand is a bit strong, more of a 'please stop it' Strangely enough, people who attempt to copy famous, successful lures do not bother me in the slightest. I know that there is a lot more to copying a lure than shape alone. Most will fail but they will learn something about lures on the journey. In fact, I would recommend trying to copy a favourite lure in the learning process as many experienced builders also suggest. Those who can copy a commercial successfully have all the skills to produce their own masterpieces. I often wonder why they bother, but I guess it is a challenge. I was even considering writing a thread dedicated to reverse engineering a lure without destructive examination even though I have never done it before. I never view the gallery. I am not really interested in the current trends. I do not want my design ideas to be affected by what others are doing. Basically, body shape is a covering over the internal structure although it does have some functionality. Because I am not commercially competing I see no reason for secrets. I even received a couple of angry PMs for revealing design secrets that they had been cashing in on for years. However they need not worry, many read the articles but very few try the ideas out. The few that do are only producing lures for personal use. I probably got a bit off subject with this post, but there you go, I am rambling Dave5 points
-
Bassmaster - Part of this is down to the beauty of the internet. Anyone can learn a skill far quicker and efficiently than they ever could 20 years ago with hundreds of videos available on any subject. This makes many people who had to learn the hard way bitter on the whole subject. I came across this attitude when I first joined TU, I was told to put the work in. I think quick and efficient learning is a very good thing. The question that you should be asking is 'what is the definition of a custom lure'. For most people, custom means slapping a coat of paint on a cheap Chinese imported blank and selling it on Ebay. My definition of a custom lure; to design and build a lure for a single customer with a specific set of requirements, size, action, depth, shape and paint job. A design that is not or is no longer available commercially. Custom could well be just the paint job, but the customer would send you the lure and request a certain pattern and set of colours. If you obtain 500 blanks, paint them with a few of your own best patterns and put them up on Ebay, these are simply lures for sale, and definitely NOT custom lures for sale. I too am disappointed about the whole 'custom' thing. You, because now everyone can encroach on your 'custom' business. Me, because the whole art of lure design and building has been devalued to the point of neglect. Just like calligraphy, lure design is a dying art. I actually own an Iwata but have never opened the box, it has never seen a drop of paint. All my lures are painted white, purely for visibility, to allow me to examine the movement. If I ever bring a lure to market, which might happen soon, it will be painted black. As a compromise, I might make blanks available, probably not on second thoughts. I don't believe in paint as a fish attraction, I believe it is all about movement. Dave5 points
-
Maybe this will help out a little... These are ones I have tested and found the fit acceptable.
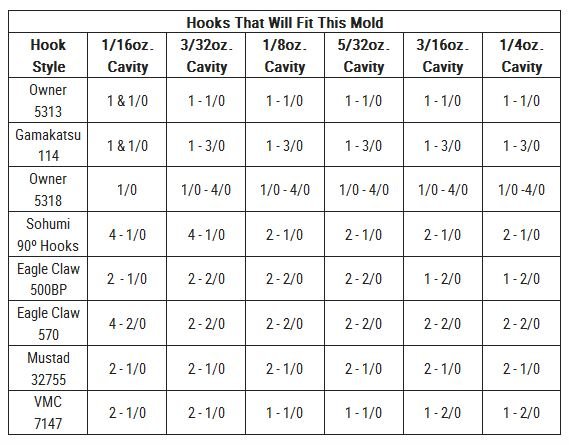 5 points
 -
Beautiful lures! You really do have this stuff mastered. Would those work up here in the US, or would they swim upside down?5 points
-
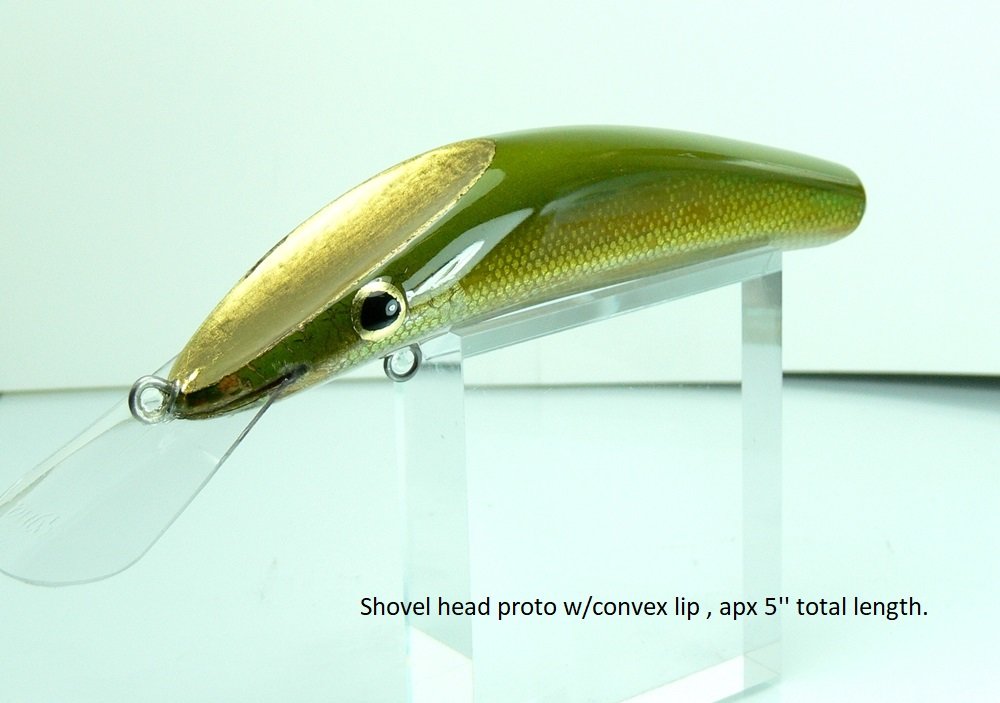
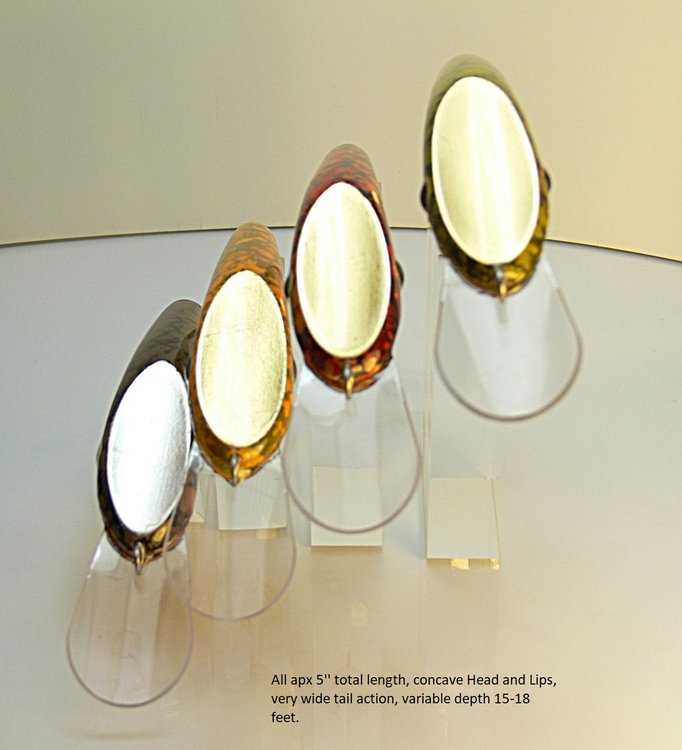
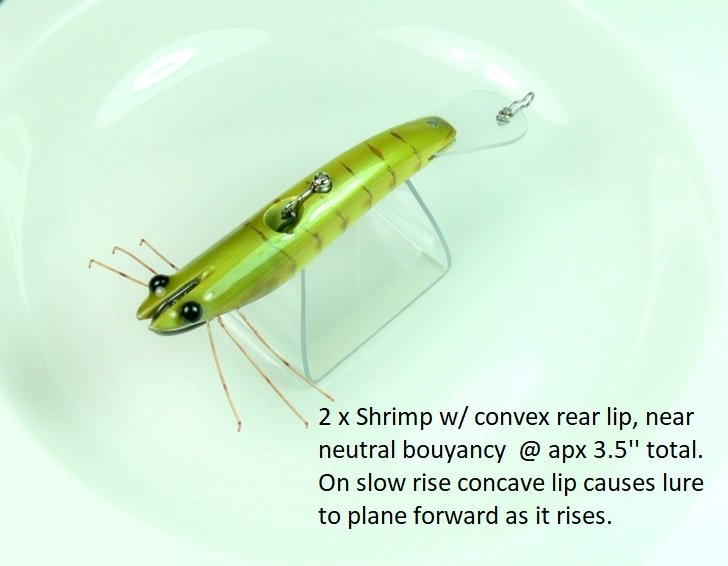
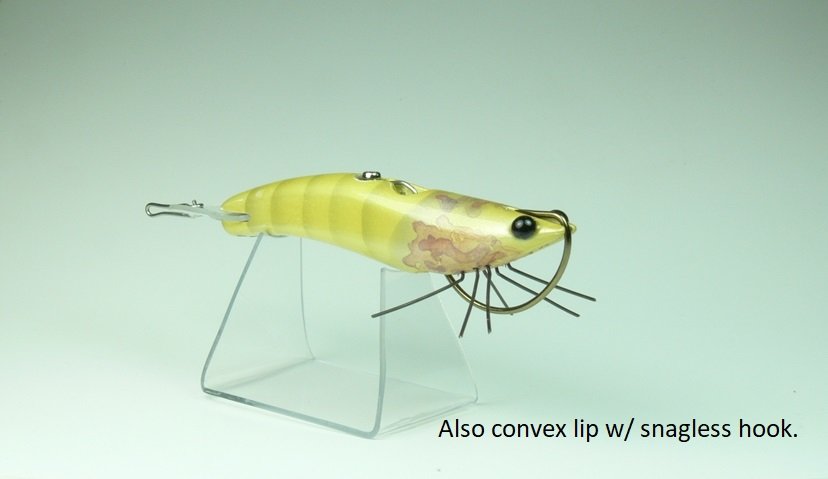
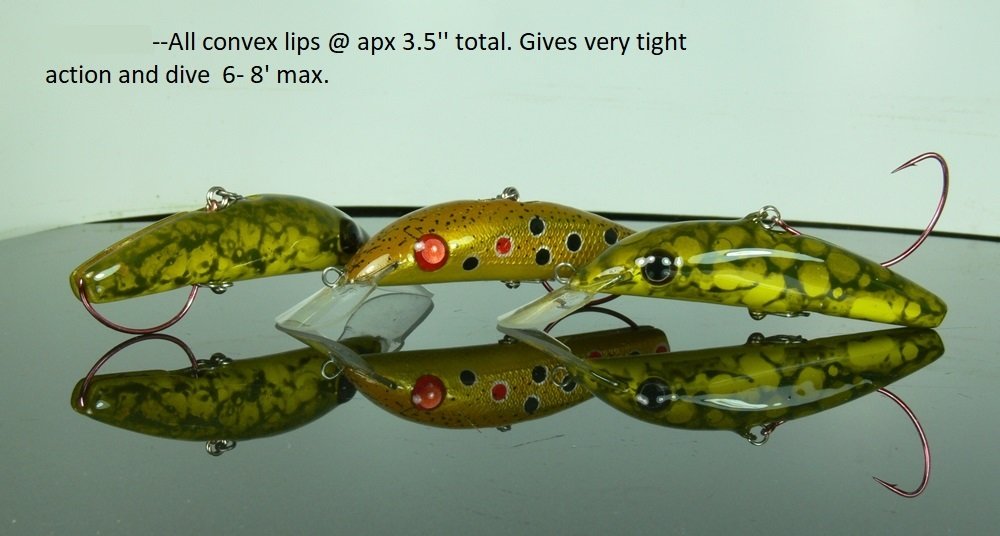
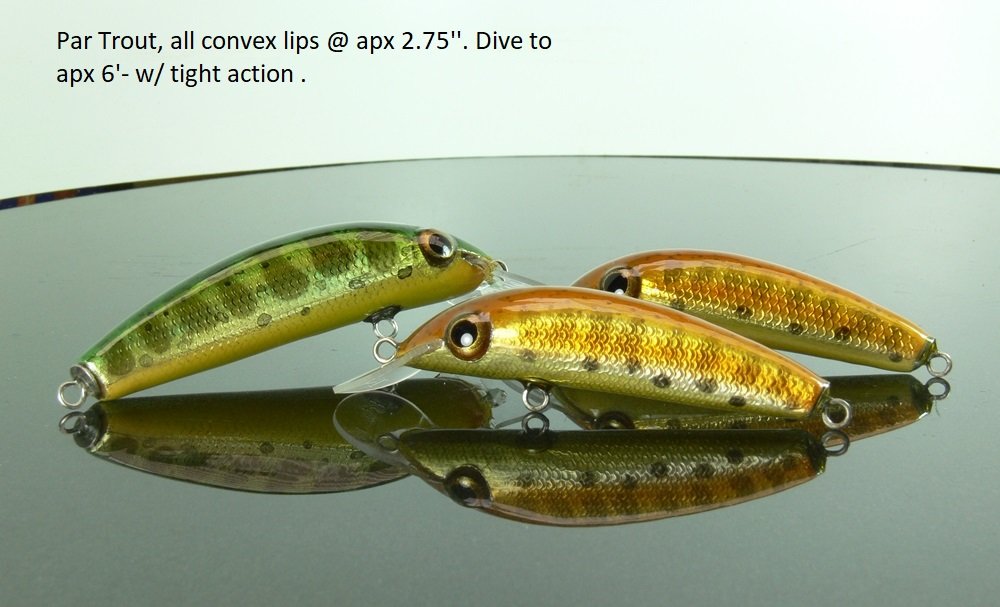
OK, I dug up some old and a few new attempts with convex and concave lips. As we know there can be a lot of variables in action and depth with just one lip shape- I wonder why it's not used a lot more ''Text'' is on each photo, just in case I can't post this many pictures here -----hope this is legal, otherwise I will post them in my attachments, or somewhere?? Pete **** SORRY, pic's 4 and 5 should read ''Concave Lip"

 5 points
 -
Mark - a concave face, which is what you are talking about, is going to increase the vortex strength, a convex will reduce the action. As for '.....to the back', I am not sure what a concave cut into the back of the lure would have. I think it may have an effect on roll. I have just checked a few of my under water videos, and I think that a hollow feature down the back might reduce roll. I am thinking that it would have a similar but lesser effect of having a dorsal fin down the center of the lure. To kill the roll would only require a short dorsal fin, say 5mm (3/16"). But again, as with all my stuff, this is theoretical, but it does fit. Often it is difficult to see what effect, if any, such features have. I am thinking back to my 'various lips' video, were I compared round, square, coffin and shaped lips. It was very difficult to see any difference between round and square, also coffin and shaped. Likewise, your concave back will be a subtle effect. In order to confirm an effect, you have to exaggerate the feature; a wide shaped body with an exaggerated concave back, directly comparing with the exact shaped body with a rounded back. And then, you may need close video, preferably submerged, head on, to observe the difference if it is too subtle, but if the effect is too subtle when exaggerated then then there is hardly any point in taking it further. Who knows, there may be another new idea waiting to be discovered. Whether roll is a good or a bad thing, I do not know. What I do know; is that fish do not roll when they swim. Personally; I do not like roll, but I know other very experienced builders do. So, after pouring my thoughts out, getting back to your point; I think more action due to the concave front end, and a more stable swim (less roll) due to the concave back. Boy I wish I had my workshop and a test tank, I would be out there right now. carving up a bunch of test lures, to test this idea and the lip/body funnel effect. I hope someone takes on these ideas and comes back with a report. BUT, they re only ideas, they not pan out. Of course, rattle traps swim back first, and so the whole of the back length is effectively the lip. Dave5 points
-
Being it’s the holiday season, I thought in the spirit of giving, we all could share our knowledge with one important piece of advice or something you would have told your younger self that would have saved you a lot of time and trouble. For me, I would have told myself to focus on function, not form, looks and being anatomically correct doesn’t matter, just get it to work. Merry Christmas to everyone and thank you for all of your help this year, it’s been invaluable.4 points
-
I grew up in a small business family. As an adult, I chose a different career, mostly because of the hard business lessons I learned at my Dad’s knee. Some guys are interested in building baits as a business. Some of them can build great baits consistently in single or small batches. But very few are able to scale up their production, keep the quality as good as it was as a hobby, and most importantly, run the operation as a profitable business. And if they manage to do it, many find that being an 80 hour a week slave to production schedules and dealing with feckless suppliers and irrational customers is not the dream they envisioned. If you can cheerfully do that, I salute your guts and initiative and wish you the best of luck.4 points
-
Or you could be like me. Add hardener, then find out it's too hard, then add softener, then too soft, repeat......4 points


(3)1425153850868.thumb.jpg.77238c34cfe34a842fe5a732a81d014f.jpg)