
Leaderboard


Popular Content
Showing content with the highest reputation on 12/24/2018 in all areas
-
Wanted To Wish Everyone & Their Familes , Friends A Great Christmas & New Years , For The Ones Traveling Be Safe On The Roads. Mike1 point
-
I also use a one drilled hole method. Takes a little practice to get the feel, but effective. I Dremel a slot or groove in the back of my lip, ( the part that will be epoxied into the bait) put the line tie through the hole, bend and run line tie under bill and to the back of the bill snug to the bottom of bill, then another bend tight to the bill again, and the bend runs through the Dremel groove bent upwards and back toward the front of the bill. Once tight & snug to the bottom of bill and where you want it, I then cut off the access length of the wire and discard it and now the bill is ready to be installed with the line tie in it's place, if done properly the line tie will be very taught, snug and will stay in place nicely by itself. I hope that helps, and Merry Christmas as well.1 point
-
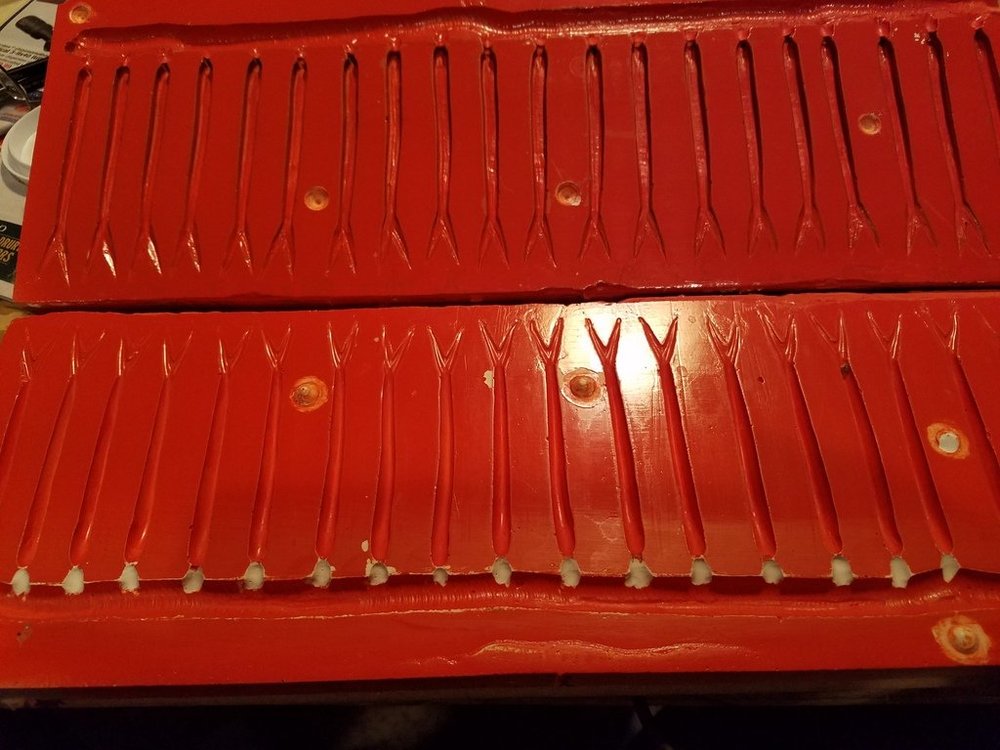
the mold turned out good. I did get air bubbles on the lower half but not bad. I tried to work out the air buy placing a vibrating sander on the bottom of the mold box for a few seconds, and the bubbles came to the top that may have been why I got bubbles on the surface of the lower half.I used glue stick for the sprew and copper wire for the gates. I think I should have drilled a hole in the end of the baits for the wire, the heads of the baits were a little deformed from pushing the wire in. I did vent it at the end of the tails, used a file while the mold was still warm. overall this worked pretty good I did shoot it once. the baits came out dull but were the right shape and very little flash. I know I still have to seal the mold with epoxy or engine enamel that should take care of the dullness of the baits. durhams is overall easy to work with, it sets up hard like ceramic. I also drilled the injection port with a 5/8" drill bit while the mold was still warm, I don't think I would want to try it now since it is hard as stone. I want to thank everyone for their input on this subject. I think I have enough info to get to it, and I hope this helps others with their questions. YOU GUYS ARE A GREAT SOURCE OF INFORMATION! THANK YOU!1 point
-
I read some advise on this forum a while back which I think was very helpful. When I make my stencils, I take extra care to remove any plastic burrs from the inside of the stencil. For many stencils, I use a Dremel tool to cut them, which can leave burrs. I’ll sand them with steel wool and also use an Exacto knife to remove burrs. I also prefer to do my stenciling as an interim step, so I can cover up any marring with subsequent layers of paint. I also found that stencils that are too form fitting can cause marring even without burrs. I trimmed those stencils down to reduce the rubbing that occurs taking them on and off.1 point
-
Use hi temp engine paint for mold release between halves
 1 point
 -
you need a vent for each cavity. at the tail of each bait, cut a line straight out to the end of the mold. This allows air to . shoot the plastic little warmer and slower1 point
-
If you keep having that problem, shoot some of the createx clear over the base coat. It dries fast , then use your stencil.1 point
-
Interesting, Thanks for sharing AZ Fisher.1 point


