Leaderboard


Popular Content
Showing content with the highest reputation on 11/16/2020 in all areas
-
I have been using super glue since the 70's, so this is kind of embarrassing to admit, but I just figured out how to keep the little silicone caps on my ZAP super glue from getting clogged with dried glue and then sticking to the glue nozzle. I took the same artists brush I use to apply the grease to my reel gears and put a light coating on the inside of the cap and on the shaft of the nozzle. Amazing, no more stuck caps!2 points
-
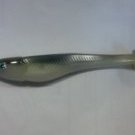
Hey TU Folks! I was making some silicone molds the other day and noticed up on a shelf that I have a ton of pigments that I rarely use. I've been tossing around the idea of a hard bait with plastic or rubber fins and was wondering: Does anyone know whether or not adding these (mica powder) pigments to clear silicone hinders the silicone's ability to set properly? I was thinking I could just order some clear silicone and add the pigments to make fins for hard baits. Have any of you ever tried this or have a better method of making fins? Thanks!2 points
-
Yes sir, I have found several color variations for the desert southwest, I did use mass produced colors as a starting point but tweaked the colors over the years, some are fairly close variations while others literally I have had people laugh at until they see how they catch fish. 5 different variations of the 1.5 just with paint, total about 20 different variations of the same bait with finish, snap rings and hooks. Sometimes it was as easy as just lightening up a color or 2 on a bait, Other times very bold colors instead. One of the main differences that I do is fade/feather my paint into the next color and add a highlight overall that can only be seen at direct angles. I am always pushing the limits of the baits with weight, multiple coats of finish, split rings and hooks size.2 points
-
I am not quite sure how they were made. I have multiples of some of those types of baits. On the some of the ones I have fished, the hook rash has gone through to the body. So, I can tell they are not printed decals. It looks like some base colors were painted, then some highlight colors painted in certain areas probably by stencil, then an ink stamp was used to make the fine details (scales/fins/lateral line/gill plate/ circles around the eyes), and on some color schemes then additional paint was applied in select areas on top of the fine detail. The fine details are typically black ink. Some of black details are so fine and crisp it looks like it has to be ink and not paint. I don't think they could do that type of printing in the 70s and 80s so I am guessing it is a stamp. The mud-bug for instance - painted brown on the back, then yellow painted in areas with a stencil, then the black carapace marks stamped? on there. The mud-bug bellies are either pearl or orange depending on the lure and black leg outlines stamped on.2 points
-
Good reply Anglinarcher. My prey are bawal, a deep bodied very aggressive fish, which explains why I only need a belly hook. Dave2 points
-
Anglin, Thank you for taking the time to explain this. Fantastic post right there. I learned a lot. I'll use all of this as I move forward with my lure making. Thanks again! Most of the trout I fish for are 'stocked"....and I would think might not be anywhere as aggressive as a wild trout. This might be why the fish I catch are only tail hooked. Like you said, they are simply nibbling at the tail of the lure.2 points
-
Tough question for sure, and a lot of personal opinion is involved. Personally I think it depends on the size of lure, the type of fish you are after, even the type of lure you are making. I should take more time to explain myself on this, but this is the short version. (This could take a chapter of a book to explain) On species that are less aggressive, like many freshwater trout species, I find that the tail hook is important. On larger lures, lures that often work much better than people think, the trout will tail tug or test the lure first and tail hooks really up-the-catch rate. Still, when the fish are aggressive, the trout will hit the front and on larger lures a tail-only hook will miss the strike. On species that are more aggressive, the real predator species, or any species that is fired up, they are eating and an eating fish eats head first so that they can swallow the fish (presumed thing we are imitating) without the fins chocking (getting stuck in the throat) the predator. Even species that "stun" their prey first usually strike head first or center body, so hooks placed more toward the head seem to be the ones that hook up. On lures that invoke reaction strikes, the front to center hooks usually are the ones that hook up IMHO. On lures that are strait swimmers, ones normally used for neutral mood fish (based on active, neutral, or negative moods of feeding fish) the tail hooks are often the ones that take the most fish. On negative mood fish, fish you may need to put the bait on their nose and keep it there for a time, the strike may be at any point and hook placement is always a guess. I could go on and on, and the lines get blurred a lot: for every rule there is an exception, so I don't want to even start trying to say one is better than another, but.......... here is my best advise. On smaller lures relative to fish size (how small is small?), when fishing for aggressive fish, front hooks are probably all you need. On larger lures, relative to fish size, fished for feeding fish, front of center hooks are probably more important, but tail hooks help. On any lure fished for neutral or negative fish, especially larger lures, front of center hooks and tail hooks are important. And..... well you get the point. In my experiences, I have fished a lot of very clear water. In my area, trout, like Rainbow, Cutthroat, and Browns are a common target. I have watched them follow a lure for several feet and just keep picking at the tail. Without a tail hook catching them would be impossible. On the other hand, I have also seen the same fish just appear out of the dark and grab the lure by the front and than a hook front of center is critical. As for a single hook, when used for a tail hook it works fine for me. I often replace my tail hooks with a single hook to make releasing a fish easier. When used for a front of center hook the hook often lays along side the lure and does not connect with the fish. I have used trout as an example because I have so much experience with them, but I have seen similar behavior in species in the Gulf of Mexico, off the coast in the Pacific Northwest of the USA, Musky and Pike in Minnesota, and on and on. I think it was In-Fisherman Magazine that I first saw the explanation of aggressive, neutral and negative feeding moods of fish, but consider this concept when designing your lures. It might help some to answer your questions.2 points
-
As I do not build gliders or jerk baits, all that I can do is throw a lot of theory out there, to help you understand how the lure works. Understanding the theory helps the builder to design a lure to take advantage of the forces accordingly. Of course, experienced glider builders will have already figured this stuff out even if they do not know the reasons why their lures work. Experience is a valuable tool, theory only gives you a ‘leg up’ at the start. As you have already figured out, this is a very complex issue with multiple factors to be taken in to consideration. The apparent ideal solution for a lure to swim a long distance with efficiency is an arrow with all the weight at the front. But we already know that this would not work in water as it does in air because of the nose down attitude, like I said; multiple factors. Also, the super aerodynamic shape of an arrow is designed NOT to produce vortices. When we fire an arrow in air for maximum distance, we apply great force and we aim up at 45°, and due to air resistance, the arrow falls at 70°+. Target sports for darts and archery only use the top of the flight arc. Also the arrow is designed not to swing from side to side, a definite requirement of the lure. As for the lure; we want it to travel in a straight line as far as possible, then on the next pull, we want the same again only in a different/opposite direction (left/right). So, what causes this desired change of direction? The answer is vortices, my favourite subject. A waggling lipped lure generates a rapid series of vortices that cause the lure to waggle left and right. The sharp lip causes vortices to be created at a relatively low speed, and the theory of the ‘Kármán vortex street’ causes the vortices to rapidly alternate left/right. But still, the lipped lure requires a minimum speed to operate. The lipless glider still creates vortices but has a much higher minimum speed to create the vortex. The operation of the lure is to tug or jerk the lure. A single vortex is created and no more as the lure is already slowed below the vortex threshold. This swirling vortex sucks on the rear half of the lure body causing it to change direction. The next jerk causes the vortex to form across the back of the lure and sucks it in the opposite direction. As the lure slows down, that single vortex is still there, working on the lure, sucking it further around. This effect can be seen on multiple section swim-baits; a steady, constant retrieve causes alternating vortices that act on the rear of the lure causing that beautiful snake action. BUT, if you jerk the jointed swim-bait, the lure curls around even 90° and beyond. Check out the video, you can almost see the vortex sucking the lure around in the jerk sections with a little imagination. The above is the basic mechanics of what is going on. Now we have to figure out how to use the mechanics, the theory, to make the glider lure swim how we want. To start with, I use an analogy that I have talked about many times; Grab a 2 feet length of dowel in the middle in your fist. Rotate your wrist rapidly left and right. The dowel swings fairly easily. Now add ¼ pound of lead at each end of the dowel and repeat. The dowel is much more difficult to swing left and right. Now put the two weights at the center of the dowel and repeat. Once again, the dowel swings easily. This is the effect of inertia. We want the glider to change direction but we want to resist the continuing change of direction. The solution is to increase resistance to direction change by increasing inertia. By placing weight at the front and rear we increase inertia and resist the change of direction. But as always, design is a compromise. If the inertia of the lure is too great then the change of direction will be minimal or even nonexistent. You may end up with a straight swimming torpedo. Another feature is the depth of the lure body that the suction of the vortex acts upon. You may think that a deeper body with a larger surface area would resist the side movement, this would be incorrect at least according to theory; the suction force of the vortex acts on the side surface area of the lure, reduce the area and reduce the force. But yet again, design is a compromise. If you reduce your lure to a torpedo cylinder, no vortex will be created in the first place. If your lure swings excessively as it slows down then consider reducing the body depth. The reduced depth will also reduce resistance to forward motion. Once the glide motion clears the vortex, it will travel aerodynamically like a torpedo. We only require the vortex sucking effect at the initial tug of the lure, if the glider can swim clear of the vortex then it will continue in a straight line for more distance. If the glide distance is short and the lure continues to turn; reduce body depth and/or extend the weights to front and rear. If the lure does not change direction then no vortex has been created, you have a torpedo. You can add a flat to the top of the nose to help the vortex form, or increase the depth on the next build. Gliders need to naturally float horizontal, but the rest is a compromise between body depth and ballast distribution. Dave1 point
-
If you are prone to headaches, you may want to skip this post. The Dzhanibekov Effect, also known as the intermediate axis effect or the tennis racquet effect. Is a fairly new theorem of motion, but one that we have all experienced at some time. Me personally, as a table tennis player in my younger days, when I would flip the bat in the air and observe how it rotated 180° before being caught. I would repeat this action over and over, marveling at the motion and never giving it a single engineering thought, but at that time I was just a school kid and not an engineer. I am not going to try to explain this motion. I will leave it to the linked video for that. The reason that I am posting this rather obscure enigma is that I believe that there is a possibility of a new lure motion, one not yet discovered. I am thinking about prop lures that travel in a straight line. There might be something here or not, but as I do not have a workshop, other than casting out a few brain cells at the enigma, I am unlikely to work the idea in the near future. So, rather than keeping the idea a secret, I decided to put the idea out there to y’all and see what you think. Anyone who thinks that there is nothing new in lure design is sadly mistaken. I firmly believe there is a lot more out there to be discovered. Dave1 point
-
I have had some High temp silicone molds made in the past. Does anyone know where I can buy the High temp silicone at. Thanks1 point
-
I've used Permatex red before and it woks really well. If you want bigger tubes, type in high temp silicone, in google. Lot of items come up. You will have to read, which of them are the highest temps.1 point
-
As @azsouth and others have stated here I think a lot of it boils down to simply trusting the bait you are throwing. similar to any product one has trust in you just find something that works and you go with it. That said, and more specifically to your question, all companies are going to have patterns and colors that are similar across their product lines so in my opinion the company that produced the bait is not as important many other factors. @azsouth and @JD_mudbug eluded to the uniqueness of a pattern/color being important where fish may have seen many varieties of the mass produced stuff hundreds of times. This is definitely an important consideration for me. In pressured waters I want to start out throwing something that the fish have not gotten smart to. Sure, you're gonna catch fish using patterns and colors similar to what others throwing but a unique looking morsel may be exactly what that lunker requires to abandon the thought process that has allowed him to get so big int the first place. I do a lot of pike fishing. When pike get big they tend to begin acting like musky in that they don't just go after anything that swims in front of them. Probably the most important thing for me when I am painting a lure that I know I will be throwing for big pike is the ability to "match the hatch" if you will. For big pike, especially those that are used to seeing lures, what better way to take the guesswork out of what color or pattern they might want than to just match what they are already eating? Tight lines man!1 point
-
True that.1 point
-
Most of the major brands have a wide array of colors. It is hard to just single out one brand. SK has a lot of colors I like. 6th Sense makes some nice ones too. When I make a lure, the color just comes down to personal preference or perhaps to fill a hole in the color spectrum that I can’t buy elsewhere. I repaint some brand name lures with black or black with blue flake because that color is hard to find in a hard bait. At night, dawn/dusk, and in muddy water, black is usually a great choice. A lot of people use a certain color based on confidence. I think that becomes a self-fulling prophecy. Once you catch a fish on a lure, you get some confidence in it. When you have confidence in a lure, you will fish it more often, take more care with your cast targeting, retrieve speed, imparting any action, etc. I am probably more attentive when fishing a lure I have caught fish on and rarely miss a hook set. That lure then becomes more successful and one of my go-to baits through my subconscious actions and not really due to any extra detail level in the paint scheme. I tend to give up more quickly on an unproven bait or color choice. That unproven lure or color pattern may not get a fair chance to be successful. That is why the guy who uses the same craw pattern for 20 years catches most of his fish on it. He is throwing that lure way more than other options. In my area, we have no shad. We have golden shiners, yellow perch, bluegill, and smelt. You see more gold lures being used in my area as opposed to the sexy shad color. Gold with black back and orange throat is very effective because it duplicates most of the local baitfish. But, as Azsouth said, the opposite can also be true on a heavily fished body of water. If the fish see hundreds of the same color lure going by, some different color (even an unrealistic color) maybe more successful. I have used lures that ranged from incredibly detailed to cartoonish color schemes. Overall, I have not seen the detailed ones out perform the simple paint schemes. On a particular day, one may outperform the other. For example, in clear water with a slow presentation, the detail does probably help because the fish get a much better chance to see the detail. I admit that I do admire a great detailed paint job. But, I think the lure's action, diving depth, and overall color are more important than any realistic detail.1 point
-
I use the thin and the medium. I've never tried the thick. For me, the thin works for attaching eyes to crankbaits, for attaching tight fitting crankbait bills, and for making baking soda filler. It also seals balsa baits really well, and also PVC trimboard baits. The medium works well for anchoring weed guards, and installing crankbait hardware. I use the ZAP accelerant to set the medium, once I have something glued and positioned.1 point
-
This really works well! Thanks again. The eyes pop like crazy once you get epoxy on them. Here are a few from my first batch. I need to sharpen up the cheap leather punch I got for this as it kinda was tearing it off. I think I need a harder backing material to punch the eyes out cleanly. More experimenting will happen yet.
 1 point
 -
Dave, I love how you explain things so they make sense. Thank you. P.S. Your Oscar for videography is coming.1 point
-
That's pike fishing for ya. Sometimes when I'm throwing big waling baits at pike they'll miss the bait by three feet or land on top of it and get snagged.1 point
-
Hello Big Epp, in my case, given that I use Balsa wood, i rather to use a passthrough wire. In this way all tension and forces are absorb by the stainless steel wire instead the wood. The wood gives bouyancy and shape. Believe me that you will have excellent captures. It is incredible. Next time in the highlands creeks I will take my camera to record some captures and releases.1 point
-
I am just a hobby builder, so bear that in mind when you consider my method. I typically cut my lip slot while my balsa blanks are still rectangular, so they're square to the bait's centerline. After I've shaped my lure, and I've drilled for my ballast and hardware, I'm ready to add the lip. I seal the bait, including the lip slot, with runny super glue, It penetrates the wood, and makes the surface wood stronger and harder than the raw balsa. It acts as a sanding sealer, because it locks the fuzzy surface wood, so it lets me finish sand the lure blank without removing any more wood. I add my lip before paint. Because the slot has been reinforced by the super glue, I dry fit my lip into it, to be sure that it will slip in relatively easily and that is still properly aligned. Then, after I've roughed up the lip surface that will be in the lure body with 80 grit sandpaper, I add some thicker, gap filling super glue (med. ZAP glue for me) to the lip slot, and push my lip into place. I smooth out any squeeze out with my finger, and then, once I've checked the alignment again, I add a drop of accelerant and let the lure sit for a minute to be sure the glue has set. If there are gaps between the lip and the lip slot, I add a drop of runny super glue to it. The runny stuff will wick into the gaps, and make it solid. Another drop of accelerant, and I'm ready to add my hook hangers, line tie, and ballast. A word of caution: Have a rag handy to wipe the excess glue off of you finger, so you don't wind up gluing your finger to the blank (been there, done that) and DON'T let the accelerant get onto the glue on your finger. It creates heat when it cures the glue, and that hurts! I'm sure there are lots of other ways to do the same thing, but this is the way that works for me.1 point
-
If lexan/polycarbonate bills aren't scuffed or scored in some way no real bond will happen. I use a 1/16 drill bit to put dimples in the material ( lexan/polycarbonate ) for grip for any adhesives I use and never had one fall out.1 point
-
OK, I'll venture a little help on this. 1st, the Pro-Tec paints seem to be brighter, better quality then say a Harbor Freight paint. In general, the Pro-Tec seems to melt more uniform, cure better with post heating, etc. Still, having had lots of construction projects done with power paint, and "borrowed" some of the raw paint, I have had excellent results from Non-Pro-Tec paints as well. Summary, You don't always get what you pay for, but you might waste a lot of money finding the bulk Powder that works as well as Pro-Tec. Power Paint goes a long way so if you are "new" to pouring, stick with a powder paint made for jig painting. If you get into production, then buy one color at a time and test the alternatives.1 point
-
You need to mix it exact as a 1:1 ratio. How long are you mixing it for? Temp that it is curing at?1 point