Leaderboard


Popular Content
Showing content with the highest reputation on 12/15/2020 in all areas
-
The jig was purposely done as a "hand tool". Clamping a lure to drill one hole is even more time consuming than any other method I've seen/tried, so I ruled that out fairly early. The jig shown above is being used with a drill press. I looked up "center drill" because I was unfamiliar, and that wouldn't address the issue, either. I'd end up just having two jigs then - one to center the center drill on the lure, and then one for the smaller drill bit - which would hide the pilot hole from the center jig anyway, so there wouldn't be much value - unless I got the mini mill table, and clamped each workpiece. Again, time... I'd be spending more time at the drill press than the bandsaw! Once I addressed the issue with that jig as stated in a previous post, it's doing exactly what I wanted it to do. However, you've given me some things to consider for future projects, or "one offs" where significantly more time would be invested. You've also made me realize that I may have been a bit aggressive in my previous wording of what my goals actually are; that is to say that I don't need the lures to be 100% carbon-copy identical in every single physical aspect, dimension, measurement, and hole placement. What my goal is is to have repeatable performance of the lures from example to example. If that means that a variance of +/- .004" for the tow hook hanger, or +/-5g of weight, etc etc. After all, as mentioned by several posted here, 100% repeatability by hand is largely a pipe dream. So I'll settle for repeatable performance, if not identically repeatable production. Hopefully this helps to clarify exactly how far down the rabbit hole I'm wanting to go.3 points
-
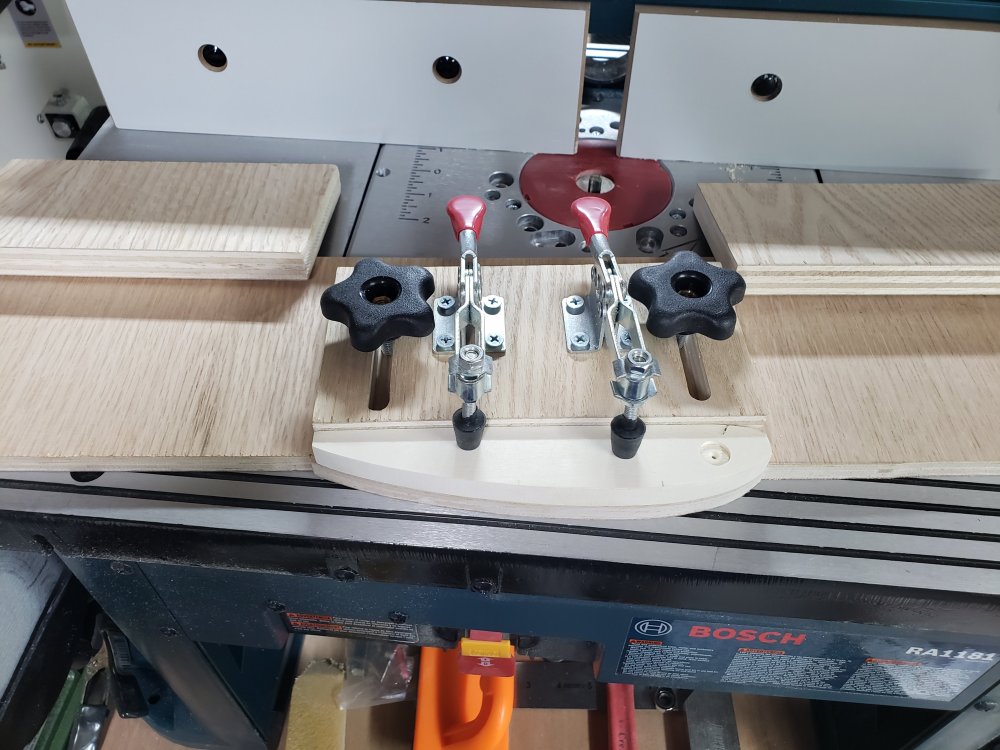
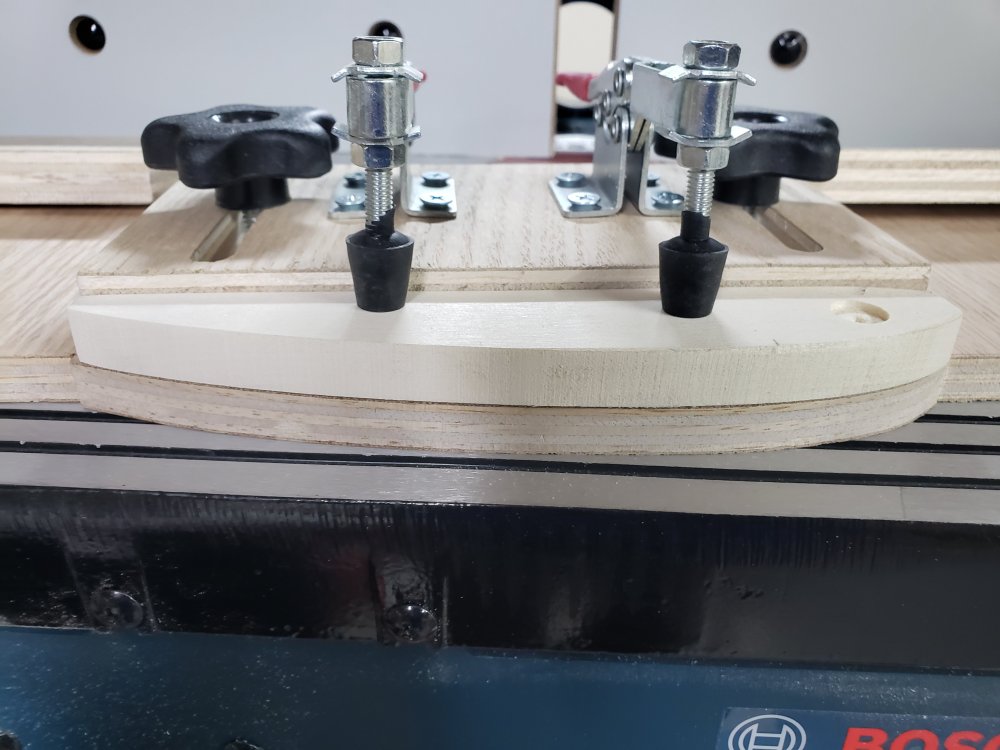
In my post about getting the screw eye holes in the EXACT middle of the lure, I had mentioned a jig I made for use with a flush trim bit on a router table. It occurred to me that some folks might like to see it. So, here it is: Used 1/2" plywood for the base, and did the profile for the back of the lure on the band saw and then the belt sander. Drilled 5/16" holes, then used a forstner bit to recess the heads of the t-bolts so it would sit flat on the router table and the t-bolts wouldn't scratch things up. Used a 3/8" trim bit to route the slots into a piece of 3/4" plywood. Got the t-bolts, the knobs, and the toggles all from Amazon for like $15 or something like that. I can create additional 1/2" plywood templates, and just move the hold down from base to base depending on what lure I want to produce. The base is 24" wide and the back of it is 6" away from the back of the lure (where the router bit would be). The bait this makes is 8" long, so I've got plenty of room to keep my hands away from the router bit. Only change I think I'm going to make it to add some fender washers under the knobs. This particular setup works great for this lure since the belly is flat (all except for by the nose, but that takes 5 seconds on the belt sander to create that small contour). However, if I decide to make one in the future that has a contoured belly, it would be easy to do. I'd just create another base from 1/2" plywood, and if the lure was 8" long again I'd do the back profile maybe 3.5" off one end, and then the belly profile 3.5" off the other end, leaving a 1" gap between the two profiles. Then I would cut another piece of 3/4" plywood, and cut the negative of the back contour into it, then add toggles. I'd use the toggle base shown in these photos with the flat side to get the back profile, and then I'd flip the bait over, move it to the belly profile side of the template, and the back would fit into the toggle base then. Hopefully I explained that well enough. I'll be sure to come back and post pics when I do it. As my buddy says: "I used my tools to make tools to use my tools."
 1 point
 -
 Not exactly lures, but close. Some bottle openers that I made for Christmas (good painting practice)1 point
 -
 With some help from the forum here, I finally got around to making my own eyes, it is a fun project. And a good use of extra epoxy. Need to be a bit better at getting rid of microbubbles next time.1 point
 -
before reading your description I was gonna ask, "what did you use for the lips?"1 point
-
I think FM Bait Co. in Leitchfield, KY only requires 1000ct. minimum per color/bait.1 point
-
As Travis said, Swede was the one that used to provide the pellets before he passed. His source was the same as Rapala. I remember that there was different characteristics of propionate, so yo using the correct one was important. If any can read Finnish, I’m sure the info is common knowledge on their luremaking forum.1 point
-
A v block is the best for cutting perfect angles on round pieces. You can spin test it then cut your lip slot. How To Make a V-Block on the Table Saw | Woodworkers Guild of America - YouTube1 point
-
There is a company in Windsor Ontario, Canada. Bondy Baits They make a lot for Bass Pro1 point