Leaderboard


Popular Content
Showing content with the highest reputation on 01/07/2021 in Posts
-
@exx1976 Do you mind sending me a DM about what it was you found out?2 points
-
Try posting this in the Wire Baits forum. You'll probably get better ideas there. For lead ingots Ebay.2 points
-
Hmmm I'm kinda curious myself, as I've only heard good things about the epoxy. I don't want to invest in some if it doesn't live up to the claims.1 point
-
I have two HP-CS brushes, and have not had the problem you describe. To be clear, you're saying the trigging is sticking down - not back - so it continues to deliver air (and not paint) after you remove your finger, correct? I would think a drop of airbrush lubricant should address that problem. Both my brushes included a small tube of it in the box when I received them. I'm certainly no airbrush expert, but I have taken mine apart several times. Since the needle goes through the trigger, I would check to ensure the needle isn't bent (accidentally from cleaning?), and that the trigger isn't twisted (not even sure if this is possible? I don't know that it would go back together). Barring that, if possible, I would consider calling Iwata support, and/or the retailer you purchased it from. Might be easier to swap it out for a new brush. As for soaking, I read or saw somewhere that you should not soak any of the parts for longer than 5-10 minutes since it can destroy them. You don't mention how long you soaked things for. Hopefully it was less time than that. Additionally, I'm not sure about the small steel wire? Could have perhaps scratched something? They make brushes for cleaning airbrushes, they're available on Amazon (I bought a sprayout pot kit that included them, as well as a nozzle cleaning tool). Please be sure to come back and let us know what you figure out!!1 point
-
I added the WDB100 double keeper to theManic Mullet mold... Nothing will come off. LOL.. It's an easy modification.1 point
-
Update on learning curve. Cut the stainless rods a bit short so as not to interfere with the injection port. Made one a bit longer to see if that actually would happen. It doesn't. Actually makes a better bait. Will order more stainless rods, and cut them longer. also on my learning curve. Removing the stainless rods is a *%^$ if you forget to lube them. Note to self Remember to lube the rods.1 point
-
Reading my last years Do-It catalog, they show a " Crystal Clear" hardener. Gonna drop them a line and see if theirs is truly crystal clear, or if that's just their brand name.1 point
-
The Owner ST35 come in size 6 up to 2/0 at TW which fit a good range of baits. The ST35 in 2/0 are bit bit bigger than other 2/0 hooks I have. The 2/0 is really somewhere between a 2/0 and 3/0. I think the Decoy T-S21 come in sizes 8 to 1/0 but they can be hard to find. They used to make up to 3/0 but I haven't seen any 2/0 or 3/0 in a while. I knew someone who used to travel to Japan who was able to get them for me. Mustad short shank KVDs EWG come in sizes up to 3/0. The Mustad 3X Triple grip go up to 7/0. Proberos 35647 trebles come in 8 to 3/0 (and maybe larger sizes) but you have to T them with pliers. Even though it may weaken them some, I have not had any failures in 1/0, 2/0 or 3/0. They are cheap. I have only made a few baits that needed a 4/0 or 5/0. It looks like I used bronze Mustads or VMCs that I T'eed in a vice. I usually only put the T hooks on the belly (or on the back if the lure has hooks on top). I use a regular treble for the tail hook.1 point
-
Hook points will wear through D2T eventually. D2T is one of the hardest and thickest topcoats out there. The only real solution I have found is to minimize the hook points scraping against the the lure. I will sometimes use nail polish or thinned epoxy to fill in a hook rash groove. That only extends the longevity some. Best to do that before it gets through to the paint. I have been switching over to T-type trebles (Owner St-35, Decoy T trebles) for belly mounted hooks. Those type of hooks reduce hook rash. When you put the hook on, make sure the flat side is against the lure. You can bend some trebles into a T with pliers. Some trebles like Owner St-36 are too stiff to bend and will break if attempted. So, be careful when attempting to do this (gloves, safety glasses). KVD triple grip trebles also reduce hook rash a little as the points are tipped in towards the shank a bit.
 1 point
 -
I like double pin joints, this gives maximum freedom to the hinge as one joint has two pivots. Strength-wise, the load is distributed along the length of the pin, perpendicular to the pull direction, you would have to rip the lure in half to break it. There are so many joint solutions and I cannot say that any are particularly bad. Whether a joint will fail or not all comes down to your design; screw-eyes too short, area around pin to thin, inadequate sealing, etc. Hinges are all about free movement, even the slightest resistance to movement will cancel out the action. Rear facing V-joint shape: head < < < - tail, this gives a wide 'S' action, reverse the 'V' gives a narrow 'S' action, therefore by deduction, a flat hinge face will give something in between. If aesthetics are important to you then a stepped 'piano hinge' style may be appealing. It is all personal choice, you cannot go wrong Dave1 point
-
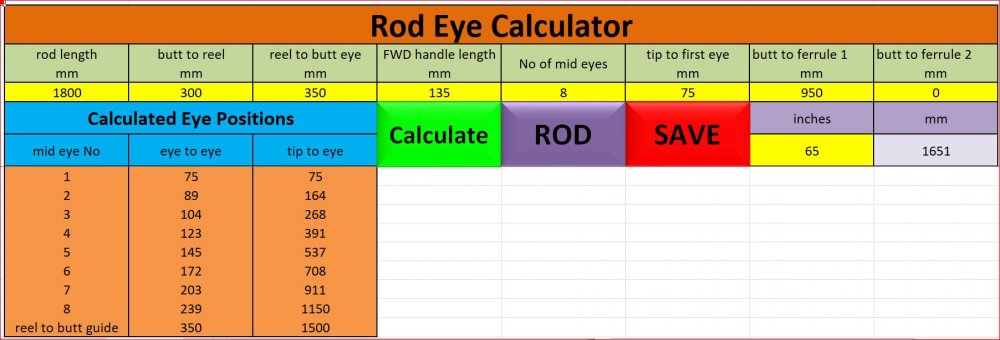
I have written a spreadsheet for calculating eye positions for rod builders, for use on laptops or desktop computers (NOT tablets). I have offered something similar in the past but this is an updated and much improved version. If you buy quality blanks then this data is provided by the manufacturer. This utility is not intended to replace manufacturer data. Ideas and suggestions will be accepted. You adjust the ‘tip to first eye’ distance and the ‘reel to butt eye’ distance to get a layout that works around the ferrule position(s). Press the ‘ROD’ button for a graphical representation of the rod. This utility is metric, but if it proves useful, I am prepared to produce an inches version. I have included an inch to mm converter for my American friends. A simple but powerful utility that I use for my own rod building. PM me your email address if you would like a copy to have a play. Dave
 1 point
 -
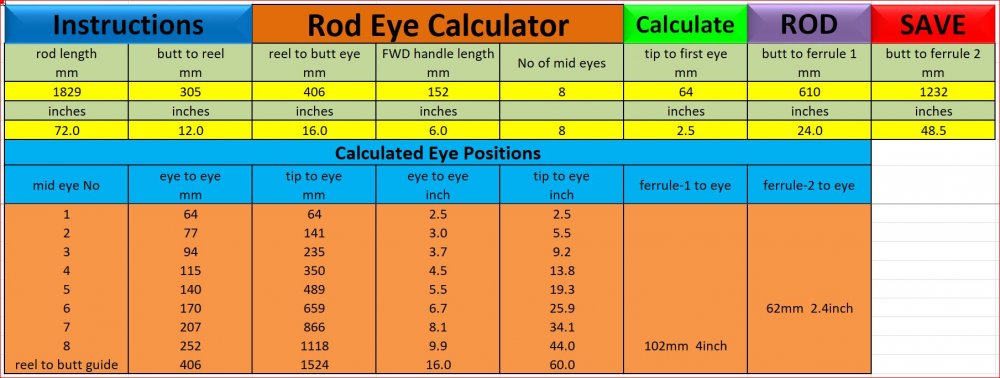
I have expanded the utility to include inches. I have added two columns to show the distance to nearest eye from ferrule. Dave
 1 point
 -
I make my own very cheap solid fiberglass 65” rods. The competition ponds here have overhead shelters to protect from the rain, hence 65”. I had too many failures with commercial hollow rods. The local tackle shop sells all the standard parts. Because I am using a solid glass rod blank, there is always a large gap to fill. I do this with string neatly wound on, in ¾” sections an inch apart. Once I have a very easy slide fit, I soak the string sections with runny CA glue. I slap on a generous coat of 5 min epoxy and slide the handle blank into place. If your gap is small then yes, tape is the way to go. The point of cork is the feel and grip. If you don’t peel the plastic off then you miss out on that quality feel, a bit like leaving the plastic on your car seats. Dave1 point
-
Huge thanks to Musky Glenn...... I appreciate the the tip. They had what I needed and an oldie but goodie reel is back in action!!1 point
-
Dadsoletackle seems to have the parts, at least they list the handle for $16.99.1 point
-
I have had good luck with spray can lacquer in clear gloss. Dries quick and is durable. Couple of coats should do. Don't spray when humidity is high.1 point