Leaderboard


Popular Content
Showing content with the highest reputation on 01/12/2021 in all areas
-
Fairly straight forward equation and several online calculators or if you have an experience with excel can whip it out. Volume of the hole (cylinder) is needed then you multiply by density. So the weight would be: Wt=[π⋅r2⋅h]⋅ d So all you need to do is substitute in your known variables. We know pi, r2 is equal to the diameter (simply the drill bit size used), h would be the height or in our case the depth of the hole, and finally d is the density of the material used to fill the hole.2 points
-
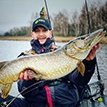
 Big fat winter pike from the kayak:)1 point
 -
Hi all, this may be a daft question, as I'm quite good at them . Okay so I would like to ask if anyone has a recorded table of pre drilled hole diameters & depths, to gauge the weight of which a poured lead slug would weigh? So if I have a bait that say needs 45g of lead for my desired action, what hole diameters would be needed to pour/drip the correct 45g of lead in to the bait body? Obviously I'm assuming we keep the depth of the holes to a minimum for our lures. I was going to do some testing by drilling different sizes holes & depths Into some wood, so as an example take a 10mm drill bit drilled to a depth of 20mm then fill with lead and weigh, but then i thought someone may have already done such a task or has information that explains this much easier than I've probably asked it Many thanks for your input. Andy.1 point
-
I don't think you'll have any problems with any of the folks you'll be dealing with nowadays. Lots had problems with Delmart, but i couldn't have asked to be treated any better myself. Did have a problem with BTS & canceled my order, but Bob got bad sick is what happened & he made things right when he was able to get back at it again. I wouldn't have any problem dealing with him now.1 point
-
@eastman03 What I do is to use the "Stroke" function in Photoshop, not sure what it is called in Gimp, to make a thick black outline around the eye. This does two things: 1. It gives the eye a cool "shading" effect, and 2. it gives you something to align the leather punch with. The thicker you make the stroke the more forgiving it is when punching them out. . My leather punch has a slot or chamber I guess you could call it that allows me to look down into it when placing over the eye. It still takes a bit of practice to get a good alignment but after you've done a few alignment gets easier.1 point
-
Iwata makes a lube for their guns. Get some. If it still sticks then you have paint in your trigger assembly. Skeeter1 point
-
I think i will try either some of the floatant materia or a high float plastic ,for shakey head worms, ned rig baits & baby brush hogs.1 point
-
If those are your first baits man you are well on your way! They look great. In my day job I am a network engineer so I can appreciate the fact that you used the two sides from an old computer case for your painting booth. That's awesome man:) You have for sure found yourself in the land of bait makers here. Everyone here is extremely helpful and listening to their advice will only make you better at this amazing hobby. There have been so many good tips provided here and I'd like to give you a couple as well. Just a couple of tips to make things easier for you I guess. I used to have HP printers almost exclusively. Every time I would buy ink it would come with a free pack of 4 x 6 photo paper. After years of buying ink I had so much of that stuff it was ridiculous. Once I began making baits I needed a way to mark a center line after cutting a blank I had drawn out. I remember using a stack of CDs to do this at first but they had a little ridge at the center which made them uneven and therefore pretty much useless. Then I noticed I had a stack of unused HP 4x6 photo paper laying around. To make a long story short, you can mark the center point on a bait when it is still in "block" form and then lay a pen or pencil or marker or whatever on a stack of photo paper (or really any paper will work) and then just add or remove paper as needed until your pen or pencil meets the mark. When it does just push the bait around the pen or pencil until you have an even line all the way around the bait. This will give you an exact center line with which to drill your hook hangers, line ties, etc. Getting things exactly center becomes much harder once you have cut the rough outline of you bait and then sanded it to shape so for me at least this method has been a great help. Second tip: When airbrushing, you can use a transparent base, I use Createx Transparent Base, between coats of paint to help mitigate errors in airbrushing. For example, for me airbrushing is still the most error prone part of the entire process. You spend a good amount of time designing, cutting, sanding, etc., then, once you have all of that perfect you begin the airbrushing process. The airbrushing process is tedious and has many steps depending on what it is you are trying to do. What I have found helpful is to use Createx Transparent Base between steps to protect the layer I just painted from overspray or other errors I make during the next step in the process. So, for example, lets say I've got my base coat down and I have my scales painted and I want to begin painting gill plates. I'll use the transparent base over the entire bait before moving on to the gill plates. Doing this means I have a protective layer over the base and the scales. This way when I begin painting the gill plates if I make a mistake I can easily correct it using a Q-Tip and a bit of water to wipe it away without worrying about wiping away the base coat or scales. I am no expert but this has saved a ton of time for me and has proved a go to method when airbrushing detail. Anyway I hope this helps. Great to have you here and welcome to this unbelievably amazing hobby!1 point
-
I get smooth wire tags end by over-wrapping a bit, pulling the tag end back around a bit to clip it as close as I can with side cutters (or a mini-bolt cutter for .051 wire), hitting the cut end with a file to clean off any burrs, and then squashing the tiny tag end down with needle nose pliers. The overwrapping gives it that pre-bend for the squash down.1 point
-
I have a couple of spinnerbaits with double french blades. I would rate the blades as a bit less likely to catch weeds than an Indiana. They doesn't slip through weeds like willows, but they are not as bad as a Colorado blades. A little wiggle of the rod tip coming through the grass usually allows it to come through without getting clogged up. On a spinnerbait, the French blades spin with a tighter axis than they do on an inline. That could be do to their being 2 of them in series. The smaller front french blade blocking water from the back blade. The head is a 3/4 oz hidden weight LPO head.
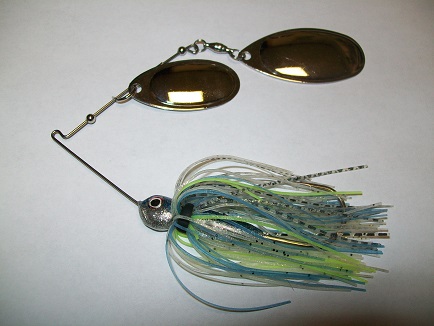 1 point
 -
You could also try double hooks on the belly like a Mustad 7982 or 7825. Owner and Gamakatsu make a double hook too. It seems like they would cause very little if any rash. I have seen them in sizes up to 5/0. I don't think heavy musky rings like Wolverines or Rasco XH or XXH would slide out. But if it looks like they might, you could use a piece of heat shrink tube on the shank. I have not tried them yet on hard baits.1 point
-
Selling baits... Few ways to go with depending on your goals. Identify your goals and do what best suits those goals. High end quality baits aimed at getting $$$$$, knocking out baits quick and selling numbers for cheap, are you trying to just break even, make money, etc.. Finally I will say do a search about Federal Excise Tax and fishing lures....at least be aware of Form 720 Part II No. 41.1 point