Leaderboard


Popular Content
Showing content with the highest reputation on 02/19/2021 in all areas
-
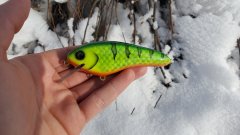 Simple crank bait. This bait is the first one I've used True Coat epoxy on and I'm a fan! Goes on nicely, don't have to rush at all and is very clear.2 points
 -
Another thought ..... all of the cavities are on a horizontal plane when injecting the hot plastic into the mold cavities and entrapping air causing bubbles in the top of the ribs . You could try propping up the tail side of the mold on a piece of wood 3/4" so the cavities are running up hill towards the tail . This way the hot plastic will force the air out through the vent in the tip of the tail as the cavity fills . Air is thinner than plastic and flows through the vent faster .2 points
-
Exx1976 - I do not understand you. I have refrained from posting this sentiment before. You put a lot of effort in, making excellent contributions to the TU community, gaining a lot of respect. And then, you seem to have a brain fart and chop someone off at the knees for very little reason. I am not blame free, I too have had my moments of indiscretion. I suggest you think your more acidic replies through before hitting the reply button! Dave2 points
-
Hello, New to posting on this forum, but research threads here often for great info. I've been building large wooden trolling baits for a some time & understand the entry level basics on buoyancy, body shape, thru[wire vs screw eyes, lip angle / thickness & tow line location. My question regards baits with a lip tow line connection - how to determine layout for lip slot location & what effect is there by moving the location one way or another? Using a sketch, I locate the lip slot by intersecting the desired angle to a certain distance from bait nose tip, ie 1-1/2" from nose tip. The lip slot layout always lays on top of this line for consistency. Length of slot is determined by bait OAL. Is there a general "rule of thumb" how far back to intersect the lip slot with bait C/L & does anyone know the effects on moving the slot location closer / further from nose tip? Hopefully I've explained my question & apologize if this has been answered previously. Of course I could build lots of prototypes & swim them, but trying to save a few tress - ha! Thanks in advance1 point
-
AZ, We plan a test swim this weekend with the 22 degree baits, weather permitting. Our current lip shapes are round & elliptical with various lengths, widths, thickness & tow point locations. Currently all our lips are 0.125" or 0.175" Lexan. We have some success with this bait in 8" & 10" at 45 degree lips but thinking the 22 degree will give us a bit more depth, maybe down to 20' - 25' with short lines. Currently, all of our bodies have the same shape with some concavity - 0.090" each side x 2" in length - in the eye location. So, I'm wondering if this concavity affects wiggle pivot point or is it lip slot location? When we test swim the 45 degree baits next to our boat, the baits show an "X" pattern with wiggle pivot point just behind the eyes. That's where we like it. I'll keep making one change at a time looking for this answer, just hoping at 64 years of age I live long enough - ha!1 point
-
You got that right for sure. Far fewer "positive reinforcement" moments for muskies compared to most other freshwater fish. I'm lucky enough to spend enough time on the Winnipeg river to come across a few patterns of open water and deep current edge muskies in July/august when most guys are ripping blades in the shallows (which obviously works good too). I've learned a lot from John Bondy there, who also fishes a big river system. One thing that probably helps al these anglers is the insane electronics that is available. I've fished with the livescope system now, and seen muskies on spots that no one in 100 years has probably fished, us included. But, you can see fish clear as day when exploring these areas. Areas with almost no discernable structure that fish use to stage, or travel from spot to spot. Now we see a lot of Muskie guys targeting fish way out from traditional areas on LOTW (the massive weed loss of recent years is also to blame for sure). I can only imagine how useful these technologies are to the pros when scouting and pre fishing a lake.1 point
-
I learned it from SolarBaits1 point
-
Oh trust me, I've made a LOT of mistakes thus far. Unfortunately, none of them were good. LOL1 point
-
Truly what sets the pros and non-boaters apart is tweaking the baits to get intended results. This is where it comes down to just changing hooks, snap rings to different size. Along with changing paint schemes. If I am throwing any mass produced bait, it is modified in some way shape or form.1 point
-
I blows my mind watching these tournaments how intelligent and knowledgeable those anglers are. They know the difference between all the grasses and weeds and movements of the fish and tiny ledges down 20 feet deep (or maybe they are just bs'ing me, but it worked). What is more amazing often is that in the same day on the same tourney, guys fishing with plastics in 1 foot of slop can slay bass at the same time as a guy fishing a 20 foot ledge with a rattle trap slaying bass. I need to take that fact and apply it more to muskies and all other fish. There is often a 'trend' or rut that you get stuck in - in july fish are only shallow (for example). When in reality, on any given day, there are active fish in several different depths and ecosystems.1 point
-
exx1976 Just remember a lot of the good lures were made by mistakes along the way. Wayne1 point
-
A good table sled is a must. Definitely one of those things do it right and woodworking gets a lot easier.1 point
-
I'd say you've found part of the problem yourself. Inject your plastic faster. It seems like your baits are cooling too fast in the mold. Keep the pressure on while shooting.Preheat the mold as well. And open your vent lines a tiny bit. BTW...I like that mold,Most of the others I've seen like that are flat on one side. Don't like that. Your mold looks round and ribbed completely around. Is that true? If so I may end up getting that mold.1 point
-
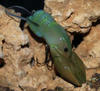
.jpg.0f995028012296b39b140eca24608cd2.jpg) That's a killer bait! Very natural looking subtle fades. Well done!1 point
That's a killer bait! Very natural looking subtle fades. Well done!1 point -
Looks good!1 point
-
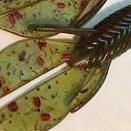
The lines from the tail of the worm on the right side of the picture (side with the bolts) are the vents. Take the corner of the tip of a flat blade screwdriver that fits in the vent and scratch them just a tiny bit deeper. You're just scratching, not gouging. It doesn't take much.1 point
-
For me, position is primarily a structural thing; a deep enough slot for a solid connection and enough body behind/above the slot for support. Waggle is a force x distance or lever thing, so the further away from the COG then the more waggle you get. If you simply move the lip rearwards on the next prototype, you will likely have a different result or even fail, because the geometry to the tow eye has changed and disturbed the balance. You may have to experiment to find the new eye position. Be mentally prepared to make a few prototypes. Make one adjustment at a time and make notes. Always test with hooks and hardware fitted. Dave1 point
-
And a picture of the other half of the mold as well.1 point
-
Can you show us a picture of the bait with bubbles.1 point
-
Well it seems I unintentionally hit a nerve Good luck1 point
-
Been lurking for quite a while, but thought I may have something to contribute. I use green painters tape. I cut it in narrow strips long enough to go down one side of the lure, over the top, and back down the other side, 2" is usually long enough. When I cut in narrow strips I don't cut straight, but instead make the cuts wavy. I don't worry too much about getting the tips down tight, that way I can get a hold of them easier to take them off. For my bluegill I paint the top with a light green, tape it, paint again with a darker green. Remove the tape and do a very light cover of Pearl Copper and again with Pearl Magenta. Then one last run down the middle of the back in either dark green or black. The stripes on this one don't stand out as much as they do on others I've done, but it gives you an idea.
 1 point
 -
I use the createx iridescent blue over black to make a cool color shifting purple. The key is LIGHT COATS until you get the desired effect.1 point