

Hoosierdaddy
-
Posts
120 -
Joined
-
Last visited
-
Days Won
3
Content Type
Profiles
Articles
TU Classifieds
Glossary
Website Links
Forums
Gallery
Store
Everything posted by Hoosierdaddy
-
Riverman, I am just wondering if your lures have a diving lip on them. If so try the following trick: Use round nose pliers to bend the tie-on point downward toward the diving lip. This drastically changes the amount of wiggle in my minnow baits. You may then need to retune the lure to get it to track left/right correctly but you may gain a whole lot more wiggle. I hope this helps.
-
I do have some polishing up to do on it I realize ie. better linking between pages, more attractive font, more info including contact info on the main page. It is a work in progress. After all that work in putting together the turorial though I needed the pat on the back. Does anyone want me to provide a link to their page? I would do that if you want, after all... without all the advice and encouragement I have gained through this site and it's users, I would have given up on hard baits a LONG time ago
-
OK.. divided up the tutorial into sections as suggested. here is the tutorial link: http://home.mchsi.com/~djaroscak/buildinglure.html Main site URL is the same: http://home.mchsi.com/~djaroscak/hoosierdaddy.html
-
I always wanted to build an online tutorrial as I have gotten many questions from friends a cofishers concerning how I have made some of my baits. It turned out to be one heck of alot harder than I thought it would be. I am a junior high shop teacher who is used to having to provide great detail when explaining things to my students. Since this is my first website, be kind if you choose to review it for me. Of course constructive critisism is always welcome. If printed out this sucker is about 40 pages long. See what you think guys . The link to the tutorial is: http://home.mchsi.com/~djaroscak/buildinglure4.htm My main page is : http://home.mchsi.com/~djaroscak/hoosierdaddy.html of course they are linked together. Thanks for taking a look in advance.
-
I use it as a primer and then as a topcoat... so two coats for me
-
Forgot to post the link . http://www.cabelas.com/cabelas/en/templates/product/horizontal-item.jhtml?id=0011962110397a&navAction=jump&navCount=0&indexId=&podId=0011962&catalogCode=IE&parentId=&parentType=&rid=&_DARGS=%2Fcabelas%2Fen%2Fcommon%2Fcatalog%2Fitem-link.jhtml.1_A&_DAV=search&hasJS=true
-
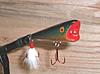
Anyone know what the purpose of the ball bearing that is lodged in the lip of the Cotton Cordell Wally Diver? Is it there to add weight to the lure. Here is a picture. What is the purpose of this ball bearing
-
Just thought I would add my two sense here. I used to use screw eyes but I really learned something on In Fisherman TV last night. On a minnow plug if you want to increase the swimming action you can slightly close the tie-on with a pair of pliers then slightly bend it downward toward the lip. With a screw eye in place as a tie-on, tuning a lure in this fashion is impossible. I had about 6 lures that were created with screw eye tie ons that I had saved on my bench but I was very unpleased with their action. I removed the scew eyes and inserted a wire eye created like Chip taught me, bent it downward toward the lip and DAMN... those suckers REALLY WIGGLE now. Thanks Chip.. Thanks Infisherman.. Ill never use a screw eye again.
-
This is what I have done that I have gotten great reults from. I mixed food coloring (the paste type that you pick up from a hobby store .. not the easter egg type) with Testors high gloss clear acrylic. This makes a wonderful transparent paint that will still keep the shine of your foil.
-
I have gotten my first order for lures that I created and painted. I always said that I was only in this because I truely enjoy the creating process and the troubleshooting involved but I must admit.. I am truely pleased that someone has looked at my craft as being worthy of purchase. Anyway these are the two that he ordered. He hasn't seen them yet so I hope he is pleased. If not .. I have two others ready to paint up and I get to add these to my personal collection.
-
It looks way better than my first bait did.. Thats for sure. Looks ready to go and I am sure you will get a charge outta catching that first fish on a project lure.
-
It is a wood lure. I did predrill the hole first but I think I caused the crack by overtightening the screw eye. I did plan on tying a bucktail for this one so the hook hanger idea won't work. I dont make all of them with bucktail though so in the future I may try the hook hanger idea. Thanks for the reply and suggestion.
-
As I was turning in the tail screw eye on a lure I made I noticed a hairline split develop in the lure. It is a Rapala or Rogue style minnow lure. Have any of you had this happen and is there a good fix? I thought about drilling the hole out a little larger and deeper, making my own screw eye like Chip does in order to go deeper into the body of the lure as with this split in the lure the screw I that I was using wont tighten completely anyway. Does this seem like a viable solution or does anyone else have a better suggestion to fix this problem?
-
Does know of a site that has a tutorial for making mini tube jigs?(two tone crappie style). I remember one guy desribing a cutter for the skirts on the tacklemaking site but I can't even get to that now. I have never made soft plastic lures before but I think I may branch out here soon. Any info you folks can give would be helpful as I don't want to pick up a whole bunch of expensive equipment that I can either make myself or that I dont need at all.
-
Hey Jerry, Did you take the reg8tr.com website down permanently? Do you know of a site that has a tutorial for making mini tube jigs (two tone crappie style). I remember one guy desribing a cutter for the skirts on the tacklemaking site but I can't even get to that now. I have never made soft plastic lures before but I think I may branch out here soon. Any info you can give would be helpful as I don't want to pick up a whole bunch of expensive equipment that I can either make myself ot that I dont need at all.
-
One of each of these is going in a lure kit to be auctioned off at a charity event. Of course, one of each of these goes in my tackle box as well.
-
Just used them to mix up my transparents and painted two lures with them.. they worked great.
-
My wife was making Christmas cookies the other day and I noticed on the counter a plastic bottle that looked just like my glass airbrush bottles. Turns out that Betty Crocker packages their candy sprinkles in these little buggers and calls the product Decor Selects. They come in six bottle packages over in the cake decorating section of the grocery store and only cost a couple bucks. The threads match my badger airbrush perfectly. I have no idea if they are chemical resistant as I use Acrylics and it won't matter to me. Since they are plastic they wont break when you drop them off the workbench or fall off of your airbrush like I have done countless times. The only drawback to using these that I can see so far is that the lids are a very unmanly pink...
-
cool idea.. got any photos of your finished eyes?
-
Devcon / Envirotex not setting up....help!!
Hoosierdaddy replied to jigflipper's topic in Hard Baits
OK.. I can't help myself here... I tried to stop myself... but what kind of person coats a lure in their car on a hot summer day?.... -
Were these old Bagley's made of Balsa? If so , the reason that no sealer was needed was that balsa is naturally water repellant. The reason that they would use this thick paint type of primer was that they wanted to seal off the grain...not as to make it water resistant but to keep the grain from showing through. This is why most of the balsa builders that you speak to use epoxy as an undercoat. After fully curing the epoxy can be lightly sanded and seals off the grain lines. Makes for a good painting surface.
-
Because if the bait is continually banged against rock or suffers an impact the topcoat may develop a hairline crack or a chip. If this happens water may seep into the wood causing it to swell. If the lure is sealed no swelling can take place and you may touch up the lure and retopcoat the damaged area. If the lure in unsealed the swelling will destroy the lure in most cases.
-
As a shop teacher, I will have to disagree with you. Scroll saws are much more controllable in finer radius cuts, they allow you to back up within a cut without damaging a blade. The kerf on the standard blade for a scroll saw is also half of the standard bandsaw blade. And... dont even get me started on the cost of replacement blades. The only instance where I would chose a band over a scroll is when cutting in stock over 3/4" or with hardwoods. I would choose a medium to high quality scroll saw over any band saw that I have ever used for the majority of lure type stock. BTW.. they do a great job on Lexan lips as well.
-
I use the type of food coloring found at any cake decorating store. It is usually a paste type instead of that stuff you get at the grocery. I mix it with a clear acrylic made by testors and thin with water to airbrushing consistancy.
-
Please let us all know the results of this... I am still very interested in finding a better way to topcoat than Devcon.


