


Hughesy
-
Posts
436 -
Joined
-
Last visited
-
Days Won
14
Content Type
Profiles
Articles
TU Classifieds
Glossary
Website Links
Forums
Gallery
Store
Everything posted by Hughesy
-
Its not color shifting, Its more holographic then anything.
-
Chuck, when you look at it and twist it around with your hand, it has a holo look to it, but it also kinda had a 3D effect that made it look very deep. They did peel very badly.
-
G-finish is done over chrome. The closest I have come to duplicating it was to start with a chrome blank and spray duplicolor effex paint over the chrome. Check out this video of the effex.
-
Sweet!!!!!!!!!!!!!!!!!!!
-
Take AZ's advise and put 2 coats on them. I use a little stainless wire wheel in a dremel tool and it takes everything off of the hangers with just a swipe.
-
Definitely 2 coats at least. The directions say wait until you can touch it without leaving a finger print, but I usually wait over night until I recoat. I have never had a problem . Recoating to soon may cause bubbling from too thick of a coat. Apparently if all of the gases have not cured out of the first coat they form bubbles in the second coat.
- 4 replies
-
- 2
-

-
- crankbaitblanks
- custombait
- (and 6 more)
-
Its a bad thing. You want it to float.
-
What is a two part lacquer base?
-
Nice work Benzin 555!!!!!!
-
I'd say KBS would clear those right up.
-
You might try acetone or dipping them in KBS. With the acetone, just put some on a Q tip and quickly swipe the bill.
-
Dinger is right. The tooth brush method works well. You can also try putting a straw over the end of your air brush and shoot the drops on.
-
lets see what you want
-
Do a google search for pad printing machines. You can buy them as low as $100 to $20,000 https://www.ebay.com/i/291842217494?chn=ps https://www.dtgmart.com/product/spc-848d-4color-closed-ink-cup-pad-printer-with-conveyor/
-
This place always has it. https://www.mckenziesp.com/Iridescent-Colors-C2627.aspx
-
This is done at the factory with an egg silk screen machine. You can see it done on this video a 4.09
- 11 replies
-
- 1
-
-
- crankbait
- custom paint
- (and 2 more)
-
Anglinarcher is dead on. I agree 100%
-
They work. Bass Pro has them on their XPS line
-
Most filament on the market today runs between $20 to $40 a roll. As I stated earlier, to print a lure cost about 35 cents. You might want to try HIP (High Impact Polystyrene) filament for your lures. Its is stronger than the ABS or PLA.
-
Everyone has their own way of weighting a lure. One method I like to use is to place tungsten putty on the belly of the lure. Make sure you have all of your hardware on the lure, hooks, splits rings. With the putty there is no need to drill holes and you can easily move it anywhere on the lure. It is also easy to add or subtract weight. Once you have the lure working, mark where the putty is and remove it. Weigh the putty and drill a hole and fill it with the equal weight of lead. https://www.amazon.com/Tungsten-Putty-PineSpeed-Pinewood-Accessory/dp/B01FYCS54G
-
I,m pretty sure everything looks correct on you lure. I really think our whole problem is the placement of your weight. Anglinarcher is correct about the placement of your weight. That is why I asked earlier where it was. I would play around with the the placement of the weight, and start with it around the front hook. But don't be afraid to move it closer or further from the nose of the lure. It should solve your problem.
-
Where is you ballast weight located?
-
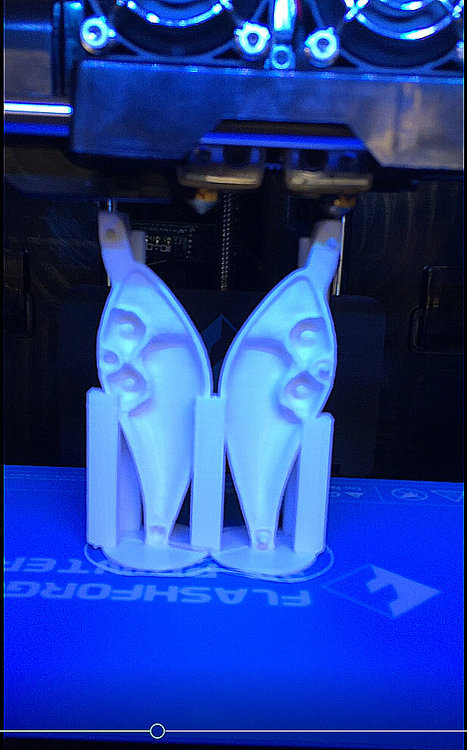
We have a 3d scanner that can scan any object and it then puts it into a stl. format for 3D printing. What we normally do when scanning lures is to scan only half the lure showing the weight chambers and hook eyes. Then, any alterations to the lure can be made using the cad program such as size, weight placements, bill angles, ect. We then make a mirror image of the first half and have the completed lure.
-
If you're going to make changes, just do one at a time. I would start with the ballast. If that doesn't correct the problem I would make sure the line tie and the lip are centered. If it tracks true its more than likely a ballast problem.

