


woodenfeather
-
Posts
149 -
Joined
-
Last visited
-
Days Won
2
Content Type
Profiles
Articles
TU Classifieds
Glossary
Website Links
Forums
Gallery
Store
Everything posted by woodenfeather
-
 Thats an awesome bait. I hope it swims as good as it looks.
 -
 like em both
 -
Awesome! Having spent more time than I care to admit just trying to fine tune a glider, I can really appreciate your accomplishment! I unfortunately can also relate to your advise about only changing one thing at a time. I made one really great swimming glider that I still can't reproduce. Great job on a very unique lure.
-
 Great job!!
 -
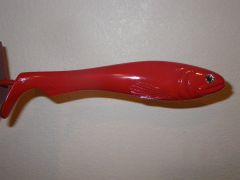
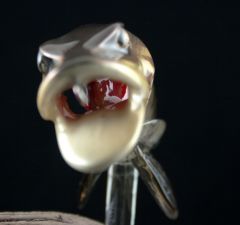
 I made this just for fun to see if I could do it. I glued layers of acrylic together to make the master. I think it turned out ok for my first go at it. The bait is 7" long and has a decent swimming action on a straight retrieve. When twitched it turns around and swims away from you. Now I just have to learn how to pour without it turning into a bubbly yellow mess.
 -
 Awesome! I tried messing around with some sculpey for the first time recently. I failed miserably. You have some real talent and I enjoy looking at all your creations.
 -
Thanks for the suggestions! I tried again last night and had slightly better results but still having problems with dipping the heads in clear. I heated the plastic to over 350 and let the bait take a bath in it for a few seconds when I dipped it. I can still pull it off fairly easily. I am going to try again but clean the baits to remove any oil before dipping. Thanks again, Dan
-
Hi Guys, Just started pouring for the first time. I bought some plastisol and colorants from Caney Creek and have been messing around having fun. I suck at it and am having all the usual problems like bubbles, scorching, 3rd degree burns, bubbles. I'm starting to get some good looking baits and wanted to try some laminates. The problem I'm having is the layers don't stick to each other very well. I didn't use any oil in the mold but there is an oily layer around the baits that I think is whats preventing the layers from sticking? I thought If I poured them quickly without allowing the first layer to cool they would weld together, and the adhesion is noticeably better the hotter the plastic. I've read though that you can pour part of a bait, like a tail, then later add it to a different mold and add the body, so I'm thinking the problem isn't so much the temperature difference but the oil thats either in the plastic or the colorant. I'm having the same problem when I try to dip clear over the heads to cover eyes. It looks good but can be easily pealed off, and when fished, it doesn't hold up. Other than brain cells, is there something I'm missing? Thanks for any suggestions, I really appreciate all the help you guys give and information you share on this site! Dan
-
 Incredible!
 -

Paddle Tail Shad - Design 3
woodenfeather commented on CNC Molds N Stuff's gallery image in Soft Baits
 Love it!
 -
bondo and quick wood work great. Both set up relatively fast but once cured can be hard to sand flush, especially the quick wood. If I'm in a hurry, which is usually the case, I do like Mark and Ben, but a little different. I will saturate the area with super glue, then grab a good pinch of PVC dust generated from the router, and push/ rub it into the hole. It will wick into the dust and usually sets up instantly without accelerator. Then, if necessary, I will put a little more glue on top of the plug and quickly sand it flush.
-
 nice!
nice! -
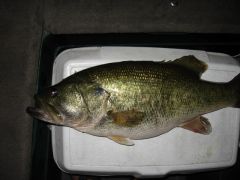 What a hog! Congratulations. She could probably eat my PB.
 -
Couple Questions For The Glide Bait Masters
woodenfeather replied to RayburnGuy's topic in Hard Baits
Nice bait! I was just noticing on one of my favorite commercial glide baits, that when viewed from the top, the widest point is off center towards the tail. Just like what you have done. I was thinking it was to allow more weight to be added to the tail, while still maintaining a nice fish shape on the side. I think your shape allows you to place your weight more towards the rear, have enough surface area at the front of the bait to make it want to turn( the steep drop of the belly), but tapered enough to get some distance to the glide. As far as the wide part being a pivot point or determining distance I'm not sure. When you pull it while its turned away from you, the side profile is what initially interacts with the water. Yours probably wants to tip over briefly because of the line tie being high, which is good because it needs to shed the water to turn, so maybe at this point the top profile comes into play. I haven't had very good luck with gliders. I've made a few, one of which was awesome, but can't seem to replicate them with consistent results. All I know is, that things going to get inhaled. -
Whats The Best Method To Paint A Bismuth/tin Jighead?
woodenfeather replied to fattony's topic in Hard Baits
Powderpaint needs to be heated to a temperature beyond that of the melting point of the alloy to cure it properly. I used to use vinyl jig paint and remember it as being very durable and the colors seemed much brighter than powder. It stinks to high heaven though and drips were a problem. I suppose if you had a drying wheel you could eliminate the sags. You can also spray it through an airbrush thinned but the fumes are brutal. Good luck. -
 Incredible!
 -
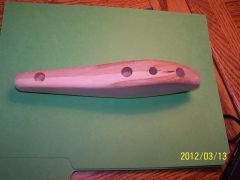 I was going to ask you how you weighted that thing. Thank you! BTW I think that might be beech. Sorry couldn't help myself, I'm a wood nut.
 -
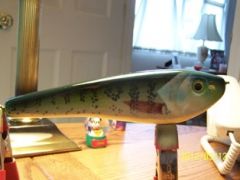 What a beast. That thing looks awesome, great job.
 -
I like the rack. great idea. I think I'll try that with my powder paint gun.
-
Guys thanks alot for the replies. hopefully I will have something worth sharing in the near future. Thanks again, Dan
-
Hi Guys, First time posting in the soft plastics forum, although I've enjoyed the reading in here for years. Thank you very much! Anyway, I was recently given some SMOOTH-ON MoldStar 30 rtv and I'm iching to try my hand at mold making. This rubber in pretty stiff compared to some I've seen and I was wondering how much under cutting I can get away with? When I say under cutting I mean shapes that would prevent a rigid material from demolding, like a slanted paddletail on a swimbait. I have a design I'm thinking about with a portion of the head (swimbait) that slopes down and into the mold. I also want it to be articulated with the connecting "hinges" to be relatively thin but the side profile to be about 1" at the belly. Do you guys think I would have problems getting this shape out of a single cavity hand pour mold? I just want to know what limitations I need to consider while I'm dreaming stuff up? Thanks for any advice! Dan
-
Great idea!
-
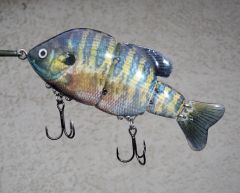
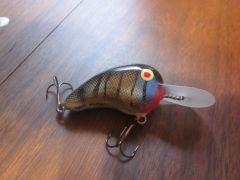
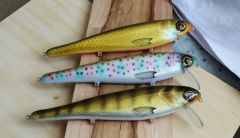 Awesome. I love the foiled perch on the bottom. The brownish color makes it a convincing walleye pattern. Great job.
 -
Tackleunderground Hardbait Tip Of The Day!
woodenfeather replied to littleriver's topic in Hard Baits
Looks good Vic! As far as the slots you see in the lips in the picture, they were an after-thought to accommodate the wire. I justed drilled a hole and then cut into it with the scroll saw. I see you are using the circuit board material. I was curious as to how well it cuts on the router? I was thinking it might be really hard on the carbide but haven't tried it yet. Here's a drawing of how I've been making the template: Here's a side view: -
Tackleunderground Hardbait Tip Of The Day!
woodenfeather replied to littleriver's topic in Hard Baits
Good topic! I've been using the router to make bibs for a while but I do it a little different than Gene. You cut the shape you want your lip to be at the end of a long(12" or so) 2" wide 3/4" thick piece of wood. Then add a thin piece of wood to the underside, minus the lip shape. This provides a shoulder for the "flat" end of the bib blank to reference and elevates it off the table slightly( this is to provide clearance for a small screw head). The bib is screwed to the underside of the template through a predrilled hole which will later be the line tie location. If you are making small bibs without a line tie in them, use a piece of the same thickness lexan as your spacer so you have zero clearance off the table. Secure with double face tape and/or drill a small countersunk hole in the bib, where it will be hidden in the lip slot, and secure it with a small screw. I like to use a round over bit for this so I can get a tapered sharp leading edge to the bib. I haven't tried Gene's method but it seems like it would be a bit "tippy" to me. I don't have any shots of the jigs but heres a crappy picture of some of the bibs. These were actually cut from rectangles so I was removing alot of material with the router.
