

jerkbait
-
Posts
113 -
Joined
-
Last visited
Content Type
Profiles
Articles
TU Classifieds
Glossary
Website Links
Forums
Gallery
Store
Everything posted by jerkbait
-
Never had a problem with their stuff coming off while banging silver buddy baits around rockpiles and zebra mussel Sold thousands of them also and no returns. I fish Erie 5 or 6 times a year and never go out without at least one rod rigged with a blade! Let me know how they turn out and maybe we can do a bait swap or I will buy a few from you. I have a trip coming up in october. Good Luck
-
Have used Spectrum Metal coating from Minn. on blade baits and they are reasonable and quick. They have done lots as small as 100 for me in the past. Gold will run around $0.38 per but call for quote. Family run business. http://spectrummetalfinishing.com/
-
Here is a good place to start http://http://www.rodbuilding.org/photopost/showphoto.php/photo/4330/size/medium/cat/507/page/1
-
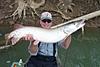
 Here she is! First of the year on a secret new Bait. Jerk!
 -
NRR If you have one you really like there are plenty of us that can make a mold from it and pour you some. Not a great big deal. Jerk
-
I did a thru-wire version of the Bull-dawg bait. From the front nose loop, the 1/16" wire went thru a swivel in the belly of the bait and was epoxied in the at the tail. Twisted it on a bolt to get the spring look and threaded the soft tail on. I really didnt need fish-n-glue but I put some on anyway. Fished is some in heavy weeds and had no issues with pull offs. jerk
-
It looks like the salt water SS in x9256 http://http://www.lurenet.com/productdetail.aspx?id=7291 Take a little phase change createx, looks like violet to me and viola. Over the foils it looks kinda pink.
-
I have been using it for about a year and even though I still route the edges of big baits, I no longer hand sand anything. I put about 10 psi in mine and use a drill press to spin it. The center of the drum will deflect as little or as much as I need to get a good rounded back on baits up to 1.5" thick. Small stuff as mentioned, I dont even rough I just hit both sides, then top and bottom and it is off to sealer. The center deflects more than the ends of the drum so you can either vary the amount of pressure or use the edges to get less radius. I saw a guy on TV making skateboard decks out of ash and he could get a perfect round edge with one pass on each side of the deck. I would be glad to throw up a picture but it may take me a while to get to it. Jerk!
-
http://www.leevalley.com/wood/page.aspx?c=2&p=47287&cat=1,42500 Here is a little tool that will work in a drill press or small drill or air tool. You can adjust the air perssure to deflect as much or little as needed for perfect radii. I use a laminate trimmer to roundover the bigger baits but on small bass sized stuff in basswood, I just chuck this in the drill press and do all the shaping in a mater of seconds. Jerk!
-
Quick Tips...take em all, but leave one of your own!
jerkbait replied to fatfingers's topic in Hard Baits
Many of us use flux brushes to spread epoxy. To keep the hairs firmly in place, crimp them in with your round nosed pliers before using. This little tech. has really cut down on the amount of hairs I have to pick out of my top-coat. One more: When using plumbers epoxy to fill holes, have your alcohol handy. Dip your finger in rubbing alcohol and rub the surface of the patch till smooth. It almost eliminates sanding after it sets up. -
Hey FF I make a bunch of stuff that takes big shots of lead and used to pour right into the body of the bait. To keep it more uniform I now melt lead in my pot or just use a spoon and a torch. Then I pour it in molds made in hardwood by drilling various depths with forstners. The are perfect size when you put then in and have a very low center of gravity. They also require less fill. That way I am not worried about drilling too deep. Once you get the weight of a prototype it is easy to replicate. The burt baits want to roll too much if the lead is very high in the bait.
-
Help on reel seat repair/replacement
jerkbait replied to Crymdawg's topic in Rod & Reel building & repair
I assume it is a spinning rod and the most common seat is a 16mm. That is the inside measurement of the tube. You can get pretty close to the right dimension without taking it apart by measuring the outside of the tube. I would suggest calling mudhole or fishtix and telling them what you are trying to do. They are fit from the top end and reamed to fit snug as you slide them down. You can get by with taking the rear grip off and then the seat but it will have to be filled with epoxy to fill the gaps under the seat. Maybe send a picture and we can help a little more. jerk -
Help on reel seat repair/replacement
jerkbait replied to Crymdawg's topic in Rod & Reel building & repair
If you mean the nut that tightens the hood, It could be fixed by grooving it with a triangle file and wrapping it with tying thread and coating with epoxy. Be sure to grease the treads underneath to prevent the epoxy from sealing to them. I have gotten by before by using copper tying wire to hold a nut closed aroung the reel seat threads, even used a zip tie once on an old flyrod. Replacing it would likely mean taking some or most of the guides off to slide the new nut or seat in place. Jerk -
Here is what I got. It is a batson blank 7' med fast taper. The seat is turned acrylic and cobra hoods [ATTACH][/ATTACH]with epoxy ramp up front and a split cork rear grip with inletted fish sekeleton.
-
I just got a D-shot rod made by a buddy on River Smallies.. DR made me a beauty and I will send you the specs and a picture if you want to see it. Jerk
-
 Where did you get that reel seat. I love the clean look! Great job.
 -
Hey guys I was on this board looking for some wires but will post my .02 anyway. A sharp wood chisel will cut a great barb in the aluminum and is way easier to control that power tools. Take a pencil and mark the barb near the end of the collar slanting back toward the head. Hand pressue is all that is necessary to take a smal sliver of Al out on each side of your line. It should be slightly wider at the bottom and fairly sharp on the tip.
-
I count myself as one of the fortunate ones to own a couple cranks by Dean. Havent recently met him and talked for a short time at a central Ky bait makers get together, I also feel blessed to know him. DM, your work continues to impress and inspire me. Thanks for the heads up on the transparent C-tex paints they are great! I love the way the yellow gold looks over silver foil and the red on the throats really pop. thanks again Jerk
-
Hey Rob If you use thin wire, you can pour 1 forms in the same mold. Twist a couple wraps of copper wire near the R-bend. I have also poured a straight looped wire in the mold and then add a U shaped wire for the blades. Barlows sells a form for double spinnerbaits that will work too.http://www.barlowstackle.com/acb/showdetl.cfm?&DID=6&Product_ID=1130&CATID=114 I sent the link so you can see how the blade arms are bent. Once they go over the shaft and up thru the loop you bend them out and they lock in real well. The easiest way is to just use 2 though.
-
Just dropped freshly devconned plug on the carpet
jerkbait replied to barry batchelor's topic in Hard Baits
Keep alcohol handy for cleaning errant epoxy on tools or hands. You can actually wipe all the epoxy off a bait crumbs and all. It is usally better for me to take it down to the paint than to double up on the final coat. Just dont rub too hard as you can take the paint off if you rub too hard. No big deal just a quick wipe with wetted rag. -
J Plastic mik or soda bottles work well and will fit around the radius of a round bait.
-
Had the same problem with dense woods. Move your weights out to the extreme ends of the bait and try it. Fixed the problem for me on a divani style glider that I make. I even had to start casting larger diameter and thus shorter lead cylinders to get it as close to the tail as I wanted. Hope it helps. Riverman was the one who clued me to it. Jerk
-
One more thing on the lip. If you use it in cold weather which I suspect you will, use polycarbonate instead of acrylic. Even very thick acrylic will be more brittle. Tapering the leading edge of a thick lip will increae the effect of it transfered to the action of the lure. Looks real good to me as far as shape and palcement go. I like a bait that will swim well just below the surface but also dive when really cranked or jerked.
-
I do something similar to the glass bead only I drill a hole lengthways through the bait with 8mm bit and insert a brass tube that is cut to a lenth less than the thickness of the bait. I use hardwood dowell plugs for the sides and sand them flat with the sides of the bait. Using a couple lead shot, they really rattle loud and dont seem to affect the balance a great deal. I use them on my bigger baits mostly. Brass tube can be found at RC model shops in all diameters. A friend and fellow Ky bait builder just drills his ballast weight holes deeper than necessary and adds a few shot before gluing the weight in. It does a good job and no extra steps.
-
Good question for discussion. I use a table router for my 7 and 9" gliders. The smaller stuff gets your fingers way too close to a spinning blade for my comfort. I drop down to a handheld laminater trimmer holding the bait on a rubber mat and running the router around it. When It gets smaller than 3" and 3/8" thick, I use a dremel with an adapter that uses small router bits. Had to mke a round insert to fill the gap between the bit and the bottom of the housing. http://www.dremel.com/en-us/attachments-and-accessories/attachment-accessory-detail.htm?H=188575&G=69679&I=69795 Use a router bit intead of the cutter. Rotary cutters work too if you make a base for them. I will try to get a picture to show you if you want. One note, the ball bearing type router bits can be too long to allow rounding on a flat surface. The carbide follower type can be trimmerd to keep a little clearance between the bit and the table you are holding it on. Makes great rounded edges and very little hand sanding. Jerk

