nova
-
Posts
2,960 -
Joined
-
Last visited
-
Days Won
13
Content Type
Profiles
Articles
TU Classifieds
Glossary
Website Links
Forums
Gallery
Store
Everything posted by nova
-
I use stamping foil under my photo finish.
-
Clear Coating Frogs With Clear Plastic Problems
nova replied to Bassinjunkie88's topic in Soft Plastics
Afew drops of stabilizer is not enough. Use 1/4 tsp or more for a cup. -
When I had my store running I got a sample bait from a Cal. company. The bait was called flex bait. Had a kind of woven fiber as a joint. There were4 or 5 sections to this bait. I don't know what the fiber joint was but it was quite flexible and swam really nicely.
-
You're probably in more danger by doing that as you may shock the pyrex and explode it.(I have done that in the past) It's not the sharp edges; it's the shiny edges. Try it on short bursts first(10 secs); then increase the times and you'll see.
-
Each cup will be slightly differant because they are handmade. You have to play around with the amounts of plastic as you want all 3 chambers to pour at the same time.
-
No problem. I've been doing this since 1990. It would have been a lot easier if TU was around then. Had to learn the hard way. When I found TU my learning curve took a big jump. There is no other site quite like this one. Good folks here.
-
Can't help you there; I've only ever used tin. I know that works for sure. You'll have to show us the results of your 3 color pours once you get it up and working.
-
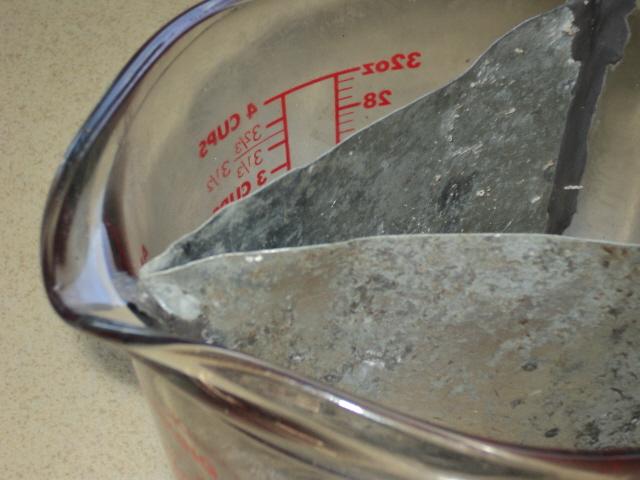
Here's the pics of the 3 color cup. Hope it helps.
-
Exactly. Make sure the "V" is as close to the pouring spout as possible. Better to be too high than not high enough.(you can always trim it down if need be. I'll see what I can do about a pic.
-
Thanks.
-
It's done with a 3 chamber pyrex cup. I have no problem sharing. That's what TU is all about and why it was founded.
-
There are things you can do with handpouring that injectors can only dream about. If you want a "cookie cutter" type of bait then injection is the way to go. If you want an "artform" type of bait then handpouring is the way to go. It just depends on what you want; but believe me hand pouring will never be "shoved out". Another point is that handpouring doesn't mean flat side. I design all my baits and most are 360. I only own one type of aluminum mold and that is a top pour stick mold.

-
Like the old guy used to say;" you'll never get rich off of a rich man, only screwed".
-
Too much heat Mark. Add heat stabilzer to the batch. I assume you're using a micro. Reheat in short blasts say 30 secs. Did you use the foil yet?
-
The obvious would be the school crest and the years from 25 years ago to now.
-
Senkosam
-
Mark; What I do is increase the colors little by little until you get the match you want. It depends on what you have for a formula. I don't know Bear's coloring so I can't help you there. I always add the salt to the plastic first. Did you ever use that foil?
-
Using Salt In Softies...is There A Recommended Ratio?
nova replied to fishbayte's topic in Soft Plastics
Fishing is a highly personal thing. No two fishermen fish the same. There are subtitle differances that happen. As for the salt in baits; you have to find what amount of salt works for you. Just play with the amounts and keep track(pen and paper) while you do it. That way you can repeat it each time. I never believe what I see in ads; too many smoke and mirrors with a dash of BS. I decide to use a bait based on shape mostly with color second. Too many consumers have been brought up(brainwashed) to believe what the see/hear in ads. Everything today seems to be the "latest and greatest". -
Been doing it this way for years with no problems. If you put the pyrex on a hotplate it can blow up. I thought the same way when I first tried it.
-
The micro will not react to the metal as long as the very top edges are not shiny and there is no metal edges showing through the glass.
-
All you need is JB weld; black marker;tinsnips; tin flashing and a pyrex cup. Divide the cup with the marker down the middle from one side to the other(pouring spout to handle). Cut and fit the flashing to the cup. This takes a while as you fine tune the divider to fit the cup. Cover the line you made with a line of JB weld and slide the flashing in place. Then apply more JBweld to both sides of the divider where it contacts the cup making sure there are no gaps around the flashing. Let it set and there you go. For a three chamber pot just take the flashing and fold it in half and continue as described.
-
Basically there are 2 postions to use when you are pouring with the divided cups.(doesn't matter if it is 2 chambers or 3)If you pour from the lowest point(closest to the sprue hole) you will get a fairly nice laminate bait. If you pour from a little higher position you get the swirls. It takes a little practice. Temprature also comes into play.
-
I had an idea it was a shrinkage problem. If the dimple is in the same place each time it can also be an airpocket inside the mold. This causes the plastic to cool faster in that area.
-
Is the mold an open or 2 piece?
-
Just a quick question. If you look at the metal devider from the outside of the pyrex; can you see the edge of the metal? I have found that if the edge of the metal is exposed you can get arking in the micro. If you can see the metal take a black marker and paint the glass on the outside; this will help. If you look in the softplastic gallery you will see what you can do with a three chamber pyrex.