

castmaster
-
Posts
84 -
Joined
-
Last visited
Content Type
Profiles
Articles
TU Classifieds
Glossary
Website Links
Forums
Gallery
Store
Everything posted by castmaster
-
Hi, my name is Brent, and I am an addict. Its been many years since my last confession... 39 years old from Hastings MN. Do a lot of fishing for walleyes and smallmouth on the Mississippi River and Muskies wherever and whenever I can. Build topwater wood musky lures under the name Musky Maven. I love handcrafted wood musky baits and have been fortunate enough to learn things from those that have come before me. Try to share when I can, and am always happy to do so if I am able.
-
Help! Problem With Ink Running Under Polyurethane Topcoat
castmaster replied to castmaster's topic in Hard Baits
Bob, Do you think dipping in water based Polyurethane instead of oil based Poly would make any difference? Baits are painted with Createx and Auto Air. I've only used Createx and Auto Air paints, what would be a brand of clear acrylic that should be compatible with those that I could spray over the lettering? Thanks! -
Each year I do a limited edition numbered run of Musky topwater lures and always sign and 3 them with a gold Pilot ink/paint pen(one of the ones where you have to shake it up some and then depress the tip 3-4 times to start the ink flowing) In the past I used D2T for a topcoat but have since switched to dipping in polyurethane. Now the lettering on some of the test lures is running from the poly, while other test lures are jsut fine. All were lettered at the same time so have had the same amount of drying time. Has anyone else had a problem with Pilot pen running when dipping in poly? Does anyone know of a way to seal the lettering that wont make it run and will be compatible with the poly topcoat?
-
The Auto Air seems to dry better for me. With Createx some of the colors seem to stay somewhat tacky even have they have been thoroughly dried. Also seems to spray a little better at low psi.
-
"When you
-
clothes pins or those spring clamps work great. Anotehr option is to get a cheap embroidery hoop and stretch your netting/lace whatever over that. If your doing a whole bait or full side etc it's easiest to wrap your netting around the bait and secure with clothes pins/clamps. If you just want to add teh scale to small areas for highlighting its best to use the embroidery hoop. At least thats what I've found.
-
I've been spending the extra $$ and buying at my local hardware store. Costs me an extra $1.50 a pack, but its much better/fresher stuff. The ones at my local Wal-Mart are already VERY yellow in the syringe and end up wrecking any baits with light colored (especially pearl) paints by yellowing the clear coat. The ones from Wal-Mart also seem to mix up thicker and not go on as easy.
-
Any of you ever tried one of those Cri-cut stencil cutting machines? How about using a laser printer with special film to "print" stencils?
-
 WOW!!! Willing to paint a couple baits for a fee if I have them all primed and ready to go?
 -
Q tips will be on there way this week Mark. Your more than welcome
-
Mark, Shoot me a PM with your address. I've got a couple hundred of the hollow plastic q-tip shafts lying around here. I cut off the tips to use as hook guards when I ship baits. I use them for stir sticks when mixing small amounts of paint and epoxy, but have far more than what I'll use. Would be happy to send you some for free so you can see if they work for what your trying or not.
-
I guess someone got something warm and yellow instead of cold and white in their cornflakes this morning!!
-
Is the Nu Lustre 55 something thats available at hardware stores or does it need to be mail ordered?
-
Etch, I'm using D2T on my topwaters now. Is there enough advantage to the Nu Lustre to warrant switching over? I havent found any problems so far with my D2T coated lures, but I've only been making/fishing them for 3 seasons now, so maybe there will be longer term issues? Just so much about topcoats out there hard to know what is needed, whats overkill, whats "Ford vs Chevy" etc! D2T has worked well for me and so I am hesitant to change something thats been working.
-
How is it on odor/fumes?
-
For you guys looking for Musky size creeper and crawler hardware it is available from the following. There are 2 different styles listed on page 27. http://mooreslures.com/Catalog08-09.pdf For anyone who picks some up and builds some creepers please keep me in mind as I am an AVID creeper/crawler collector who is always looking to add new specimens to my collection. Enjoy, creepers are a blast to build.
-
I use a sharpie and Devcon and have never had a problem with signature smearing.
-
I use Cedar exclusively for my topwater musky baits. You shouldnt have any problems if you follow the suggestions others have offered. To get reasonably priced cedar you can buy 2"x2"x8' (actually 1 5/8"x 1 5/8")at most lumber yards for around $4-$5 a piece. You may have to pick through them to get the ones without knots or splits, but they work well. Another option is to get 4"x4"(3 5/8"x 3 5/8") x 8'. For those I either rip down on the table saw to get whatever sizes I am looking for, or just turn down if I'm not looking to go much smaller diameter.
-
You can get duplicators for most lathes. For the mini lathes they will run you around $300. Try Rocklers Woodworking, Woodcraft, HUT, or any of the woodworking stores.
-
Here's a link to Dick Moores online catalog. The creeper wings being talked about are the "Large Creeper Wings" on page 27. http://mooreslures.com/Catalog0809.pdf
-
The wings sold in the '08 R&H catalog are the same as the new ones from Moores. They are based on the Factory Le Lure wings/brackets. $5.99 from R7H's, $5.00 from Moores. I'd suggest ordering from Dick Moore, he's a great guy to deal with and really knows his stuff! For those not wanting to take the time/effort to hand cut and shape their own wings/brackets these are BY FAR the best that are commercially available.
-
"Frenchy LeMay used brass tubing for his handmade thru-wires...a bunch of heavy Chippewa Flowage muskies will attest that "brass kicks azs!"" Using brass tubing thru the head of a globe is best. You can experiment with both round and square tubing to get different sounds. Same for the tail section on a tallywacker style bait. And to follow Frenchy's techniques one step further you can solder the wire shaft to the rivets in the main body so it wont spin. It also seals off the main shaft hole so no water can enter. I even use brass tubing in the holes I drill for the belly hooks on my topwater baits to help seal it a bit better.
-
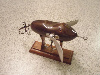
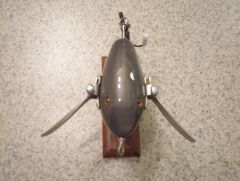
 Heres a small gray mouse creeper. Hand cut and shaped stainless steel wings/brackets. .062 stainless steel thru wire soldered at front of bait and soldered loops on both ends. Tail and shaft and back of bait are epoxied to body. Glass eyes and epoxy topcoat. hand formed wire hanger connecting belly hook to thru wire shaft, brass tubing in belly hole and finished with standard hook hanger.
 -
 Heres a small gray mouse creeper. Hand cut and shaped stainless steel wings/brackets. .062 stainless steel thru wire soldered at front of bait and soldered loops on both ends. Tail and shaft and back of bait are epoxied to body. Glass eyes and epoxy topcoat. hand formed wire hanger connecting belly hook to thru wire shaft, brass tubing in belly hole and finished with standard hook hanger.