

Travis
-
Posts
1,763 -
Joined
-
Last visited
-
Days Won
90
Content Type
Profiles
Articles
TU Classifieds
Glossary
Website Links
Forums
Gallery
Store
Everything posted by Travis
-
I still consider "west coast" to mean a very different thing. The pouring and guys using west coast differ considerably from ther rest of the custom "pouring". Of course we also have various degrees between the two.. West coast I think of a flat sided soft baits that result in incredible action, and incredible colors. The baits have incredible "depth" to them in different aspects. Care is taken in pouring with emphasis in layering, color selection, etc... so you get remarkable blended color combinations when viewed at different angles. It is a much more difficult task to learn and pull off. They are refined baits that to me are like art. Then we have what has morphed to meet the demands of the southern fishing scene. These guys could care less about the "fru fru" west coast style of pouring. Many are just wanting a bait in "name a companies color". Flat sided bait aren't all that big of deal, most of action will be imparted becasue of weight and speed that they are fished at, soft enough so their is some action but they don't want it to rip apart too easy. Colors are more in your face, opaque with a heavy hand on glitter. How it is poured isn't as important as the actaul pouring is just a means to get plastic into the mold. The pouring process itself doesn't play a vital role, as in west coast pours.
-
Creating Your Own Lure Designs--how Do Ya'll Do It?
Travis replied to tclark's topic in Soft Plastics
I use smooth on products typically but many places one can get acceptable RTV. Mold Max 30 is what I typically use. http://www.smooth-on.com/Silicone-Rubber-an/c2_1113_1135/index.html -
Creating Your Own Lure Designs--how Do Ya'll Do It?
Travis replied to tclark's topic in Soft Plastics
When I first started I used sculptey to make my masters. I shortly moved over to just carving the masters from wood because I enjoy it more and more straight forward in making the master (not that sculptey is difficult to use but found myself going through many of the same processes as I do with wood). There is something more satisfying about it for me. As far as symetry that is something I believe one just picks up as they progress. Calipers and other tools make it easier to start with the same "blank" to form into claws for example. With wood I start with a squared piece and can transfer my pattern centered onto the wood. I also mark key points for reference so I have squared reference lines if I have one flat side and freehand the lines on two sided baits. I recently did a small swim bait/paddle tail design, while I didn't take pictures from start to finish I have a few pictures that show the process on a flat sided bait. 1. Draw design on either graph paper or on the computer utilizing whatever software you are comfortable with using. Just basic paint will work. I draw a side profile and then a top profile. 2. Square a piece of wood for transfer of pattern. 3. Divide the wood into sections and mark key points by utilizing a square. For example where the eyes will go, gill slit, back of belly, etc...... 4. Transfer the pattern onto the block and then go to the bandsaw to cut away the bulk excess. 5. Sand and ever cut surface smooth and make no attempt to shap yet. After smooth I will then transfer the reference lines from the top onto the cut surfaces and make sure they wrap around and join. 6. Carve, sand, etc. to desired shape. 7. After I am finished I will dampen the bait to raise grain and sand again. Use wood puddy to fill any imperfections and correct my screwups and sand. Perfectly smooth surface is key. 8. Seal the bait utilizng Zillsner Shellac (spray). Sand lightly and spray again. 9. I like RTV better for molding since it is much more forgiving and allows one not to worry as much about design of bait, with POP and Durham's rock puddy one can design a bait that will effectively lock it into place as it sets. If using POP or Durhams just visualize the bait and how the mold will form to determine if you are going to lock it in place and change the master to avoid these issues. From my pics the eye sockets, areas of the gill plate and the tail would have locked the bait in place if using a solid molding medium. You can see in the RTV mold the areas that would have been issues. 10. With wood I just have an assortment of plexi glass bottoms with pilot holes (recessed for screw heads) and screw the master to the base. With all things don't get discouraged as even with careful steps it isn't going to be exactly the same. Also be prepared to make changes to the bait after you get plastics. Redesign is often necessary so all your hard work may find its way to the trashcan or a "shelf of shame" At Step 3 just haven't transferred lines, from top around bait. Finished master, At Step 9. RTV molds -
It is painly slow on my end also. So much so browsing the forums is not enjoyable.
-
With proper ventilation/fume hood no respirator is needed. Hands down proper ventilation is the proper way to avoid problems. Respirator use is not the best option for various reasons. Proper fit testing, lung function under the strain, allegeric reactions, etc.. are all of concern. If using a respirator you need to be sure to follow manufactuers recommendations. If you have any breathing or heart problems you shouldn't use one until getting tested. Cartridges don't last for ever. Our work practice is discard after 1 month of opening the cartridge or after ~8 hours of use (we use hoods and respirators are for limited applications or secondary safety feature). Wear one if you would like but ventilation to an outside source is really the key.
-
I have never messed with curing of POP molds in a oven. Too many guys have no patience and try to rush every aspect of lure making. Demold and just let air dry. As a test I took a mold as soon as I could remove it, sealed with devcon/acetone thinned and poured. The back of the mold sweeted profusely but the molds never had any issues.
-
I used Mod Podge once and well that was enough. As you listed guys use all sorts of different things to seal. I still use Devcon thinned with acetone (water consistency) and do multiple coats. First few coats easily sink into the mold I keep doing it until I get a nice glossy finish on the mold. It doesn't take too long. You know you are getting there when you brush it on it runs to the bottom of the cavity. Just brush it out when it starts to do this. I loose very little detail in this method. I think it takes me about 10 minutes at the most to seal a mold this way since the acetone flashes off quickly.
-
It has been years ago but I thought some on the forum had used the fry daddy. I thought there was thermostat set screw you had to get to from the underside. Break away a plastic/epoxy drop and then use a screw driver to dial it in?
-
Are you serious? Essentially you are wanting someone to teach you experience? Your best bet is to pony up the bucks and get a guide a few times or just put the time in on the water. I will have to disagree and say history, internet, articles, etc... will be of great importance in understanding systems like this and how to find fish and when. Then with this understanding you can eliminate water and determine patterns more readily when on the water.
-
The process is virtually universal. As long as you get a good adhesion of your bait to the bottom of the designated molding box you will be good to go. Glue, double sided sticky tape, etc.. can be used. I typically use vasoline and just ligthly rub it against the lure surface and then stick it down in place. I like to use molding containers that have a flat and featureless bottom that have a certain degree of flex for easier popping of the mold out. You can construct mold boxes also out of various materials that easily diassemble instead of having to knock a mold out of a container. For laminates you just need to have hot plastic. Pour you first layer then followed by the next. You can layer as many colors as you can do. The trick is to have temps correct and be careful not to allow thick "skins" to form before pouring the next level. With the size sluggo you are using it becomes even easier do to the bulk of plastic. When done correctly you get a completely smooth adhesion line between colors. Improper technique and you get cold cracks in some areas. It is easy to do with the large lures so no worries. Plastic comes down to personal preference and the style of fishing you are doing. I typically pour Calhoun's but any will suffice. Medium to hard plastics usually will work better for larger sluggos since they are more of pure jerk bait that trigger fish do to the erratic action. Softer plastics give more action but rip easier.
-
This is one bait where I think plaster of paris makes the most sense. We aren't having to mold any complicated appendages or undercuts (not that POP can't be used in these cases) so wear/force is minimal on the mold. Easy pour and peel out lure. For a few dollars you can make a lot of molds and be able to pour numbers because it is dirt cheap medium. 10 Inch Jerk Bait
-
I find that if you don't post pictures you don't have to worry about it.
-
Want To Make A Mold Or Reproduce A Old Crankbait, Where Do You Start ?
Travis replied to reel doctor's topic in Hard Baits
How many of this bait do you have in hand? Do you prefer one material over another? If it isn't an expensive bait I like to sacrifice one to get measurements and weighting. If you carefully split it you can then trace to get a side profile if you are wanting to reproduce the bait from wood. One can also just use calipers, ruler, and trace the bait and get a good measurements for reproduction also. Molding isn't a hard process either. Make a clay bed to embed the crank in so only 1/2 of the crank is showing. Make a mold box and use a mold release and cast the first half. Pins, allignment keys, sprue, and venting should be added at this point also. Once the first half is made place the crank into the formed half and cast the second half. RTV works about the best but POP and durhams can be used also relatively easy. The RTV just last so much longer and easier to demold baits from. -
Hmmm. Sort of like the Herter's mold and plastic compound they sold back in the day to make your own frogs, craws, minnows, etc......
-
There are various variables with why and how this occurs. Unless one wants to research electrons, electric fields, heat transfer, etc... no sense in using lureology to explain why one can and/or can't do it. Several claims in the thread are not correct. One shouldn't assume that all glitter is the same. Irregularties in surface, production, product composition etc.. will all vary from manufactuer, lot to lot, and even in the same bottle since quality control isn't a huge issue with the product. Coatings over glitter can play a role in "sparking". Repeated heatings cause decomposition in some coatings, thinning in areas, cracking, and other abnormalites that typically increase in as things are heated. In my experience as one continually reheats some glitters the more likely one is to see the problems occuring. I have looked at different "sparking" glitters over the years and noted such occurrences. I have used all sorts of glitters and the blanket statement all metallic glitters can't be used is absolutely false. I have had glitters that spark and glitters that don't. For me it isn't a big deal. Chuck it or give it to the kids we aren't talking about a major investment.
-
Fishes of Tennesse is in my opinion a much better book and would recommend it over all the Fish of (insert state) books that I have looked at.
-
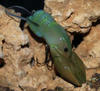
Vodkaman is correct it is a logperch species. Most likely a big scale logperch.
-
It is going to be personal preference and very much dependent on what you are looking for in making baits. Based on the use of a CNC I would say go with the PVC material. Pesonally I use basswood for most of the cranks I make. Balsa second. I used palowina and some cedar for a brief time but still prefer basswood as my main crankbait material. Any of them will work just be aware of any safety concerns with exposure to fines. One piece cranks are easy to do. Drilling holes for weight, line tie, and hook hangers takes seconds and is pretty much fool proof once you have everything worked out (especially if you have the ability to machine two exact sides.) Two piece bodies are nice for weight transfer systems and through wire designs. I only use through wire with balsa baits and don't mess with weight transfer stuff too often. I prefer one piece over two piece bodies but either aren't very hard to do.
-
Lots of filling to do cutting out a rap lip and replacing with a circuit board lip. Not worth the effort in my book. I would rather just build one from scratch.
-
Guess I should be thankful that I managed to get it right when I put mine together.
-
I have made lots of lures inside the house. It doesn't have to be messy at all. A box fan and a furnace filter will pick up fines if you carve witing a few feet. If you choose something like balsa or basswood hand sanding can easily be done and in my opinion stirs up little dust in comparison to power sanding. I set up a card table in a corner of a room for years. Everything goes best if you do things in series. Cut out X many bodies. Put away those materials. Carve and shape baits, clean up and put away those materials. Continue the steps and take all cranks to each step at the same time.
-
You can use Devcon 5 minute epoxy to glue the lips in. You can (not usually done) mold the lip directly into the lure. You can use any plug to make the mold. If it is a wooden crank just a little twisting or sliding of a sharp blade will free the lip. If plastic bait or firmly secured then cut it out with bandsaw, scroll saw, dremel, etc..... I would recommend just making a wooden master a lot more satisfying than copying something.
-
My favorite mold making tutorial of all time. The tutorial at one time was here on TU and Shawn was a regular contributor and I thought moderator at one point. I know he was big help to me when I started making RTV molds. Just follow his tutorial and don't rush it and you will be happy with the results. All my RTV molds have always followed the approach in the tutorial.
-
I would think that balsa would be about the only wood you could use with an epoxy/sand shaper. I have a DIY dremel router table and the amount of wood you are wanting to remove, in my opinion, would put too much strain on the smaller shaft of a dremel bit. I would not forsee the set up lasting long and then of course the risks associated with it. A laminte trimmer or router table would be your best bet for hard woods and only if set up as to avoid injury. Most of my baits are smaller and in my opinion not user friendly for routing. I did set up a jig/pin system to route some larger baits but still wasn't happy with the results and saftey of the system. My only real success has been with larger balsa cranks and a drill press/bit combination. I utilize a clamp to hold the crank and can rather quickly shape the bait but these are larger cranks with thicker bodies.
-
When I first read the topic I had feeling that we might see a post or two from some seasoned crank guys.