


sdfd29
-
Posts
17 -
Joined
-
Last visited
-
Days Won
1


sdfd29's Achievements
")


-
Barlow's shows some alternative hooks for this mold. Look at the bottom of this page. https://barlowstackle.com/Do-It-Herring-Head-Jig-Molds-P3289/ Barlow's also lists several alternative hooks when you pull up the hook style. It has been posted before that if you call them, they can tell you the other hooks that will work.
- 1 reply
-
- 3
-

-
https://fishingskirts.com/product/purple-red-glitter-203-218/
-
I would cover the hook points with a silicone tubing material. It should stand the heat and will keep the hook points clean. The two tone can be created by double dipping the hooks while they are hot, or reheating it after the first color is dipped.
-
Have you tried turning the hook and the wire over. I think the hook is facing the wrong way in your picture. The point of the hook should be on the hinge side of the mold or at least this is the way that I pour my spinnerbaits.
-
I'll second the use of Smalljaws videos on U-Tube. Here is a link to several of his videos. https://www.youtube.com/user/smalljaw/videos
-
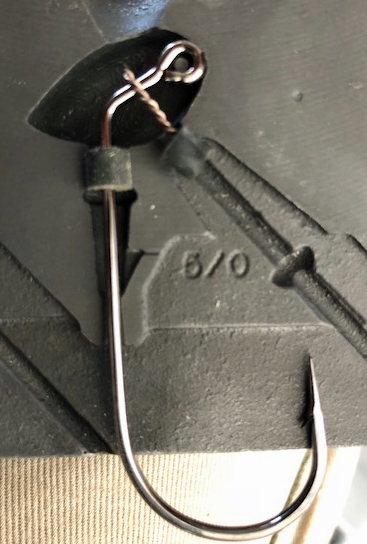
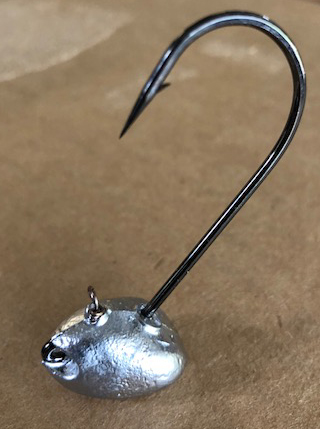
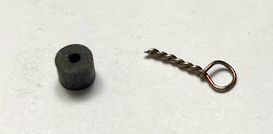
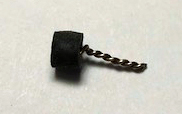
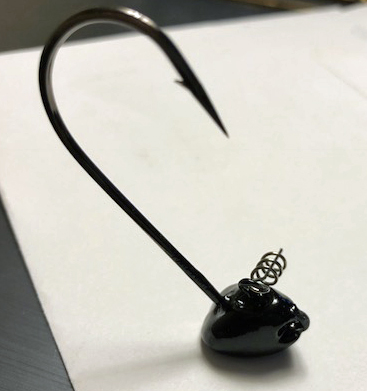
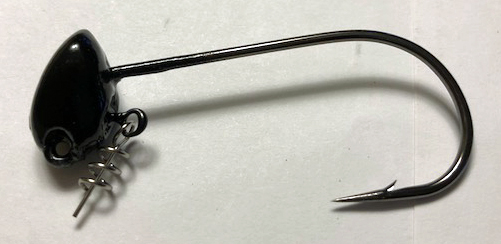
I use a large shakey head jig for ledge fishing during the summer. I have converted the brush jig to a large shakey head to use with 8 - 10+" worms. The first step is to make a twisted loop using 0.022" inch brass wire. I will place this loop in the weed guard slot on the jig mold. I use a silicone jig skirt collar to hold the wire in place and also to stop the lead flow. The collars are not damaged by the heat and can be reused. I also place a skirt collar around the hook shaft to prevent the skirt collar on the jig from being poured ( slightly reduces the weight, but also shifts the balance of the jig so that it stands up better). Here is a picture of the hook and loop in place in the mold. Here is the result prior to powder coating and after the powder coating. I install a commercially available screw lock with a center pin to attach the worm to. I used this jig without the center pin keeper last year and had good luck with it.
-
As Basseducer said, use the Drop Out made by Frankford Arsenal. It will help with the pouring issues. It makes the mold very slick feeling. It is about $10 on Amazon. Looking at the picture, it appears that you had a small pour followed by the finishing pour. You have to make the pour one motion. If you start and stop the pour you will see the pour lines like your top image. It looks like the pour started and had only partially filled the mold, then the pour was stopped and restarted. This caused the lead from being completely poured into the collar of the jig. I have done this myself. I have this mold and it is usually easy to pour. Trying angling the mold a little when you are pouring the jig. This allows the air to flow out of the mold and not get trapped by the lead. I am assuming you are using a bottom pour pot. As far as the weed guards, they come in different thicknesses (individual fibers, not the size of the weed guard). You can purchase stiff or flexible weed guards, it appears that you got the more flexible ones. I have not tried the super glue method, but have seen some where the glue that I used wicked up the weed guard and it was a little stiffer. I use my toaster oven to heat up my hooks when it is cold here. I normally do not heat the hooks in this mold. I store my lead in the pot, i drain it from time to time and clean the pot. Otherwise I keep the pot covered and leave the lead in it.
-
mikemack01; Have you used the Frankford Arsenal Drop Out on the mold??? I think this corrected my issue, even though I did a light buffing of my mold. I did not take much material (if any) off of my mold as I used a soft pad with the buffing compound on a Dremel tool. I think that the drop out did the trick by itself.
-
UPDATE: I have followed CADMANs suggestions from above. 1) I used a dremel tool with a rubbing compound and pad to smooth the edges on the mold. Partially to remove the candle soot and also to smooth the edges. 2) I purchased a can of the Drop Out (from Amazon $9.99 and free shipping). I applied it to the cold mold as directed. After these steps, I poured 25 jig heads. Everyone was removed by pulling on the sprue. They were not loose, but they came out very easily. If you are having issues with this mold, I would suggest that you follow CADMAN's suggestions above. It will be worth your time and effort. Thanks for the help and suggestions.
-
Jeff, I found it on Amazon yesterday and ordered a can. Thanks for the help. One thing I have noticed on the baits that I poured is that they have a very small ridge on the 'keel' of the bait. You can see it upon close inspection and can feel it when you run your fingernail across it. I am going to polish the mold like Cadman suggested and try it again.
-
Thanks for the replies. I am using soft lead, so not sure that is the issue. I will try what Cadman suggested and work on the mold a little. One thing that was peculiar was that the baits stayed in the same side of the mold. It never opened up with the baits on the opposite side of the mold, so the imperfection may be the issue.
-
I recently purchased the SBH-5-A Do-It Swimbait Head Jig Mold. Prior to using the mold, is "smoked" the mold with candle soot. The baits poured well, but it was very difficult to get the baits out of the mold. I tried pulling on the fill sprues, but they broke off. I ended up having to pry the hooks up a little, then prying up on the hook eyes, then prying up on the bait area where the sprue was. Has anyone had any experience with this mold? I think the issue is the keel like area on the bottom of the bait head. Most of the baits were not affected by the prying, but I had a few that ended up with hooks that were loose (not bad, still usable). Just wondering if anyone else had any experience or suggestions. Thanks,
-
I do not like to hang jigs in the toaster oven to cure the powder paint. I tried to make a holder out of 3/4 inch aluminum angle, but the jigs would slip around as I was trying to tighten the two thumb screws to hold them in place. Today I had an idea to add magnetic strips to the aluminum angle. It worked really well with the 1/8, 1/16 and 1/32 jig heads ( I have not tried it with the bigger heads yet). I used magnetic strips that are used to hold up posters on display boards. They are peel and strip, but I used high temperature RTV (from Lowes in the grill section) to hold the magnetics on the aluminum. In the picture the jig heads are being held in place by the magnetics and the thumb screws have not been tightened. Thought some others may be interested

-
Try http://www.predatorbassbaits.com/id69.html
-
Born in Huntsville , Living in Soddy-Daisy, TN just north of Chattanooga. In case your wondering, Roll Tide!