


Unagi
-
Posts
24 -
Joined
-
Last visited
Unagi's Achievements
")


-
If i understand the question correctly, the toaster oven will heat them up just fine. They will be plenty hot and you'll have more than enough time to grab one from the toaster oven and dip the jig before it cools. You're leaving the cookie sheet (or whatever vessel) in the oven with the rest of the jigs and only taking one out individually to paint. Play with the toaster oven temp to control how thick a layer of powder you want to stick. We have all heated a jig too hot and ended up with a 1/4" of powder sticking to the jig head. I have found that the right temp is when the powder looks a bit "rough/bumpy" after it dries and before I cure the jig head. The oven cure will make the powder flow and it will be perfectly smooth when done. Hope this helps, -Paul
-
As mentioned, heat the unpainted jigs in bulk in a toaster oven. Have a pail of water on the floor or bench next to your work area. As soon as you dip the jig in the powder drop into the pail of water to instantly cure the paint. Once they're all painted retrieve the painted jigs from their water bath and hang them to cure in your oven. The water bath is faster than trying to hang them when they're still warm and "wet".
-
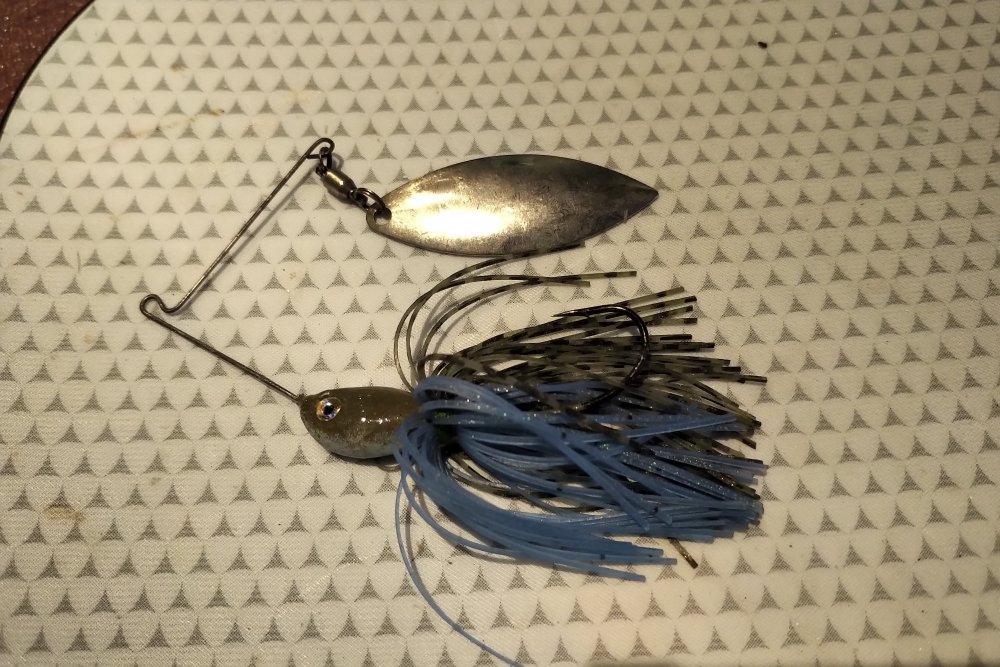
Back in the day (now I feel old....) when I was making a ton of baits, I was always in search of the "perfect" combination. Head design, wire gauge, wire form angles, arm lengths, and hook pattern. Head design was limited to what I could find through Do-It and Hilts (dating myself again). As a broke graduate student, custom design was not part of the program. I eventually settled on piano wire forms. They were thinner (.035 & .032) and vibrated more freely. I wasn't concerned that they tarnished over time given that I never sold anything. Though I experimented with arm length, and the form geometry it seemed that I always returned to a compact design with standard angles. The last variable was the hook choice. I remember making a ton of spinnerbaits and cleverly thought that lost fish would be a thing of the past because I found 6/0 spinnerbait hooks!! Never thought to make just a few to try first...... I think I poured at least 200, custom painted all of them with 4 layers of powder, epoxied the entire head to encapsulate the perfectly positioned 3-D eyes, then hand tied the most gorgeous skirts. Well the first cast immediately revealed they they didn't run true, surprise surprise. And bending them to resemble the x-wing fighters from Star Wars still didn't correct the "torque roll" from the grossly overweight 6/0 hook. Note to self....... use smaller hooks!! As described in my first post, I found that regular gauge Owner offset worm hooks worked perfectly. The compact gap coupled with a fine wire eliminated torque roll. And despite the smaller gap, the fine wire penetrated with little effort which yielded incredible hooking success. A pet peeve has always been hook or wire movement in the head after a catching a few fish. Changing the lead alloy certainly improved the spinnerbait durability but the embedding offset hook design resulted in a rock solid lure. Hope this helps, -Paul Shibata
-
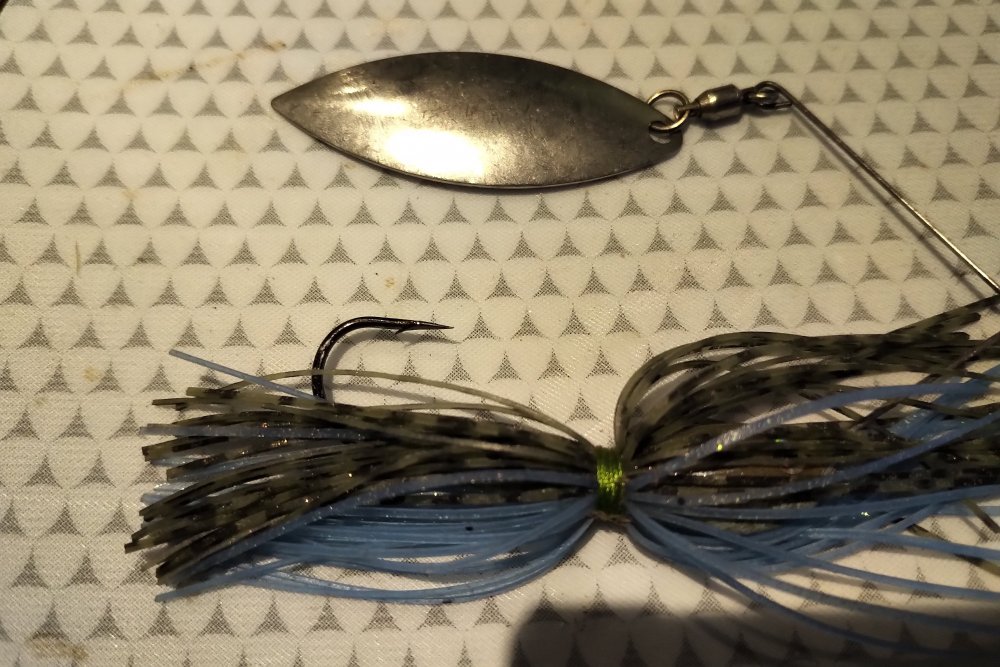
For years I have been using Owner offset worm hooks (regular shank 5301-141) in my spinnerbaits. The fine wire, hooks fish when they breathe on the baits. And the smaller gap coupled with the thin wire gauge results in almost zero torque. The baits run true even at the slowest speeds. I selected the offset hooks instead of the straight shank to help anchor the hooks inside the lead heads. Despite our best efforts, successful hook penetration is diminished significantly given that the entire wire frame acts as a spring and dampens the force applied. And for the same reasons, fish are unlikely to open the gap or deform the hook. Subsequently I have elected to run finer gauge hooks on all of my spinnerbaits with great success.
-
Nemire Ripper http://nemirefishing.com/ Older company that catered to the redfish crowd.
-
Have been experimenting with a variety of rattles for years now. Though I am not a hunter, i have tried every brass cartridge available including some of the smaller rifle calibers. Sealing them was easy enough if you inserted the bb's or glass beads then used a ball bearing which was just slightly larger than the opening which required a bit of tapping to persuade it into position. The ball bearing would easily bulge the brass sealing the hole nicely. The volume and frequency of the sounds could be "tuned" by manipulating; (1) brass caliber, (2) rattle materials (steel, copper, glass etc.) (3) quantity of rattles inside the chamber. Making the rattle was the easy part, attaching it now became a bit of a challenge. My objective was to create a "better" rattle for flipping jigs which proved to be quite difficult. I tried everything from soldering, wire wrap, epoxy etc. None were sufficiently durable and aesthetically pleasing. In the end I switched to making aluminium rattles. Though less than ideal as a material considering the softness of the metal, aluminium rattles were easier to make and attach. They proved to be still loud as heck and quite effective. I used 3/8" to 1/2" aluminium tube which is readily available at hobby stores. The tubing came in 36" lengths. Start by crimping one end with diagonal cutters as if you wanted to cut a small piece off. With one end now "sealed" drop in a few bb's and then cut the rattle with the diagonal pliers "trapping" the bb's between the crimped ends. I would make the rattle approximately 1.5" long. Now further crimp one end "flat" which will enable you to drill a hole through the crimped aluminium. The hook of the jig could be inserted through this hole like a trailer hook and with the addition of a piece of vinyl or plastic tubing, the rattle would swing freely and stay attached. You could also cut the crimped ends to a point which would facilitate the insertion of the rattle into a plastic chunk. Push the rattle lengthwise in a plastic chunk starting at the end where the tails/legs start. push the rattle through the plastic chunk body ending shy of the nose of the chunk. If inserted properly, the hole in the crimped aluminium would be perfectly positioned as if you were going to nose hook the plastic chunk in the same way that you would for pork. Hope this helps!
-
Please contact me. I'll take a bunch. Thanks, fishsbc (at) sympatico (dot) ca
-
The ebay picture may be somewhat deceiving. I think that the hook depicted may be an "EWG" variety from Mustad, specifically the 91768BLN. If this is the case and you need a 5/0 hook I have found the 28 degree hook manufactured by Hookerz to be both superior in quality and much better value.
-
Hey Mark, Weather is a lot nicer than a couple of weeks ago at BassTalk eh ! -Paul Shibata
-
Complete pours and sharp barbs were a constant frustration. Hours of research and ensuing alloy manipulation still yielded inconsistent results. Venting was also tried with varied success. In the end a $5 auto-ignite butane torch remedied all problems. As described, the heat capacity of the wire form and hook shank are the culprits which are causing your problems. After laying in your wire forms and hooks, a quick shot of the butane flame over the cavity and especially the collar will ensure complete pours every time. A quick shot is exactly that, don't try to weld anything!!! You will destroy the temper and have the lead exploding out of the pour hole. Wave the flame a couple of times over the described areas. The delay caused by this step will soon become insignificant as you find your rhythm. Furthermore 1 re-pour more than compensates for the time spent preheating your hooks. Hope this helps, -Paul
-
Spectacular tutorial. Clearly this has become a true passion. Thank you for sharing your knowledge
-
Real Pros in Ontario has a really nice big bait mold. http://www.luremaking.com/catalogue/catalogue-index/catalogue-items/molds/muskie_spinnerbait_mold.htm
-
Please pardon my ignorance, I am not sure what you are asking. The mold is symmetrical and as such I have performed identical modifications to both sides. The aluminium plugs were counter bored using a forstener bit yielding a flat bottomed hole. The hole did not continue through the entire mold. I hope this helps. -Paul
-
It is a relatively easy modification and can be done with a few basic tools including a drill press. I modified the Do-It Shad head Jig (SHB-5-A) to accept 0.25" eyes using appropriate sized round aluminium stock readily available at hobby stores. Once the mold is drilled, high temp glue will secure the aluminium plugs. Good Luck, -Paul
-
Jigmaster, thanks for the heads up on the Cast Industries site. I am forever cross referencing hooks in the search for the perfect jig, spinnerbait etc. Upon closer examination I think that the hook that "Cast" uses is the Gamakastu straight eye Shiner hook (5141). The shape of the shiner hook including the crossed eye could easily be incorporated into a custom mold yielding the appearance of an EWG style jig, furthermore the Pro weedless football jig has a similarly forged hook. The other tell tale is the size selection offering which includes 6/0 hooks which is otherwise rare for Gamakatsu flipping jig hooks which often top out at 4/0. http://www.gamakatsu.com/catalog/shiner.htm Good luck, Paul Shibata


