


SteveLibs
-
Posts
26 -
Joined
-
Last visited
Content Type
Profiles
Articles
TU Classifieds
Glossary
Website Links
Forums
Gallery
Store
Everything posted by SteveLibs
-
http://www.tackleunderground.com/community/gallery/image/8279-moss-mouse-new-fixture/ Homemade rotomold
-
or have a suggestion for it?
-
Anyone come across the recipe?
-
Thanks. That is of course where I shoulda looked for info on a wire bait.
-
With all the hype lately, I would have expected to see more discussion about these rigs on this forum. Or is everyone keeping it close to the vest? I notice e-bay is flooded with them now. Sounds like a great opportunity for the custom lure maker.
-
I thought that the fact that colors yellow with exposure to UV was pretty well documented. Keeping colors in the dark slows down the process, no?
-
This looks like the one, but if you follow the thread I think it leads to updates/improvements http://www.instructables.com/id/Make-A-Rotational-Casting-Machine--For-Under-150/ I stumbled on this one later, and think it would be much more practical and funner to do -
-
I was gonna try help by posting links to the correct location for the pics in the gallery, but then realized I screwed that up the 1st time and still didnt know how to go about it the right way. Anyway, for the mold I used Alumilites RTV, and Sculpey Clay for the master; and I used the Flex-40 product from Alumilite (http://www.makelure....&Name=Flex%2040) for the body; its worked perfectly once I got the right amount down. There's other durometer levels available, but I havent tried them as yet - duro 40 seems to work fine for my applications. As I mentioned in the posting, I picked this process up from a tip Larry Dahlberg gave me on his forum, and modified it just a bit, and given the small size of the baits (frogs, mice) I'm making, the rod dryer method I'm using works perfect for 'spreading' the goop around inside the mold. I previously started building a simple multi-axis rotational casting device following some simple instructions I found thru web-search, but that turned out to be way unnecessary for bass-size baits....my kids use it now to time-warp their batman figurines into hyper-space instead. I've got several hollow-body baits going now, probably more than I will need for the season, and the process actually turned out to be quite economical (as you know the store bought frogs can be costly), fun, and easy once I got going and got over the initial intimidation-factor.
-
-
thats just silly try this: http://www.tackleunderground.com/community/gallery/image/8279-moss-mouse-new-fixture/ search around for the other posts on this forum, the gallery and the huntforbigfish forum for the 'moss mouse' discussion. Some great stuff for making your own without the big fancy equipment. Although there are some great videos on you tube etc for making a really cheap and effective rotational casting system, they are NOT really needed and can be acheived this way with a cheap rod drying motor and handmade stand for less than $20 in equip. The materials from makelures are additional, but work just fine! these were just pilot discussions and are much more refined now - you can do it toooooo.
-
 Actually, the rod dryer is 11 rpm and I think with the new fixture/design (see subsequent photos) it is just right for this application - you cn get a cheap one at cabelas. The trick is the right amount of Flex 40 to get the right thickness - but i can tell you it doesnt take much (a lot for your $). See makelure.com for the material and huntforbigfish.com for Larry's site and links to the forum, etc - these are really his innovative ideas for the process, as I've stated in the forum etc. There are other duro's of the Flex material but this one seems to work just fine.
 -
 Thats right its hollow, and the plastic isnt hot. Its a 2 part 'rubber or latex' called Flex 40. Mix it up and let cure for 45 minutes and its god to go. It's very pliable and durable so will collapse to allow the hook to set. See here for further discussion http://www.tackleunderground.com/community/topic/21746-moss-mouse/page__gopid__162258#entry162258
 -
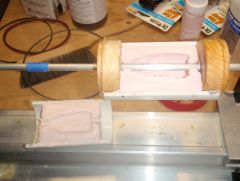
The new mold does not include the hooks. Instead, I used an 8mm tube in the master to create a thru hole. Then, I run an 8mm rod thru the hole. The rod sits centered in the rotating fixture. Spray it with mold release. The thought, as suggested by Larry, is to embed some split shots in a puddle on the bottom half of the bait, and let that cure. Turn the top half of the mold upside down and fill it with just the right amount with Flex 40 to create the right thickness for the hollow body. Raise it up, strap on the rubber bands, turn on the drying motor, and let it spread the goop for 45 minutes until cured. It should create very much the same mouse as before, except a thru hole and no hook. I'll pass the hook thru the back and out thru the front. I've got separate mold I made to create an 8mm 'nose plug' (pink of course) around the eye end of hook, so that it fits nice and keeps it from filling with too much water. I'll post a pic of the finished product when finished, probably this weekend.
-
Maybe one of the aluminum mold makers out there will make a mold for us? Package it with some Flex 40, a few hooks with Rabbit Zonkers, and a pack of split shots to imbed in the bottom, and a cheap rod dryer (in addition to the one in the pic, I have a homemade one from a few scraps of wood and a $6 motor from Cabelas), and I bet you could corner a market. The small bottle of Flex 40 is going to make a LOT of baits.
-
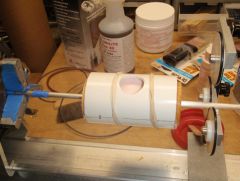
heres the new fixture i made for this. thanks for all your help/suggestions - i think this if going to work out just fine. would be nice to have an aluminum mold that would fit in the fixture instead of the rtv mold, but it will do for now. http://www.tackleunderground.com/community/gallery/image/8279-moss-mouse-new-fixture/
-
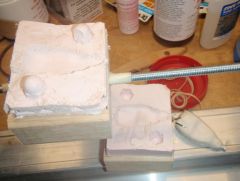
 This is a closed view the moss mouse mold i made - see related pics before this
 -
This is the new fixture i came up with for the mouse moss mold - the mold itself didnt come out so good (bubbles), but I made this so that it easily pops out and I can mold a new master at any time. The rod provides for a thru-wire insertion of the hook. I used 8mm pen blank tubes. I also have a mold in the works for multiple 'nose plugs' using, you guessed it, 8mm pen tips to form a mold that will go around around the eye of the hooks, and then simply push into the mouse from the backside to fit perfectly in the nose. See the related pictures before and after this one.
-
LOL - you wouldnt want to see the video - it was messy, lacked professionalism, and was full of cussing. This was actually my very 1st mold as well - all prior pouring experience was with purchased aluminum worm, craw and solid frog molds. I'm a rod builder, not a lure maker. You shoulda seen me freaking out trying to pull the 2 sides of this RTV mold apart after it cured - they were stuck! I either didnt apply enough mold release, or the mold release didnt work as well as I thought it would. Also, another goof occurred when I laid in the hook. I CA'd the rabbit zonker to the hook with pro soft, which works very well - but trust me, dont do this IN THE MOLD like I did (what an idiot) - the glue dripped onto the mold and made a hard spot/indentation that made a thin spot on the top of my hollow-body bait. What did amaze me was that the 'slot' for the hook worked so nice using hooks in the master - I dont know why I'm so amazed, but I am. I wasnt so confident about it, but in the end the hooks fit perfectly into the slots in the mold and dont get covered up. PS - I'm also modifying the mold fixture. For one thing, I dont need all that wood. For another, the all-thread needs to be better centered and I'll use nuts to tighten the mold on the rod. Finally, I need tighter rubber bands and a faster motor to improve the flow/spread and containment of the Flex 40 inside the mold.
-
Thanks Frank. That makes a lot of sense - I'll try it when I get a chance! One thing thats becoming obvious as I tinker more with this today, is that very little of the Flex 40 is needed per bait and I'm wasting some by making too much but I'm concerned if I use too little that it wont mix as well. It would be more useful I think to make a multiple molds, or multi-bait molds, for this process. Regarding the rod lathe....Some parts may be Clemens. I didnt buy them, but rather inherited them and dont know their source - some folks from RBO think they are clemens but cant say for sure. Other parts, like the supports, I got from Renzetti afterwards, and as I understand it they bought the Clemens line and continued it so that they work, for the most part, together anyways.
-
I'm thinking maybe just another layer that I lay the hook into and then let cure around the hook...
-
Its no secret - I'm not in it for the commerce - and would love to see more of this type of bait copied and improvements and innovations made to it in the custom tackle making community. You can find the initial instructions for this on Larry Dahlbergs forum, where he provided me tips for making a Scum Frog. I modified them a bit for a moss mouse instead. Anyway, here's a pic of the RTV mold I made and the master from sculpey you can see in the background: http://www.tackleund...oss-mouse-mold/ This is a hollow body mouse, so the body flexes/collapses when the fish bites - exposing the hooks - and returns to shape when removed. I poured a little Flex 40 in the bottom mold and let in cure. Attached the rabbit zonker to the hook with pro soft CA, and laid it inside. I attached a swivel so the fish can't get leverage on the hook, and laid the swivel head out the top of the mold and pinned with the nail shown in the pic. I filled the bottom mold almost to the top with Flex 40 (you'll have to play with the amount to get the right thickness depending on the depth of the mold), attached it to the top mold with rubber bands, and started the drying motor - I'm already working on a different fixture as the one in the pic is somewhat clumsy. About 40 minutes later, it was ready to demold. But as you can see, the swivel head moved around so it didnt come out as good as I'd like. Larry suggested using a tube for the hook, which I'll try using pen makers tubing. Any other suggestions would be awesome. Thanks.
-
the mold used for the moss mouse. sculpey master in background
-
http://www.tackleunderground.com/community/gallery/image/8266-moss-mouse/ How would you folks deal with the hook moving around in the above? Maybe an initial layer to embed/hold down the hook/swivel, or a tube? I was trying to just stake it to the rtv mold to avoid having to do more work/layers, but it didnt work so well. PS - not sure this belongs on a "soft plastics" forum as its not a soft plastic, but didnt see a better place to ask.
-
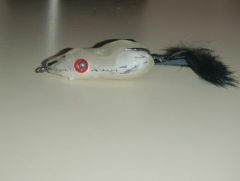 My 1st attempt at this was a disaster. This 2nd attempt was a little better. Used a smaller amount of Flex material to produce just about the right thickness for this hollow body bait. It casts, floats, is very durable and pliable, and moves well - maybe not as pretty, but sure is just as functional and much cheaper than the original. Need better fixturing of the mold to the rod dryer, and maybe a little faster motor. Also need to pin the head of hook better so it doesn't move about and get all crooked like it did here. The tail is a little ratty, but that because I re-used it after the 1st attempt and it was messy. The next one to come out better will get more serious detailing and TLC; and maybe a sister frog.
 -
Does anyone have any idea how these are made http://southernlure.goodbarry.com/_catalog_41566/Scum_Frog ? Any molds or pictures of how to make something similar - relatively 'thin' shell hollow body soft but not so soft (kinda like plasti-dip but better) bodies? What plastic/recipe would be used - I've only poured soft plastics thus far, and bought the pre-molded hard plastic bodies, and neither of those would fit the bill.
