atlasstone
-
Posts
45 -
Joined
-
Last visited
-
Days Won
1
Recent Profile Visitors
641 profile views
atlasstone's Achievements
")
Newbie (1/14)
8
Reputation
-
I just use the rubbing compound linked above. If you wanted to polish it further than what the rubbing compound does, ironically I would try a wax or polymer polish similar to what would be used on a car or, probably more appropriate, a boat. I've heard good things about Bass Boat Saver and Slick Mist
-
You can always buff that haze out if you like. Here is a piece of scrap that I buffed out: Here are some tests I did with and without adding the mekp using single and double coats: I enjoy the flexibility of Solarez because it affords me the time to make sure the coat is smooth and I have the coverage I need (if you don't add the mekp). With the other clears it's only a matter of time before it cures whether you like it or not and I'm simply not skilled enough to trust that I got it right the first time Others have asked how I buff them out so here is my response: I got all of it at the auto parts store. I think it was NAPA because the one we have here has a paint department. What I used was: 1000 grit wet/dry sand paper ( I dry sanded but dry sanding followed by some wet sanding may reduce polish time... I've not tested it) http://www.napaonlin...3013_0006436611 3M Perfect It II Fine Cut rubbing compound (39002) http://www.napaonlin...9002_0006436791 http://www.amazon.co...2/dp/B0002NUNB6 Micro fiber cloth I used the sand paper until the surface was even and dull, then I wiped off off the dust and put a small dab of rubbing compound on cloth and just rubbed the finish with moderate pressure. Circles are best if you have the room, but not necessary. I think any rubbing compound and cloth will work, but I prefer the liquid over the pastes. I use it all the time to remove screen printed logos off of plastics and to get minor scratches out of car finishes etc. If the finish is really uneven or wavy, you can use a 600 grit sandpaper to flatten it out then smooth it out with the 1000 grit. Anything more abrasive than 600 and you will have a tough time getting the scratches out. You can even use a 2000 grit if you notice any scratches, but with the Solarez, I have not needed to go down to the 2000. I think the solarez is hard enough that you could use a buffing wheel ( cotton not the felt) without burning through it if you use it with the rubbing compund, but I do all of mine by hand. If you do one practice piece, I'm sure you will get the hang of it quickley.
-
You can find MEKP at Lowes, WalMart and most auto parts stores. It's most commonly used to harden fiberglass resin. In fact, most places just call it fiberglass resin hardener. I use it in Solarez and for fiberglass work. For small work, you typically only use drops of it at a time. Use the same precations for MEKP as you would for any solvent like acetone, turpentine etc.
-
Over reducing some of Createx's Wicked detail line can yeild some cool ghosting effects as well as using their Auto Air candy pigments. For depth, I stay away from using black to shade and go with a reduced raw umber or reduced raw umber mixed with the prominent color of the bait.
-
my apologies for the delayed response. I used very little MEKP when I tested it. I think I added one drop per ounce of resin. I wish I would have timed it to see how long it took to cure by itself but I know I had plenty of time to work with it. I ended up curing it under UV light but left the remainder in the cup and meant to check on it but lost track of time. However, I did come back to find that it cured on it's own with the MEKP in it. I just don't know the exact working time, sry.
-
You can also put a drop of MEKP (fiberglass resin hardner) in solarez if you're concerned about light not getting to some sections of the bait. Most auto parts stores ans walmart carry it.
-
What were the issues you ran into with this design for cranks? It seems like it should work if you change the design of the bar pulling the lure. Perhaps a "hangman" type set up (sorry, I can't hink of another way to describe what I am thinking for the wire).
-
For me, I just wanted something to test crank baits in. From an 'end user' perspective, I needed something: 1. Easy to set up 2. Easy to tear down 3. Easy to store 4. Required little real estate (benchtop) 5. Could be run indoors From an engineering (and I use that term loosely) and design perspective, I determined that I needed: 1. Fast flow 2. Consistent flow 3. Controllable flow 4. Adjustable flow 5. Tall water column Anything else such as turbulent vs lamnar, round verses angled etc are really solutions so determining the right solution to meet the requirements is the real challenge. My biggest struggle was getting the water column to be tall enough to allow the bait to move in it without falling out of it. Hazmail's ide might very well solve that if the blades are tall enough like a paddle wheel of sorts. I have to say that from a consisitency perspective, the laminar flow looks to be the way to go because of how it splits the column into layers. I'm interested in hearing more ablout the prop idea too. All of my tests were dismal failures when using a prop so I'd like to know what I did wrong. I am glad that this topic has taken off though. I think it's a worthwhile topic and a seems to be a respectable challenge as well. I'm not sure if I answered your question but I hope it helps.
-
The issue I had putting the lure directly in the flow of a pump was trying to keep it stable. My assumption is that it was falling out of the flow. Do you think the pool pump would provide a tall enough water column or do you think it's just a matter of finding the right distance as the flow spreads out? Agreed. I've seen no difference in performance from baits rated to different depths. It's the same as running it beside the boat on short line to check the action while the boat is moving.
-
My theory is much like Vodkaman's in that the CoG needs to be below the CoB to maximize stability. It doesn't necessarily remove the roll, but it does help. This explains why taller baits tend to be more stable and shorter baits roll more. Much in the same way that flat sided crankbaits tend have a tighter action but rounded ones have a wider wobble. Here is how I view stability in swimbaits (no making fun of my drawing): With that in mind, here is my theory on rolling. While at rest, all is good, but when it moves, there are several things going on. The distance between the front and back of the bait will grow and shrink as the side to side movement is created. This has a slight effect on the side to side stability as the "footprint" moves back and forth across the center line. Assuming that the ballast is mainly in the middle section, the weight will move away from the center line, which acts as an axel, causing the bait's middle to drop. As it moves back to center, it stabilizes and then the imbalance shifts to the opposing side. Here is another poor drawing of what i am talking about: Assuming this makes sense, to Vodkaman's point, it is more than just stability as far as the roll is concerned, but stability certainly helps as it takes more force to pull it off balance and makes it quicker to stabilize at the center. If the movement of the weight across the center line causes roll, then to build on Vodkaman's theory, it would stand to reason that the roll might be reduced if the ballast was greater in the front and rear sections with just enough to stabilize the middle to decrease the amount of weight moving off center. That's just a guess though as I'm sure there could be other impacts to the action. hope this helps!
-
I had the same issue with a crankbait design I had and through my research I found that a good understanding of stability really helps. The center of gravity is where I started looking but found that the relationship between the center of gravity, the center of buoyancy, the metacenter and the impact they have on the overall stability helped me understand how to tighten, loosen or remove the roll of a bait. Here are a couple links if you are interested: This is where I started - http://www.planetseed.com/node/41133 This one has several pages and it goes through buoyancy, stability, COG, COB, metacenter etc. - http://www.cruisingonstrider.us/Buoyancy.htm
-
I just used mirrors. You can get cheap plastic mirrors (or even glass ones if you want) like the ones people hang in lockers, from Amazon. I like the plastic ones just because they won't shatter and I can flex them a little bit.
-
Good find! I have an email into the company on the Discovery Video. I'll let you know if i come up with anything.
-
Ugh... I was really hoping that would work out, but you did get results so that helps. I'm really regreting not getting any pictures or video of my first few designs. I'm wondering if the laminar flow idea in combination with an oval tube design might work. I took another look at the laminar flow videos and it seems that the straws stabilize the flow, but it's the pressure in the cylider pushing through the hole in the end that actually causes the current. All of the designs I found have a round hole in the end, but I'm wondering if (for our purposes) the end could be shaped like a rectangle and still take advantage of the layered water column.
-
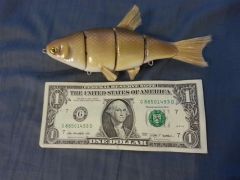 Thanks! Many thanks to jrhopkins for his video. I used a lot of his tips for the construction. Now that I think about it, the dollar is an abstraction of how much 'sense' I spent, which indirectly shows how much have left.