Stonepointer
-
Posts
17 -
Joined
-
Last visited
Stonepointer's Achievements
")
Newbie (1/14)
0
Reputation
-
Thank you. I can think of 2 things that might have gone wrong. One was using a salsa cup and the circular depression in the bottom rim did not allow for a full mixing. Two, I was brushing it on possibly past the workability duration. After mixing it in the bottom of a soda can, I put on another coat this morning and will check it later on this evening. I Hope this solves the problem.
-
I put a topcoat of this on a lure this morning, and it is cured on all but one side, which is still a little tacky. I mixed it from a syringe and stirred very slowly and made sure the lure was clean from any contaminants as well as using disposable gloves during the process. Will that side eventually cure or will I need to put more epoxy on?
-
Thank you everyone for the replies. I guess it does seem a little redundant to gloss the paint when a clear coat of epoxy will be applied later on. I was concerned that it would just look like a flat coat of paint under a clear glossy coat of epoxy. I was thinking maybe the acrylic floor finish would somehow bond with the acrylic paint to give some kind of shine to the paint, and it does to some degree make the paint shine visually a little bit more. As far as the floor finish gumming up the needle in the airbrush, I did not use the Badger 350 clone, but the other cheaper brush which is some kind of straight barrel shaped fluid cap siphon fitting. I am planning on using the clone for airbrush specific paint only. Last night I glued the iridescent plastic ribbon strips on the sides, then I spotted it using an old toothbrush dipped in paint and flicked the paint at a distance onto the lure. After this I applied the plastic paste on eyes. This morning I decided to use a hairdryer on it as BobP mentions and it is now probably dry enough to apply the epoxy coat. The green paint seems lighter in color than it was yesterday, but it still looks like a small rainbow trout, hopefully enough to fool a fish. It is far from perfect, but once the eyes were placed on, the lure really seemed to take on more character. I am thinking about using red treble hooks with it when I get I get to that step, but I am still not sure whether I should or not. Anyway, this is one of my more serious attempts at making a wooden hardbait, but even if it does not turn out in the long run, I will take it as a learning experience to make better lures later. Thank you all very much for the information.
-
Today I made my first use of an airbrush and I wanted to start out using cheap craft paints, because I do not want to waste good airbrush paint while learning how to use an airbrush. Okay, I am also kind of cheap, but I do intend on purchasing either some Createx, Spectra-Tex (which is the most closely available airbrush paint I can find), or maybe some other more efficient airbrush paint in the near future. However, in the meantime while I am learning, I will use some of the water based acrylic craft paints, because they are really inexpensive. I am using a siphon type airbrush; one is the kind that a discount tool warehouse sells and I also have a Badger clone of the siphon type put out by a model making company. Of course I had to thin the paint I was using and did so by slowly adding distilled water and mixing little bits at a time so it would not lump. I also added acrylic floor finish and came close, but not exactly at about 1/3 by volume of each substance of paint, water, and floor finish. Really, I just mixed the 3 substances in that order until it seemed to have about the same thickness as best I could remember as some Spectra-Tex I picked up and shook at a local art supply store. I sprayed 2 lures today, already with a dried D2T seal coat over foil and the paint sprayed okay with a belly coat of white and a mix of colors that seemed close to trout greens I had come across in the past, but it came out a little flat when it dried. One lure came out fair as far as spraying and masking was concerned, and the other not so much. No clogs, but I obviously need to work on how I move the brush as well as the distance of the brush to the workpiece. I also tried to gloss the flat looking paint after it dried to some degree with a model brush and floor finish. I think using a model brush was a mistake because it started to grab up some of the already applied paint and caused some small holidays. The after coat of floor finish will give a gloss to the paint though, but the next time I try this, I will instead spray a mix of floor finish and distilled water instead of brushing it. I will have to experiment with the ratio of water to finish, as I am not sure I should spray the finish alone from the brush. I will also give the paint longer drying time before trying to gloss it. After this I want to use some thin strips of plastic iridescent ribbon glued on the sides of the lure and some paste on plastic eyes, I will then over coat with some more D2T. Anyone have an idea how long I should wait before applying the D2T? I obviously have to wait for the glue on the plastic ribbon to dry, but I might do more lures this way, if it is feasible. With lures with just paint and gloss alone I am thinking maybe 3 days before applying the D2T. If anyone else has ideas on how to gloss flat looking paint I would like to hear them. I know some will say just buy the gloss type of paints but thinning with water flattens the paint to some degree anyway.
-
I have never used etex, but from advise I have found elsewhere here on other types of clear coats, you should probably mix it very slowly and make sure your coats are applied very thin. I also use latex gloves when using epoxy, but I make sure I do not use the powder treated gloves, the powder could end up getting to your work pieces.
-
I have not even started to paint mine yet, but from what I understand a lot of people precoat with D2T to seal their lures before putting on primer and paint and then put another coat of epoxy over the paint. I am thinking with the way this stuff behaves, the throat detail might give a slight stand-offish or 3D type effect, unless you paint it all over again; this might depend on how thick or thin your epoxy coat is. .
-
I have foil that I saved from roll (the little drum shaped ones) chocolate caramel candies. I have been thinking of using them in foiled wooden lures, but I do not know if they would be practical, until I make one. These are really thin and a little delicate with one side gold colored and the other a mildly frosted silver. I have cut away the over wrinkled ends and carefully burnish out the foil over a magazine with a smooth tool and lightly pass with thumb and forefinger as many wrinkles from the rectangles of foil as I can possibly get. Then I wash them in dish soap and slow running warm water and burnish them again the same way, dry with with a folded paper towel, then I place them in a book. I was wondering what would be a good spray adhesive for this to be put on over a dried precoat D2T. I had thought about the 3M stuff for this, but it is kind of pricey. Anything cheaper? Would the Elmer's work for this?
-
Thank you for the answers. I have been thinking about ordering some of that McMaster-Carr SS soft temper wire, that I found using the search engine here. I am not sure, but It seems as though jewelry craft wire has a different gauging standard than most other types of wire. I can't really decide on what gauge to use from McMaster-Carr but I think most lure wire sizes are somewhere close to .041", so maybe I will try that. The .032" and down is probably too narrow for my purposes on this. I have some 6" SS closed loop wire for making inline lures at .031", but I think it is too narrow and probably too stiff for my uses in a wooden lure.
-
Correction on wire size it is about 22 gauge I think.
-
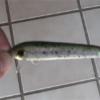
A while back, I carved a couple of small minnow lures from some firewood scraps and did not really know how to go about putting hook hanging hardware on them. The minnows are 2 9/16" long by 5/16" thick, one piece minnow lures and I eventually decided to have some kind of through-wire riding under them deeper in a saw kerf on the bottom of the minnow and then epoxy over the through wire. I am not ever sure about how to go about setting up hook hangers on the shorter carving. My first mistake was how the wire was to be twisted and I subsequently made a closed wire eye loop at 2 ends with a twisted hanging loop at the bottom and epoxied the wire in the kerf with the barrel twists on the outside ends. When I first did this, I was guessing on how this should be done and I guessed wrong because when a fish fights they will bend and weaken the wire at ends. My second and much bigger mistake was the kind of wire I used which was just happened to be convenient to at the time. It is jewelry craft wire about .026" thick and it bends too easily. Although there are ways to strengthen it with different twists, this stuff is not really suited to every fishing application. I suppose it might be a little stronger if I epoxied the barrel twists into the kerfs. I am wondering what would be the best kind of wire for an ultralight lure this small? It might be too late for one of these potential lures, but I might try to salvage it if possible, by placing epoxy over the ends. I don't want to make the same mistake on the other one.


-
Thanks BobP, I will look into that and have added their site to my fishing favorites.
-
Thank you very much for the answers. I just picked up a couple of plungers of D2T 30 minute cure today which was not at most of the larger hardware outlets around me. I already had some 5 minute, but from what I have been reading here and there, the 30 minute cure is far superior. It was a smaller store that carried it, so I consider myself lucky to have found some.
-
Hello everyone, I made an earlier post in the hardbait category concerning casting spoons. I was not sure that the questions belonged there or here, so now I am posting similar questions here. I was wondering what would be the best bevel angles on the opposite ends of casting spoons for small quarter and eighth ounce spoons about an inch long? The other question is what would be a good metal tint paint for a stainless steel casting spoon? I found some automotive translucent metal tinting paint online and I wonder if this would be good enough or is there something made specifically for metallic lures or metal that would be exposed to water? Also what would be a good extra protective clear overcoat on any paint jobs I might do on a casting spoon? I have used high grade nail polish to protect a regular paint job on homemade spinner blades and it has worked so far, but if I use a tinted paint should I look towards a different option?
-
Thank you Kajay920, I will do that.
-
Hi everyone, I am a beginning lure maker and I have a couple of questions regarding casting spoons. I am near finishing up a couple of small stainless steel fluttering casters made from a dimpled spoon handle obtained from a cheapie store. They have been beveled at the ends on opposite sides to try to gain some kind of action from them similar to a well known casting spoon but they are definitely not beveled at the same angles, so I am not sure how well they might work, if they work at all. If I make more, what would be an optimimum angle for bevels on opposite sides? I can use them as is right now, but I would also like to possibly dress them up a little by maybe painting them and maybe feathering the hook, but I would like the metal to show through on the spoon especially on the dimpled side. Is there a metal tinting paint that could be used to achieve this? On my smaller casting lure I would like to possibly get a two tone tint. Any suggestions would appreciated.