


granddadslures
-
Posts
14 -
Joined
-
Last visited
granddadslures's Achievements
")
Newbie (1/14)
3
Reputation
-
rcbv has good points. it's my understanding that all you would have to do is change your product by as little as 15% and you are good to go.
-
try this? drill your eyes into the wood before you begin the finish process ( 3/8, 5/16, 1/2 etc.). Use Brad Point bits. after priming/sealing, you should still have eye dia. and center point. after prime/seal is dry, take your Brad Point bit and 'gently' hand turn the bit to clear the eye socket. paint. when paint is dry, 'dab' a little wood glue in the socket and let it dry until opaque. press in 3D eye and let sit for a bit.......finish over.
-
have one, don't know how old it is but with all the teeth marks it surely isn't new. total length nose to tail is 8". weight is 3.35 oz. front belly hook is 2" back from nose and the weight is located right behind that. appears to be 2-1/2" back from nose.
-
one thing you might try is using different grit's of sandpaper. the heavier the grit the more stain it will take and the more fine it is the less the stain will soak in because you are closing the pores of the grain.
-
take a look at Hagen's ( in South Dakota) for large quantity.
-
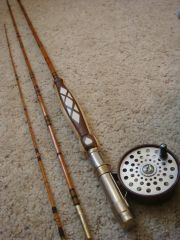
refurbished antique bamboo fly rod.
granddadslures commented on bluewaterspecial's gallery image in Best Custom Rod or Reel
 VERY NICE!
 -
 in that case, 4X cool.
 -
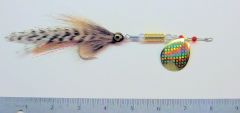
cool combo fly/spinner.
-
Dieter, thanks for sharing. really like the lure and the style. as a classic lure maker myself, am now toying with the idea of trying to make one of that style myself...love it! however.....and ya'll forgive me cause I truely mean well....your production methods are just this side of primitive. Example: eyeballing everything and having to go back and bend the screw eyes to center. If I may....when cutting the length of your blank, cut it 1" longer ( 3" finished, 4" blank ). when you start turning, leave approx. 3/8" on both ends square, working inward from there. finding the center of these square ends will allow you to find center on all four sides. plus cutting off square ends is much easier than cutting off round ends...the roll/stable factor. also before cutting off the square ends, you can make a jig or clamp a guide down and push the lure into your sanding disc to get the same angle on the diving lip ( whatever angle you choose ) every time, making it nice and straight and flat. got your centers marked, got your lip sanded flat/straight....cut off the ends....good to go. again, truely mean well and hope this helps more than hurts.......PLEASE use a tape measure/ruler/square on everything. you would be surprised at how much better your already great lures turn out.
-
have also used these lips on cedar lures and as Mark say's I drilled two holes from underneath, thru the wood, thru the lip, and halfway into the head. cut two pieces of ss wire just short of the hole length (ss wire being scrap from other thru wire projects) and glued in, puttied over. wouldn't know they are there by looking. most glues today will probably be just fine on their own, but I consider the pins a great bit of extra insurance. extra work, better sleep at night.
-
Woods I Can Access To Make Lures, But Not Sure What To Choose
granddadslures replied to Tallbald's topic in Hard Baits
TALLBALD, if you have ready access to (Eastern) Red Cedar, use it. have been a yacht carpenter for over 35 years and have used/worked with every type/exotic wood grown. for the past eight years have been using Eastern Red for all our lures and will continue doing so. great wood, great price. -
on that particular model would it help to move the eye further back above the mouth/lip slot?
-
the fabric is called "netting fabric". I mount it in an embroidery hoop ( 8" ). hoops come in a variety of shapes and sizes. the bigger the better. plastic ones are better than wood. mount the hoop with fabric on a bench upright, hold lure tight against back side of fabric and shoot your paint thru. done deal.
-
try a fabric store. my wife picked up yards of high quality material for a couple bucks.
