jonister
-
Posts
749 -
Joined
-
Last visited
-
Days Won
2
Content Type
Profiles
Articles
TU Classifieds
Glossary
Website Links
Forums
Gallery
Store
Everything posted by jonister
-
I have a Ryobi 16" scroll saw. I get it to work good for cutting the general shape of lures and for fins and lips and such. It cuts everything fine. My only issue with it is that it can't cut much anything over 2" thick. Essentially I can do shape horizontally but not vertically in my initial lure body cuts.
-
Spent .22 works great. I also use worm rattles occasionally. You can also drill a hole straight through and cap both ends with a countersunk piece of metal or plastic. Add some BBs. Circuit board sounds cool too. Play around with shot size, material, etc.
-
240-300.. now we are talkin'!!
-
Yeah Dave we will keep your products in the states!! This thread really is awesome though. I work for a company that makes some really cool stuff sold around the globe. Some customers overseas wanted samples and within a year this complex crap was stolen. I believe it when I see it, but it really is sad.
-
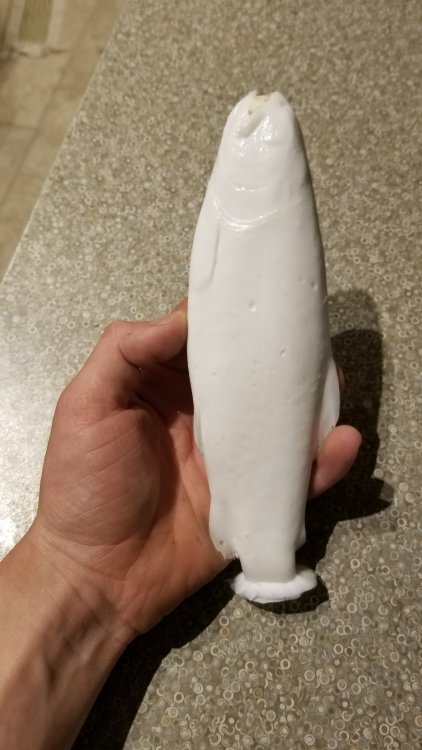
I forgot to mention, I cleaned the mold very well before pouring with alumalite amazing cast white. It cured fine, but here's a question for the alumalite guys. It says on the package I can mix 1 to 1 but fails to say if it's by volume or by weight. All the videos out there use tiny measuring cups and obviously I cant do so, as I used about 180 grams of resin. If it's by volume I will need to get large measuring cups. Also, I filled the mouth in with clay so I would not get mold material in there
- 1 reply
-
- 1
-

-
Maybe this has been brought up before, but just for fun I decided to make a mold and pour a resin fish. This is my first time trying this so I figured maybe someone else could take away from this. First off, I started with a fresh 9" or so trout that I froze. I made a mold box and suspended the fish tail up. Next time I do this I will probably skewer the fish mouth to tail because he wanted to flex on me when I poured the silicone. I used smooth-on Oomoo 30. I would have loved to de gas the mold but it was too big for my air chamber. Next time I'm going to use a smaller fish as well. This is a one piece vertically poured mold by the way. Upon demolding I noticed I lost lots of scale detail due to slime on the fish. Next time I will spend a lot more time making sure the fish is dry before I freeze and mold. Also going to again make a smaller mold so I can de gas. I do not have a picture of the mold but here is the finished product. Probably will mess around with it a little but I'll try again on a small bluegill or shiner next time. My plan with these it to mold the lures I produce from the blanks.
- 1 reply
-
- 1
-
-
Mark's idea with the swivels is great! I love to do that as well. If you look at popular handmade baits, a few of them implement such methods and they seem to be popular. Just a tip though; go buy your swivels in person. Ive ordered stainless a few times offline and ended up with stainless shark swivels... make sure you like the size
-
For a similar effect, take your favorite lures out laser tagging
-
Really depends on the size of it. If its very small or along the centerline, like where ballast would be, I like to use spackle as it is very light and has less effect on the balsa action. A balsa plug could work too if the hole is too large
-
3d printer; look at Cubepro. 3d scanner; Xbox360 or Xbox 1 scanner.... trust me, it works! However, 3d scanners are not as accurate as you would think, unless you want to spend a very large sum of money
-
 Thankyou!
 -
I spent a year on some age old CAD software for high school metals class and graduated to Rhino the next year. That stuff is FUN! Seriously I never would have learned so much so fast if my motivation hadn't been around fishing lures.
-
If you are the right minded, mechanically sound, determined person I dont see why figuring them out would be too difficult. It helps to have a good base in CAD and CAM. Start with a 3d printer! Screw around till you get a feel for the software and then transition over to CNC.
-
Time is my enemy these days
-
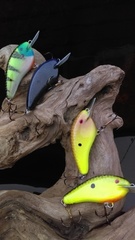
Little glide for smallies and whatever else. Slow sink and very good action
-
-
At this point I'm too busy in life, but I don't doubt we could do it! Especially with your design skills
-
Dave let's band together and make some beast of a machine so we can post the schematics up for free
-
See if your local auto shop will let you in on their clearcoat, or see if they will throw a few lures in on their next clearcoat run.
-
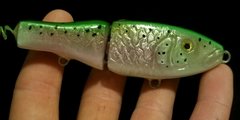
![20180511_140324[1]](https://www.tackleunderground.com/community/media/monthly_2019_01/small.825485745_20180511_1403241.jpg.c0be2b6e0345dc7b82a293e0faea117f.jpg) Is this one weighted or unweighted? Looks awesome!
Is this one weighted or unweighted? Looks awesome! -
Make yourself a heat box! Or you can cure your paint with a heat gun in between coats.
-
A easy adjustable balast I learned and used just yesterday is lead solder wire. Especially on your first few baits, get it initially where you want it and then cater to water temp, line material, hook weight, distribution, etc with the use of lead solder around the hook shanks. A smaller diameter solder shouldn't affect hook ups too bad. I just used this on a floater jerkbait to make it slow sink in cold water. Another plus is its cheaper than suspend dots. So many possibilities!
- 15 replies
-
- 3
-
-
- clear coat
- crankbait
- (and 2 more)
-
Dave I think you just solved a problem of mine I was having some time ago! for some reason I never considered density of epoxy in my equations. As far as epoxy thickness and weight, on big baits it is still important, however starting with variables such as bill size and placement along with ballast weight and location will affect action more than topcoat. Topcoat should be last, so you should have more room to adjust it accordingly. There is lots of great stuff in the search function regarding size and bill shape. Generally larger the bait, larger the bill. Plus variables like depth goal and placement.
-
The rattle can clear has yet to set up on the bait. I'll try art resin and if that doesn't work I will have to figure something else out
-
Hmm. Thanks for the info on clearcoating! I'll avoid the 2 part, maybe try it on a small area. The guy I'm painting it for had painted over it with rattle cans and that had lasted until I took it off with acetone. I might try the rattle can clear and see how it lasts. Hes a friend so I figure I can paint it again if it comes off.