


JD_mudbug
-
Posts
419 -
Joined
-
Last visited
-
Days Won
55
Content Type
Profiles
Articles
TU Classifieds
Glossary
Website Links
Forums
Gallery
Store
Image Comments posted by JD_mudbug
-
-
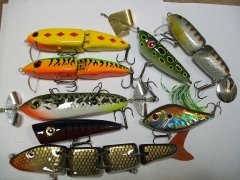
I have fished the bait at the top right. It is a wake bait. It will go under a bit if I hold the rod tip low. The blade flaps. The back section tapers to a flat end. A small eye screw is at he top of the flat surface. A split ring connects a #5 Colorado blade. The blade flops around randomly and strikes the back of the bait. It sound like a few forks falling down a set of stairs, a lot of random pings. I also tried it with a swivel instead of a split ring. The blade would spin with some intermittent pauses but made less noise. I liked it with the split ring better.
I also made a one piece flat tail. It makes less noise. The jointed swimming action really gets the blade bouncing around.
-
 1
1
-
-
Nice job. Good looking bait. Did you remember to put your initials on the bait somewhere with the date made? An artist should sign his work somewhere. I like to put mine inside the V joint in the back of front section. Sometimes I make my name or initials part of the paint job. I did that in the jointed firetiger bait in the stripes.
Jim
-
1
-
-
It looks like my local common carp. Just a shade darker than golden shiner. I painted the bait flat black on the back and sides. The belly is flat white. I hit the nose with a red. I wrapped the bait with a piece cut from a Walmart lingerie laundry bag with binder clips on the belly. Those bags have a thicker material which works well with rattle cans. The bag cost 1.88. Gives enough material for a dozen baits or so. I misted the sides with Rustoleum metallic copper from just over a foot away. A couple of light passes. Tail fin is cut with scissors from a brown silicone place mat. The brown is actually more of a brownish red but it was labeled brown.
-
There is a rattle can rainbow trout clipped at the bottom this pic. It is also in pic 2 at the top. What I do is:
1. paint+primer flat white base coat on whole bait
2. pearl mist on belly with belly directly facing nozzle. Sometimes I skip this and keep the white bottom for stained water.
3. You can use a fine mesh here for scales if you want. Metallic silver or Shimmer Metallic silver (Krylon) with back(top) of the lure facing nozzle at slight angle so the paint hits the shoulder and fades down the sides. Give a good dry time here.
4. Use low adhesion masking tape to mark a stripe area down each side of the bait. Spray a few light passes in pink. I found a can of ‘English rose’ color that makes a good rainbow trout stripe. Here you can also do something like paint the stripe purple, keep tape on and let dry, apply mesh, and hit same are with pink so you get purple and pink in the stripe.
5. Spray the back of the bait with a green with the center of the back directly facing the nozzle. The top will get hit and fade onto the shoulder. I have used army green, camo green, dark olive, forest green.
6. Dot with black or purple Sharpie. Or hand dot with small brush. I have used small cans of Rustoleum here because I have a bunch of them.
7. Optional- you can do another light pass of the green on the back here to blend in the shoulder dots a touch.
8. Optional- hit the sides with a quick light pass of Krylon Glitter blast in gold or silver. Keep the nozzle a bit further away from the bait. Only looking for a light dusting here. I do a practice spray away from the bait to gauge the spray flow so I don’t cover the paint job in glitter.
I have done a bunch of rainbow trout baits. I sometimes change the colors a bit depending on what I have and what is on sale. It is easy but there is some drying time in between steps. You can use a hair dryer to speed this up if you keep the coats light.
-
3
-
-
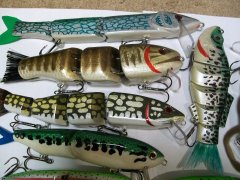
Chain pickerel. It is 10 inches long and weighs 4 ounces. I fish a 100 acre pond that is loaded with 12-18 inch pickerel. Every so often a big bass will smash a pickerel being reeled in. I made that bait quickly for that pond. I could not come up with an easy way to make a stencil for pickerel markings. So, I just drew the markings on the rattle can paint job with a green Sharpie. I drew the markings, let the Sharpie ink dry, and re-drew them a second time to make them show up better. Sometimes you have to do a second layer on Sharpie ink or it doesn't show up well after clear coat. It has fooled a few bass and several pickerel so far. It dives deeper than expected because the sloped nose acts as an extra diving lip.
-
Thanks. The smallie has paint brush bristle tail fin. The pike tail fin is a trimmed turkey feather. You can just barely see it at the edge of the pic. Fins on the other baits are silicone mats.
-
1
-
-
Rattle can and Sharpie paintjobs.
-
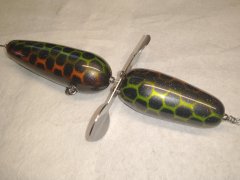
Nice looking bait. I have made a couple of globes. One has a blade made from aluminum sheet metal. The other has a blade made from Lexan. I like the look of your blade. Is it stainless steel?
-
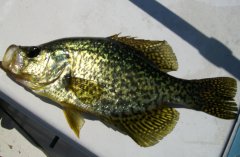
Crappie caught on Bruce County Brown Trout's underground spinner
-
Well done on the lure and the video.
-
Thanks.
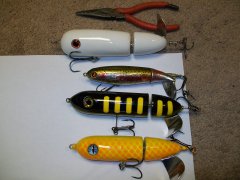
I agree on the hook size. I am out of 2/0 to 5/0 trebles. I have been waiting on some 2/0 and 3/0 hooks for a while from overseas. I had to used the biggest I had, 1/0 and short shank 2/0.
The white one is so bulbous it needs a 3/0 on the front, maybe even a 4/0.
-
130 size rainbow trout whopper plopper for size reference.


799280BF-B3F3-4E53-AC09-12EF9E09C8EB.jpeg
in Hard Baits
Posted
Nice job! I can picture Quint or a scuba tank in its mouth.