


JD_mudbug
-
Posts
419 -
Joined
-
Last visited
-
Days Won
55
Content Type
Profiles
Articles
TU Classifieds
Glossary
Website Links
Forums
Gallery
Store
Everything posted by JD_mudbug
-
I have formed or bent 1/8” and .093” Lexan to make curved crank bait lips, jitterbug type lips, and prop blades for globe type lures. I have not tried a headbanger type scoop which is more complex. I don’t see why it couldn’t be done to at least make the face of the scoop. I make simple curved objects by pressing Lexan heated with a heat gun around a pipe or other curved or round object. I sometimes use a second curved object to use as my pressing object. I wear heat resistant gloves and use sheet metal bending vice grips to hold the Lexan while heating and to position it before I bend it or press it between my curved objects. I don’t do a lot of Lexan bending. The tough part for me is heating the Lexan enough to bend it without causing bubbles to form from too much heat. Tiny bubbles don’t seem to weaken the Lexan. But, I do try to get pieces with no bubbles where the hardware will be. When using a heat gun, it can tough to get the Lexan to a bendable temperature without overheating it. It would be tough to get the complex curves on the back side of a rocker-head by using heated Lexan without making a weak spot in it somewhere. Maybe you could just make the scoop part, drill a hole through for a wire with loop on one end, once to wire is slid through you could bend another loop. You would have a Lexan scoop with a loop on each side. You could attach a split ring and hook on the back side. You could use a keel weighted swim bait hook for more weight. It would be a bigger version of a Paycheck Nose Job scoop.
-
Those drop shot clips look too tightly wrapped to get on a jig blade. If I am not using a snap, I use Mustad Fastach Clips size 2 (3/4" long). They have enough room to get on the blade. I will bump the clip up to a size 3 on 3/4 oz and 1 oz bladed jigs. I recommend using painters tape down the sides of both faces of the blade until to you get used to putting them on. The tape will prevent scratching the finish on the blade. I use needle nose pliers to put them on. It doesn't take long to get the hang of it.
-
I am no expert but lead melts at around 621 F. PVC will melt anywhere from 180 F to 500 F depending on the formula. Flexible stuff like shower curtains have a lower melting point. Rigid stuff like boards and pipe have higher melting points. Molten lead will be hotter than the toughest PVC's melting point. So, I would not pour molten lead into it. I have seen molten lead poured to seal a joint between a cast iron pipe and a CPVC pipe. CPVC is specialized for higher temps and the plumber knew what he was doing. PVC trim boards can warp on hot sunny days. So I highly doubt trim boards would fare well against molten lead. Trim boards are perfectly fine for lure bodies given the size of even the biggest lures. I just wouldn't use molten lead. I no longer pour lead. I use 1/8" diameter or 1/4" diameter solid coil sinker lead for ballast. I used to use cylindrical lead finesse sinkers but I can no longer get those due my state's lead ban. https://www.basspro.com/shop/en/bass-pro-shops-xps-finesse-weights 1/4" diameter lead: https://www.amazon.com/gp/product/B003OCAFEC/ref=ppx_yo_dt_b_asin_title_o07_s00?ie=UTF8&psc=1 1/8" diameter lead: https://www.amazon.com/Bullet-Weights-1-Pound-Fishing-8-Inch/dp/B00CMR7EX0/ref=pd_rhf_d_ee_s_gccp_rtpb_sccl_2_3/143-4076970-1543140?pd_rd_w=vngFW&content-id=amzn1.sym.df3d5bde-1953-4d58-8d9a-9d2bb11a39c6&pf_rd_p=df3d5bde-1953-4d58-8d9a-9d2bb11a39c6&pf_rd_r=A2BVHPNDVVAG7XZMHPFQ&pd_rd_wg=MGVUc&pd_rd_r=ad49f5a2-3fe8-4e62-91e3-f90b3a6b1605&pd_rd_i=B00CMR7EX0&psc=1 To put ballast in PVC trim board or wood, I drill a hole with a 5/32" or 9/32" bit depending on the diameter size of the ballast weight I am using. If I can't find those bits, I will use 1/8' or 1/4" and run the drill in and out a few times to widen the hole slightly. I coat the inside of the hole with superglue or epoxy using a cheap brush (30 pack brushes for $2 in Walmart craft section). I slide a 1/8" or 1/4" diameter length cut off from the coil lead into the hole. After the glue/epoxy dries, I seal the hole with the usual stuff like super glue and baking soda, epoxy, or Bondo. I have also used wood and plastic plugs if I am not lazy. I have used discs cut from the handle of a cheap salad spoon to plug ballast holes in PVC boards.
-
I have a glide bait made by Duel which is fairly blocky at the shoulders, where the sides of the body meet the top. So, I don't think that abruptness is killing the glide. It can cause a thin area in your clear coat so I round the shoulders on the baits I make. Those baits do have a taper as Mark described, thinner at the head, getting thicker as you get to the joint, and narrowing to the tail. As for the depth a glide should run, on the surface or below, that depends on the depth you want to fish. I have surface gliders, slow sinking gliders and some faster sinking glides I can fish deep. As long as the sections sink at close to the same rate and the joint has a decent range of motion, it can work. I have some glides with minimum ballast in both section. Each section floats. The ballast is just to keep the bait upright while it glides on the surface. The V-joint in your pic is very pointed with only a slight gap between the sections. It may not have enough range of motion. I would keep the back section point the same and widen the angle of the V at the back of front section. I have seen people do this to mass-produced glide baits to increase the glide. https://www.youtube.com/watch?v=sU9ebyGd90A When I cut a V-joint I am usually doing the reverse of that, but yours is already made. After I cut a V-joint, I make the back section more pointy than V in front of it by hitting the sides of the point on the back section with a belt sander. You can also try keeping the parallel gap and just make it wider by having longer screws come out of the front section to see if there is any difference. I would take one of your cast bodies and taper the head more. Do the same to the tail end on the back section and test again. You might be able to save a lot of detail work and use it as a new master. You could re-carve the gill plate and the small amount of the detail work you sand off. I do use a snap on large glides over 7”. I don’t use a split ring with the snap. I seem to get better action on big glides with a snap as opposed to direct tie. I find it easier to get a big glide to do a 180 degree flip with a snap. I would try that bait directly tied and with a snap to see if it makes a difference. If all else fails, put a lip on it. Some my best lures are failed glides that got turned into large jointed crank baits. I wouldn't scrap a mold until I tried all options with it, either with a lip or trying 2 joints to make it a 3-section swimmer.
-
You may want to try a floor wax midcoat before a final topcoat. The floor wax does help chrome spray paints keep their shine better. I don't know why it wouldn't work with a chrome powder paint. See the post linked below and the Engineered Angler's past videos on Youtube where he tries different chrome paints, mid coats and topcoats. The links to videos are also in the post linked below. https://www.tackleunderground.com/community/topic/38203-chrome-paint/#comment-312630
-
I have used plastisol, feathers, paint brush bristles, silicone mats, flexible plastic cut from various containers and notebook covers, even a thin flat belt from a small piece of machinery. I like tails that will flex and compress some if the bait is bit from behind.
-
I only make normal bass size lures when I can't find a blank that will fit the need. As there are of wide variety of normal size blank lures, I mostly make larger lures. I have used stainless nails for years. I got a big box of them cheap years ago. I use the stainless rods and shaft wire to have a range of diameters for pins. The Lowe's Kobalt 8" bolt cutters are decent and run $15. They make a good hook cutter too. If those can't cut a rod/nail, I go with a vice and hack saw. When using bolt cutters, I turn my head the other way and listen for how many ricochets I get around the shop. Using a sock or rag to cover the rod when cutting is a good idea. Sometimes my laziness gets the better of me and I just cut them without doing that. Safety glasses are always a good idea too.
-
I use the LPO .092" stainless screw eyes or make my own screw eyes from stainless lock/safety wire from Malin or US Wire purchased on Amazon. If there will be 2 screw eyes or the bait is under 2 oz, I go will with .051" twist wire. If it will be a heavier bait with one twist screw eye, I go with .062" twist wire eye. https://www.lurepartsonline.com/-092-Magnum-Screw-Eyes On small baits if I am using the LPO screws, I use the .072" stainless screw eyes and the 1.5mm rods, .062" shaft wire, or cut section of a nail for the pins. Those 2 mm stainless rods are very hard. I use a hack saw and vice to cut them to length. I file the ends smooth before installing them in the bait. Using a Dremel on these can be very dangerous. Cut off disks have a tendency to explode on those rods.
-
When I use shaft wire cutoffs for the pin, I typically use .062. I mostly make 5" baits or bigger and I like a thicker pin. You can find the .062 as well as the .051 using Mark's link above. I have just started using sections cut from stainless rods used for axles in RC cars. The 1.5mm diameter is .0591" and the 2mm is .0787". I use the 2mm rods on baits over 2 oz. 1.5mm diameter https://www.amazon.com/gp/product/B082ZNTD4J/ref=ppx_yo_dt_b_asin_title_o04_s00?ie=UTF8&th=1 2mm diameter https://www.amazon.com/gp/product/B08L7RKM6Q/ref=ppx_yo_dt_b_asin_title_o05_s00?ie=UTF8&psc=1
-
When searching online for the random mesh, try random pattern tulle, random web tulle, or spider tulle. It will help narrow down the search results.
-
I don't think there is clear etching primer. At least, I have not seen one. If you are only painting part of a spoon or blade, you can tape off the part you want to keep the metal finish on. If you are doing a bunch of the same pattern, you can make a stencil to block off where any primer will go. I have done something like this on a spinnerbait blades by scuffing one edge or both edges with a green Scotch pad and applying paint to that area keeping the rest of blade with its original metal finish. A light scuff on an entire spoon/blade may be enough to get a mechanical bond and keep most of the underlying shine if the paint is thin. You could try an automotive adhesion promoter. I have never used that stuff. So, I would test a small batch first. I have seen it in clear and people have used it for paint on chrome car trim. It may help to see the a pic of what you are trying to achieve. There are a lot very knowledgeable people on here (myself excluded). A picture of some the patterns usually gets the comments and ideas flowing.
-
As woodieb8 says, it's best to buy the blades and spoons ready to paint. I usually buy white too as any color shows well over it. I have also purchased chartreuse for particular color schemes like perch, mustard, 5 of diamonds. Most of the lure component suppliers have a lower price painted line or at least a lower polished line. The LPO H series blades do not have a clear coat and can be painted over with no work. There is no need to pay for the higher polished finish if you will painting them. The more polished finish is harder to get paint to stick to unless you scuff and/or use etching primer. Save yourself some money and buy the regular grade of blade or spoon. For LPO products, the 'premium' finish is the regular grade. The 'regal' finish is highly polished and difficult to get paint to stick too https://www.lurepartsonline.com/Painted-Colorado-Blades https://www.lurepartsonline.com/Painted-Willow-Blades https://www.lurepartsonline.com/Premium-Finish-In-Line-Blades https://www.lurepartsonline.com/Premium-Finish-Casting-Spoons
-
They look nice. I am not sure if I am seeing the swivel correctly in your pics. You may want to put the swivel the other way especially if you will do any bottom hopping with those baits. I usually put the rotating end of the swivel towards the back to reduce the dirt and lake snot the can get into the swivel and shorten its life span. The non-rotating fixed end of the swivel will be in the front and they is no way particles can get into that side.
-
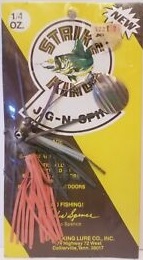
Here is a pic of what I think you are looking for -the Strike King Spin Dance Short Arm. There may have different models and the one with the weed guard was called the 'Drop Model'. They also had a similar bait (or just a renamed version) called The Short Arm Spinnerbait. Those baits were around in the 1990s. There is also the Jig-N-Spin which is a jig with a blade on a flexible wire. Retrobassin has a video on the 1991 Bass Pro Shops master catalog. The Short Arm Spinner bait can be see from 6:29 to 7:29 at the bottom right corner of the left page. https://www.youtube.com/watch?v=Ilucla7gwBs Unfortunately, I threw out my old catalogs a while back. I hope this helps. Jim

-
I have used the Proberos hooks from China off aliexpress. I have only used the model 35647 1x hooks. Those hooks are good for the price. You may get a hook or two with a damaged point in a 50 pack. With their price being cheap for big hooks, I can tolerate a couple of bad ones. Proberos also makes 2x , 3x and 4x hooks. The 3x and 4x hooks from there are tinned and not black nickel, if that matters. There is a price jump from the 3x to the 4x. I don't know about the quality of those heavier gauge hooks. You could order a 10 pack to see if you like them. The 10 packs are in stock. You can also search for the model numbers to see if other vendors have them in stock in the bigger packs. You can also ask them if they would do a bulk wholesale order. I know they sell some of their normal gauge treble hooks in bulk 500 packs. Model 8003-2x. 2x- black nickel. 50 packs are out of stock now https://www.aliexpress.us/item/3256801658561810.html?spm=a2g0o.cart.0.0.683938daF0pN7x&mp=1&gatewayAdapt=glo2usa&_randl_shipto=US Model 8008-3x. 3x tinned. 50 packs are out of stock now https://www.aliexpress.us/item/3256801658142325.html?spm=a2g0o.cart.0.0.683938daF0pN7x&mp=1&gatewayAdapt=glo2usa&_randl_shipto=US Model ST66-4x. 4x tinned. https://www.aliexpress.us/item/3256804805648298.html?pdp_npi=2%40dis!USD!US %241.25!US %240.69!!!!!%402100bb5116698240472802540eb687!12000031266462473!sh&gatewayAdapt=glo2usa&_randl_shipto=US
-
Best type of fishing line for inline spinners
JD_mudbug replied to william cohen's topic in Wire Baits
I also am a co-poly fan for moving baits. Yozuri Hybrid is probably my favorite. Pline Fluoro Clear is also good. If I am in pike/musky waters, I almost always go with Berkley Trilene Big Game on moving baits. It has some of the best shock absorption when a big fish hits a moving bait. Plus, it is very affordable allowing for more frequent re-spooling. I tie a 9-12" leader with AFW 7x7 Coated Surflon in Camo color. Pike have a nasty habit of inhaling #4 and 5 spinners. I have had two reels damaged on strikes by pike when throwing an inline on braid, one a broken gear tooth and the other broke the end off the line pawl. -
How about trying a 'High Heat' , 'Engine' or 'Caliper' paint from Rustoleum, Krylon, Duplicolor, VHT, Por-15, KBS Motor Coater? It comes in rattle cans and liquid cans in a variety of colors including white. You can find the temp tolerances in the descriptions and the tolerances are usually quite high.
-
If all the airbrushed in the world suddenly got sucked into a wormhole...
JD_mudbug replied to Big Epp's topic in Hard Baits
Outlaw4 You reminded me that I never got around to trying hydro-dipping baits using oil-based spray paints in a bucket of water last winter. It looks like I should be able to get some interesting patterns without a lot of effort. -
If all the airbrushed in the world suddenly got sucked into a wormhole...
JD_mudbug replied to Big Epp's topic in Hard Baits
A combination of rattlecans, hand painting, and Sharpies. You can accomplish quite a bit with those and stencils, netting, 1/8" to 1/2" masking tape. I still use rattle cans for primer and base layers especially on large baits. For some small details and touch ups, I have done a quick rattle can spray into a plastic cup to make a little pool of spray paint. Then, I use a small paint brush from Walmart to hand paint with the paint from a spray can. (30 for $2 in the crafts section). This can come in handy when you get a blemish from removing tape, a bug landing on wet spray paint, or if you drop a bait mid paint job and only get a couple of paint chips. Sometimes a screw up is savable with out starting over. -
I have ordered from Predator Baits a few times and like their quality. I have also had good luck with Dinger, Cedar Run and Shelt's. In case you did not see it, there is a pinned post at the top of the Hard Baits forum with a good list of blank lure suppliers. They each have a different selection of blanks. If you test blanks before you paint them, you should seal the line tie and hook hangers with a bit of superglue. Sometimes there are tiny holes that can let water in.
-
I have some baits coated from Jan-Feb of 2018 with D2T. No yellowing yet. I usually write my initials and date made inside the joint or somewhere on the bait. I don't leave my baits out in the sun when not is use. Make sure you get the 2 Ton 30 minute one. The 5 minute Devcon will yellow. The packaging does look similar. Even though the package says 30 minutes, it is more like 10-15 minutes before it starts to set. I also like to use T type trebles or Ewg trebles to cut down on rash. I will sometimes T bend some trebles like the Ali 35647 model if I don't want to spend for Owner ST-35s or Mustad KVDs. I have not used UV yet. Once I get around to building a UV light set up, I am going to try the following UV resin https://www.amazon.com/gp/product/B08YMTFM7D/ref=as_li_tl?ie=UTF8&camp=1789&creative=9325&creativeASIN=B08YMTFM7D&linkCode=as2&tag=engineereda06-20&linkId=af7e71c648cd23380fcbc3423ddb6bf9 Engineered Angler's video provides some great info https://www.youtube.com/watch?v=NVyA-F4tosE&t=20s You would need at least two coats of UV to hold up to teeth, maybe more. I think the speed of curing is a huge plus. I also like how you can put it on a rotisserie to level it out before turning on the lights. Mark is correct on D2T glue type vs. Etex decoupage type. D2T is very tooth and hook rash resistant. When it does fail, it seems more likely a piece will chip off than with Etex. Damn bridges. I also think if the wood is not completely dry that D2T is more likely to crack from wood expansion. It is rare but I have seen it a couple of times. D2T is easy to find in a double syringe for $6 in my area. My small local hardware store carries it. I would suggest you try that before getting the bigger bottles. D2T is very easy to use. I mix by eye even when using the larger bottles. I like it for pike/musky waters. I also noticed on the last few packages I bought they had printed a Use By date on them. I don't remember that in the past. I like to buy it in the store if possible. I like to look at the packages so I can buy the clearest one and the newest one. Etex is easier for teeth to penetrate but has a better chance of surviving rocks. I have a few Etex coated wooden baits that have small dents but the Etex top coat is still intact. It just flexed with dent. I have several Etex baits going on 5 years and no yellowing either. I think Etex is a bit more temperamental than D2T. I have to pay more attention to mixing and environmental conditions with Etex. I have recoated damaged sections of both types of epoxy and the patches have held so far.
-
Do you mean twisting the wire so one of the twists will have a space in it held open by the tube so you can cross-pin the twist-eye screw? I have never done that. I think I would just do wire-through at that point. It would be probably easier. When I do twist wire eyes, I twist the wire around a nail/rod in a vice. Cut the screw to length. Cutting the twisted part with mini-bolt cutters usually causes the end to flare wider than the rest of the twists so I file the flared part to keep the diameter the same and give it a bit of a point. Filing takes a minute or 2 but I don't like making the pilot hole bigger than necessary. I drill my pilot hole just big enough for the screw to fit. I then drill a small cup maybe an 1/8th inch deep with the end of a bigger drill bit to set the base of the eye in. I often do this by hand with just a drill bit so I don't go too deep with the cup. The screw eye will twist in with left handed twisting. I do a dry test fit to check length and back it out with right hand twisting. Then, I put epoxy in the hole with scrap wire, cheap syringe if I have one, or baggie with the corner cut off. I then coat the twisted part of the screw with epoxy and screw in by hand or using pliers. Wipe away the excess with a paper towel. Your final clear coat will also give a bit more strength as that will cover the base of the screw eye too. When I do wire-through, I use drop wires with loops on each end for hook eyes so the main wire will pass through the drop wire. Sometimes, I will use a barrel swivel in the same way instead of a drop wire. Jim
-
.062 is strong enough. Wire thicker than .062 is hard to twist. I use .062 on large baits 2+ oz and .051 on smaller baits. .040 on typical bass size baits. I would consider going thicker than .062 when the lure is going to be over 6 oz. I sometimes have used a combo of .062 on the line tie and single screw joints and .051 for hook connections and 2 parallel screw and pin joints. I have only used Malin and US Wire stainless safety lock wire / aircraft lock wire. If you are buying wire twisting pliers, don't waste money on the 6" inch ones. They are too flimsy to twist .051 and up. Get 9" pliers or larger.
-
Wire through is the way to go. I would go with twisted wire eyes and epoxy before .092 screws on musky baits. The force on a lure of a musky or pike thrashing in the net is brutal. You may not notice a screw eye opening up. Once the eye starts to open, it will fail in short order. It could fail on the next fish. If you do use the .092 screws, I would countersink a cup-shaped divot for the bottom of the screw eye to sit in. When the cup is filled with epoxy, the base of the screw eye will be embedded in epoxy and reduce the chance of the screw eye opening up. I have used gate hardware screws which are over .125" and noticed one had started to open up on a 38" pike. The first pike on that lure put it out of action. You put a lot of effort into making a lure to have it fail on one fish. Wire-through is easy once you make a few baits. If you are making a hinge with 2 screws coming out of the back of the front section and 2 slots plus pin in the back half, have the screw eye gap spots facing opposite directions. If one of the screws eyes start to open to the side, the force of the pull will be be against the solid side of the other screw eye. I have had that happen. Unfortunately, it was a snapping turtle and not a fish.
-
I have made several baits where the lip is close to the front hook hanger. If the hook catching the lip does become a problem, I find that a short shank treble of the same size will usually fix it. I use Mustad KVD Elite 2X Short Shank Trebles and Owner St-35 when I run into problems.

