JD_mudbug
-
Posts
419 -
Joined
-
Last visited
-
Days Won
55
Content Type
Profiles
Articles
TU Classifieds
Glossary
Website Links
Forums
Gallery
Store
Everything posted by JD_mudbug
-
It could be an old Flatfish X5. The X stood for ‘Expert’. Helin got the patent for the Flatfish in 1936. It could also be a knockoff of the Flatfish as it was widely sold and copied through the years. I don’t think it is a Kwikfish which came after the Flatfish. The Kwikfish usually has traditional type hook arrangements. It does not appear to be Lazy Ike which is narrower than a Flatfish. It also does not appear to be a Brooks Reefer or a Beno lure. Your lure has the body length and weight of a Flatfish X5 which came out in 1947-8. It was available in wood or plastic. The hook setup on your lure is different from the typical X5 which had 3 trebles, a tail treble and two belly trebles mounted to the ends of a single wire spreader that had a loop in the middle that went through the belly hanger. Helin called that hardware setup - ‘gang hooks’. Some of the models could be ordered with two double hooks or gang single hooks. The older Fly Rod Flatfish models came with a single hook that could swing on a piece of wire imbedded in the center of the belly. Some of the bigger fly rod models had 2 single hooks mounted gang style. The biggest Fly rod model was the F7 which was 2-1/4” long. Your bait looks like an X5 but with a fly rod type hook set up. The line tie wire also looks like the line tie on some of the Fly Rod Flatfish models. Your lure looks like it was an attempt to use the X series to make a bigger model in the F series. From what I have read, Charlie Helin was concerned about increasing the chances of a hooking fish that did hit the lure. He created some unusual hook layouts and designs on baits to keep hooks facing away from each other or on opposite sides of the bait. I would not fish with it. It could be worth something. It could be one of Helin’s designs that was only available for a short time. Even if it is a knockoff, some of the older well made knockoffs can be worth something. helin hook assembly us2621438.pdf
-
I like to use coil lead too. It comes in different diameters that will match up to common drill bits for a tight fit without having to worry about fumes from pouring lead. To make multiple ballast weights of the same weight, you just snip off a bunch of same length sections off the coil. 1/8" https://www.amazon.com/Bullet-Weights-1-Pound-Fishing-8-Inch/dp/B00CMR7EX0/ref=pd_bxgy_2/131-0210692-0293459?pd_rd_w=YiHT8&pf_rd_p=6b3eefea-7b16-43e9-bc45-2e332cbf99da&pf_rd_r=GZSJ63PWP85HDVTA7W41&pd_rd_r=8f6544bd-35da-493c-b188-51792e0e21ab&pd_rd_wg=6T1QC&pd_rd_i=B00CMR7EX0&psc=1 3/16" https://www.amazon.com/Bullet-Weights-1-Pound-Fishing-16-Inch/dp/B003OCF4ES/ref=sr_1_18?crid=19PPHPBGINDMX&keywords=coil+lead&qid=1646071144&sprefix=coil+lead%2Caps%2C114&sr=8-18 1/4" https://www.amazon.com/Bullet-Weights-1-Pound-Fishing-4-Inch/dp/B003OCAFEC/ref=pd_bxgy_1/131-0210692-0293459?pd_rd_w=YiHT8&pf_rd_p=6b3eefea-7b16-43e9-bc45-2e332cbf99da&pf_rd_r=GZSJ63PWP85HDVTA7W41&pd_rd_r=8f6544bd-35da-493c-b188-51792e0e21ab&pd_rd_wg=6T1QC&pd_rd_i=B003OCAFEC&psc=1 You can also cylinder weights matched to a hole drilled with a same diameter drill bit. https://www.basspro.com/shop/en/bass-pro-shops-xps-finesse-weights?searchTerm=Bass+Pro+Shops+XPS+Finesse+Weights
-
Crankbait Lip and Nose eye, Belly Weight Epoxy
JD_mudbug replied to chachybaby's topic in Hard Baits
I have used both Bob Smith and Devcon 2 Ton. They both work great for bait hardware. The D2T has a longer working time. I use mostly D2T now because of availability in my area. When I use Denatured Alcohol, I only use a few drops on a typical batch, which would do around six squarebills sized type baits. It helps to have a plastic plunger type syringe because a couple drops goes a long way. I mix the epoxy first, add the DN, and do additional stirring to blend the DN into the mixed epoxy. It is a 'feel' thing when you mix it to get the consistency you want. I just want it easy to apply and not too thick for a bass bait. I only thin epoxy on small and medium bass sized lures. I don't thin topcoats on larger bass swimbaits and musky/pike baits. Two penny size amounts of resin and hardener are a small amount when combined. I think it will only take 1-2 drops of DN for that small of a batch. If you are using that size batch for a seal coat, you might want the epoxy thinner with an extra drop or 2 to give the epoxy a better chance to get into the tiny imperfections on the bait's body for a better bond. -
I don't know about Monty Python. If I had a vote, it would be No. Years ago, I barely survived a savage mauling by a rabbit.
-
I use Krylon Glitter Blast rattle cans with good success. Start spraying 1.5-2 feet from the bait to see the coverage and move in as necessary to make the glitter denser. I have also used FolkArt Extreme Glitter 2796E Hologram which is a brush on glitter on white baits and it ends up looking like the old G-finish lures. I have not tried the other colors in that product line.
-
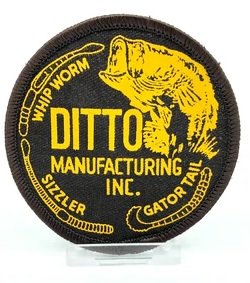
That Ditto bait doesn't look like their regular eel which has the serated-type tail and ribbed body. Most of their baits are not smooth like that one. I have heard about Ditto’s Verifier but have not see one. I have also not seen a Ditto Cutthroat worm nor his DW worm. The bait could be one of those. Ditto also made: Gator tail worm 5-1/2” and 7” Fire Claw (crawfish) Eel and Baby eel (have ribs/grooves on the body and ‘serated’ gator type tail) Sizzler worm (reminds me of a Creme scoundrel) Whip worm (4” and 7-1/4”, looks like a Slider type worm) Ditzit claw (creature bait, forerunner to the Brushhog type baits but with claws on the end of the center legs) Dragontail lizard (lizard with stumpy legs and a gator worm type tail) Chunky (chunk style trailer) Fat grubs Tube (solid tube bait) Topwater worm? Not sure of the name. (one curly appendage off the middle of the worm plus the curl tail. See pic. Don’t know if it was actually sold or if it is the Verifier, Cutthroat or DW). Squarehead paint, you might want to reach out to Longrodder over at Bass Boats Central (bbcboards.net). I think he is Bobby Ditto’s nephew. He might be able to identify that bait you have.

-
Well, my name is Jim, but most people call me... Jim.
-
I wouldn't mind a narrow spray replacement nozzle. I don't know if the Liquitex caps would fit on a Rustoleum or Krylon rattle can. The Liquitex is a water based paint and the rattle cans I already have are oil/solvent based. If the cap did fit on my existing cans, I don't know if a narrow nozzle designed for water based paint would get clogged if used on an oil/solvent rattle can.
-
The keys to a rattle can paints job are keeping the nozzle at the right distance and proper angle to the bait. You want to hit the proper areas with the right amount of paint and move the nozzle on the next pass changing the angle slightly to get some blending. Start your spray before the lure, use a straight steady sweeping motion that maintains the same angle and distance to the bait, stop the spray after passing the bait. Any splatters that fly from the nozzle at the start or end of a spray will miss the bait. You have to use tape, stencils or items like a large comb to get detail. The volume and area of spray from a rattle can is too great to get fine details without something to block off some of the bait’s surface. You can also use rattle can to do the bulk painting and then use a Sharpie, hand painting or air brush to get details. Big Epp is right about scales. You have to be particularly careful with the nozzle distance when using a mesh scaling. The finer the mesh material the further away the nozzle has to be from the bait. The mesh should be clipped/clamped fairly tight down the full length of the bait. You may have to do several light dustings with a time gap between them to prevent the mesh from getting too wet or saturated. You may also have to tape off the belly if you don’t want the scale paint to hit the belly. The nozzle might have to be so far way that very fine paint particles can drift back onto the belly even if not facing the nozzle. I have not seen paint throw off the balance of a lure. It would have to be a suspending jerkbait, glide bait or finesse type crankbait like a Shad rap 5 for the paint to have a chance to throw off the balance. A heavy clear coat like D2T would be more likely to do that. I have painted some baits with the thick liquid Rustoleum and they work fine. I have found rattle can skills do not really translate into airbrush skills other than visualizing the overall paint scheme to be achieved. Good airbrush technique is nothing like using a rattle can. I keep using rattle cans on some larger baits because I can get cans for $2 at a local discount tool store.
-
These posts might help. From what I understand, the site did not use any user info from before August 16, 2021 to calculate rankings when the site moved to a new server. https://www.tackleunderground.com/community/topic/38179-badges/ https://www.tackleunderground.com/community/topic/38101-upcoming-server-migration-please-read/ You get points for posts and likes made after 8/16/21. I also suspect any reference in a post to Blazing Saddles, History of the World Part 1, or Spaceballs earns bonus points. May the Schwartz be with you. Jim
-
Most of the standard Rustoleum and Krylon seem to be oil based or solvent/synthetic based that float. The standard Rustoleum in my area is the white can that says Protective Enamel on it somewhere. The Krylon cans come in a bunch of colors. The Colormaxx ones are what I usually find in my area. That paint also floats. At least, the 20 or so cans I have in those product lines float. Marking paint and Fabric paint seem to be usually water based. They don't want oil based paint used to mark the ground to seep into the groundwater. They don't want a canopy or outdoor furniture to burst into flames because some dope put it too close to the fire pit. If you can't find the base info on the can, I look up the particular paint up at Walmart, Lowes, Home Depot websites. They usually list it in the product spec down near the bottom before the reviews. Or, like Mark says, you can do a small spray into a disposable cup filled with water to test it.
-
Most of the rattle-can paint floats as it is oil or solvent based. You can spray it into a bucket of water to make hyrdo dipped swirl paint jobs. There are some water based spray paints like the spray paints for outdoor fabrics. The water based paints may float, sink or even suspend depending the ingredients. https://dipdoctr.com/best-spray-paint-for-hydro-dipping/ https://www.youtube.com/watch?v=kHoW-56NGVU
-
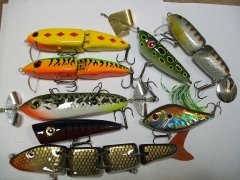
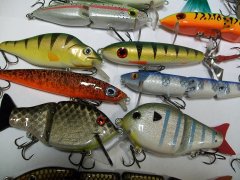
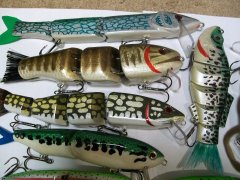 There is a rattle can rainbow trout clipped at the bottom this pic. It is also in pic 2 at the top. What I do is: 1. paint+primer flat white base coat on whole bait 2. pearl mist on belly with belly directly facing nozzle. Sometimes I skip this and keep the white bottom for stained water. 3. You can use a fine mesh here for scales if you want. Metallic silver or Shimmer Metallic silver (Krylon) with back(top) of the lure facing nozzle at slight angle so the paint hits the shoulder and fades down the sides. Give a good dry time here. 4. Use low adhesion masking tape to mark a stripe area down each side of the bait. Spray a few light passes in pink. I found a can of ‘English rose’ color that makes a good rainbow trout stripe. Here you can also do something like paint the stripe purple, keep tape on and let dry, apply mesh, and hit same are with pink so you get purple and pink in the stripe. 5. Spray the back of the bait with a green with the center of the back directly facing the nozzle. The top will get hit and fade onto the shoulder. I have used army green, camo green, dark olive, forest green. 6. Dot with black or purple Sharpie. Or hand dot with small brush. I have used small cans of Rustoleum here because I have a bunch of them. 7. Optional- you can do another light pass of the green on the back here to blend in the shoulder dots a touch. 8. Optional- hit the sides with a quick light pass of Krylon Glitter blast in gold or silver. Keep the nozzle a bit further away from the bait. Only looking for a light dusting here. I do a practice spray away from the bait to gauge the spray flow so I don’t cover the paint job in glitter. I have done a bunch of rainbow trout baits. I sometimes change the colors a bit depending on what I have and what is on sale. It is easy but there is some drying time in between steps. You can use a hair dryer to speed this up if you keep the coats light.
 -
Chain pickerel. It is 10 inches long and weighs 4 ounces. I fish a 100 acre pond that is loaded with 12-18 inch pickerel. Every so often a big bass will smash a pickerel being reeled in. I made that bait quickly for that pond. I could not come up with an easy way to make a stencil for pickerel markings. So, I just drew the markings on the rattle can paint job with a green Sharpie. I drew the markings, let the Sharpie ink dry, and re-drew them a second time to make them show up better. Sometimes you have to do a second layer on Sharpie ink or it doesn't show up well after clear coat. It has fooled a few bass and several pickerel so far. It dives deeper than expected because the sloped nose acts as an extra diving lip.
-
Thanks. The smallie has paint brush bristle tail fin. The pike tail fin is a trimmed turkey feather. You can just barely see it at the edge of the pic. Fins on the other baits are silicone mats.
-
I think the action is more important that the paintjob. I don't try to get a picture perfect type paint job. I have posted 3 pics in the Hardbait gallery showing about 20 paintjobs done without an airbrush.
-
Rattle can and Sharpie paintjobs.
-
-
I use rattle cans, mostly on larger baits. I use 3M blue 2080 tape that comes in 1/8” and ¼” wide rolls for getting fine lines. The tape is easy to curve and has low adhesion so it doesn’t ruin underlying paint if dry. After doing a few baits, I have gotten fast at taping off things life perch stripes and fins. https://www.grainger.com/search?searchQuery=3M+2080+tape&searchBar=true I use netting, tule, window screen, Walmart lingerie laundry bags for scales. The laundry type bags are thick with larger openings which are great for larger lures. I use stencils as well. I just use a mix and match approach to what I think works on a bait. You could try liquid masking tape/art fluid masking. I have just started using that. You can also use Sharpies with different tips for fine details. In addition to starting the spray before the bait, another key is not to get the can too close and do a couple of light passes. If the paint goes on too heavy, you can get a paint ridge at the tape edge or a paint run. On areas like a gill plate, you may want the paint ridge. No doubt an airbrush is better than a rattle can. With a rattle can, it would be difficult to get a ‘work of art’ paint job. But, you can definitely can get a quality paint job that will fool a fish.
-
My only snakes had a jitterbug type lip. The only ballast I had was in bottom of the head at the half way point and a smaller ballast in the second section. That placement won’t work on yours as that is where the lip is. My lip was in front of the body. Most of my other wake baits are 2 or 3 sections and the ballast only goes in the head section between the lip and the front hook hanger. They have a much longer front section than you snake does. I would get your joints, line tie and hook hangers mounted. Then seal it. You can hold the lip in with tape and glue ballast weights to the belly to test it. I test with sections of coil lead off Amazon. That way I can drill holes sized to the diameter of the lead once I know the right placement. https://www.amazon.com/Bullet-Weights-1-Pound-Fishing-8-Inch/dp/B00CMR7EX0/ref=pd_rhf_ee_s_rp_c_5/136-4478048-8878557?pd_rd_w=lrLLj&pf_rd_p=961484e4-9800-4359-8d69-ee5560f2fd47&pf_rd_r=8T2DFHYV7PDWADQEZDBJ&pd_rd_r=5302d3c2-c02a-4cdd-a866-42b8913993c8&pd_rd_wg=JBUn0&pd_rd_i=B00CMR7EX0&psc=1 https://www.amazon.com/gp/product/B003OCAFEC/ref=ppx_yo_dt_b_asin_title_o07_s00?ie=UTF8&psc=1 You may need some ballast before and after the lip in the head section because that section is so bulbous, a smaller ballast in the second, and an even smaller ballast in the third. It will also depend on hook placement. Your bait looks great so far. I would want to test it before drilling holes into the body especially after all that hard work in carving.
-
Jointed Lexan Tail-- What effect does it have? (if any)
JD_mudbug replied to RiverSmallieGuy's topic in Hard Baits
I have made numerous Shellcracker type baits as well as 2 and 3 section baits that are 6 to 10 inches . Yes, that type of tail will work with the serpentine action of the bait. The tail fin itself is not jointed. The tail fin is one piece with 2 holes for mounting. The holes in the fin have to be bigger than the cross-pins so the tail will flop loosely back and forth on the pins. I use small wire nails for pins. If you stop the video at 12:28 and 13:07, you can see the holes. Sometimes, I just make one long rectangular hole vertically in the fin instead of the 2 holes. When the bait swims, the actions carries on to fin which flops back and forth. It gives the effect of an extra joint. I like that type of tail kick. I have gotten away from using Lexan fins. I like somewhat flexible fins that will bend over when a fish bites. I make my flopping-type fins from silicone mats (placemats, cooking mats, under sink mats) and plastic containers (milk jugs, coffee can lids, food containers, notebook covers). You still get the kick with Lexan as long it has freedom of movement on the pins and is not too big in relation to the size of the bait. Jim -
Stainless Steel Snare Wire (20 gauge) for wire through balsa baits
JD_mudbug replied to chachybaby's topic in Hard Baits
That's what I usually do. Fit it with tape on the part of the lip that goes in the slot plus a piece of tape on the backside of e lip to the body. If the lip is aluminum, I use some hot glue where the lip comes out of the body. The glue peels off with an Xacto knife. I have lost a couple of aluminum lips with just tape. -
Stainless Steel Snare Wire (20 gauge) for wire through balsa baits
JD_mudbug replied to chachybaby's topic in Hard Baits
Engineered Angler, Marling Baits, TreysArt, zimmtex use twist eyes in some their builds. Engineered Angler has a bunch of vids on twist wire eyes. I wing most of my builds. I test the lure after sealing with hooks that have points bent over. I hot glue or tape any diving lip in temporarily. That way I can try different lips and adjust ballast if the lure is a dud. Once the lure works, I paint it.