


Chuck Young
-
Posts
906 -
Joined
-
Last visited
-
Days Won
45
Content Type
Profiles
Articles
TU Classifieds
Glossary
Website Links
Forums
Gallery
Store
Posts posted by Chuck Young
-
-
I know i could throw .024 in one of two ways: 1) using fly casting techniques with mono, or 2) by throwing the rod, reel and jig over the side of the boat.

-
 2
2
-
-
With D2t use the 30 minute, not the 5 minute (it yellows). I have never put in a glitter that reacts poorly with it. But I have had bad reactions with water based paint. On larger jigs, as on cranks, you can put different colors on different parts of the bait. For a thinner coat add a drop or two of denatured alcohol.
-
Mckenzies has water based paints also. I'm assuming they are acrylic. You must be looking at the laquer line. Also I would consider building a spray booth. A plastic bin tipped toward you, with a bathroom exhaust fan attached to a hole in the back. You can vent it outside with a dryer vent hose. Do this and you can use super glue, laquer, etc with impunity. Even water based paints that are non toxic are best kept out of your lungs.
-
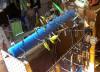
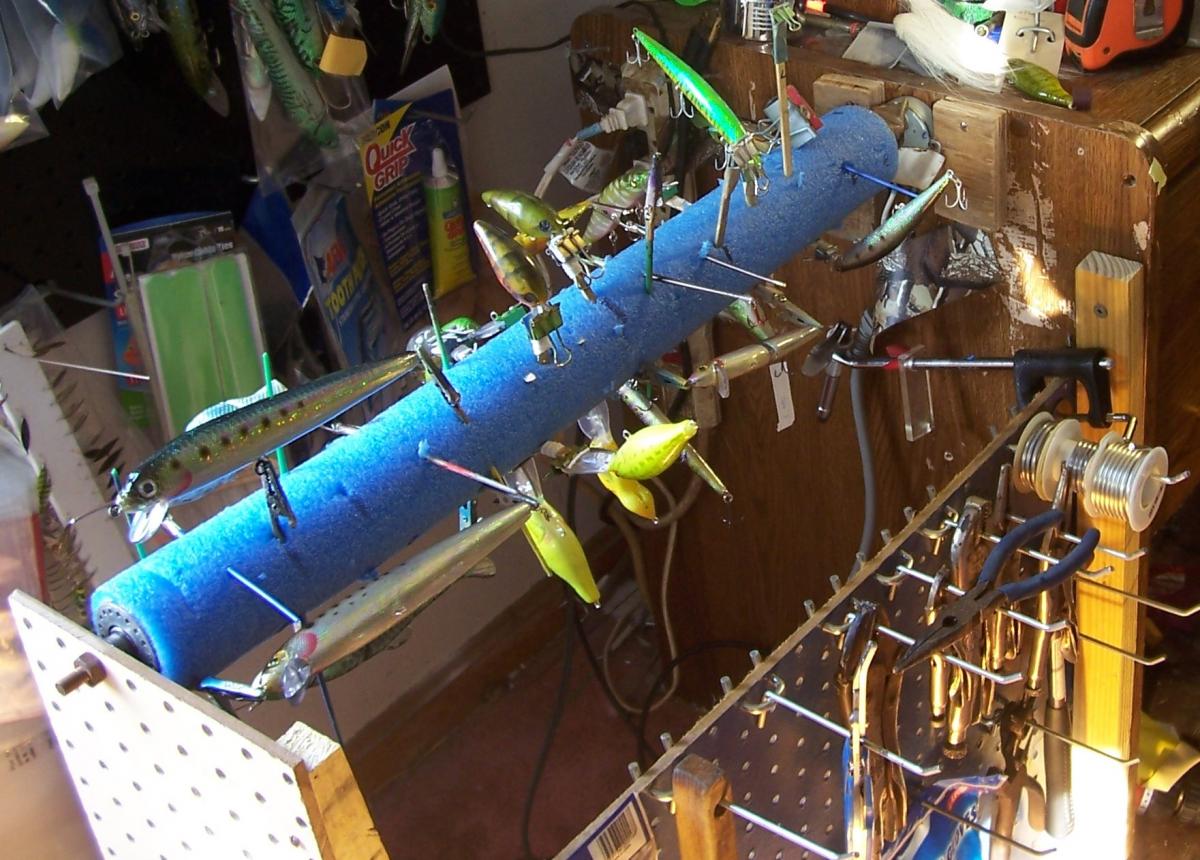
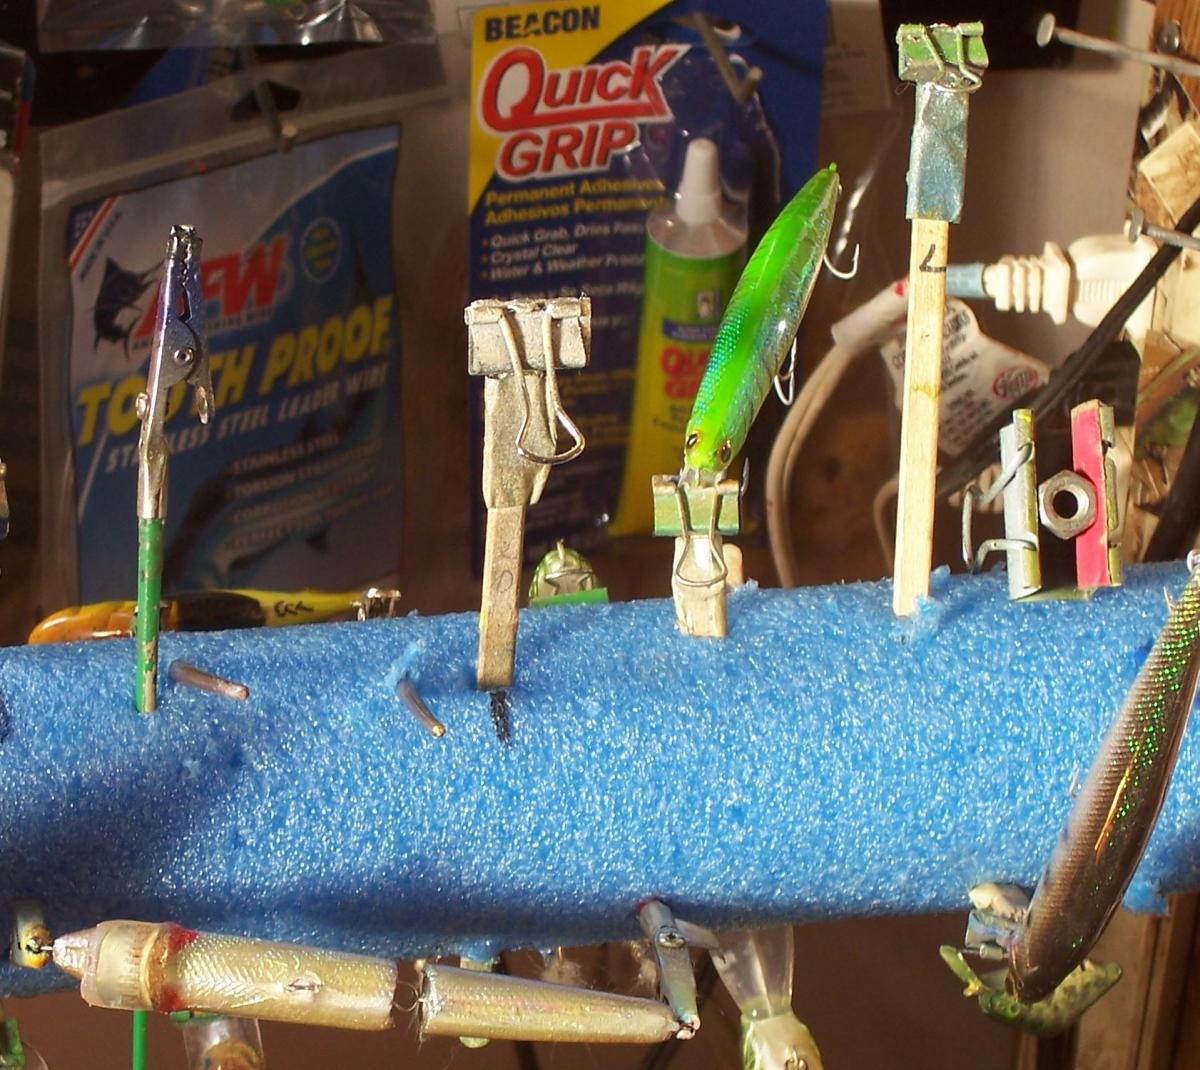
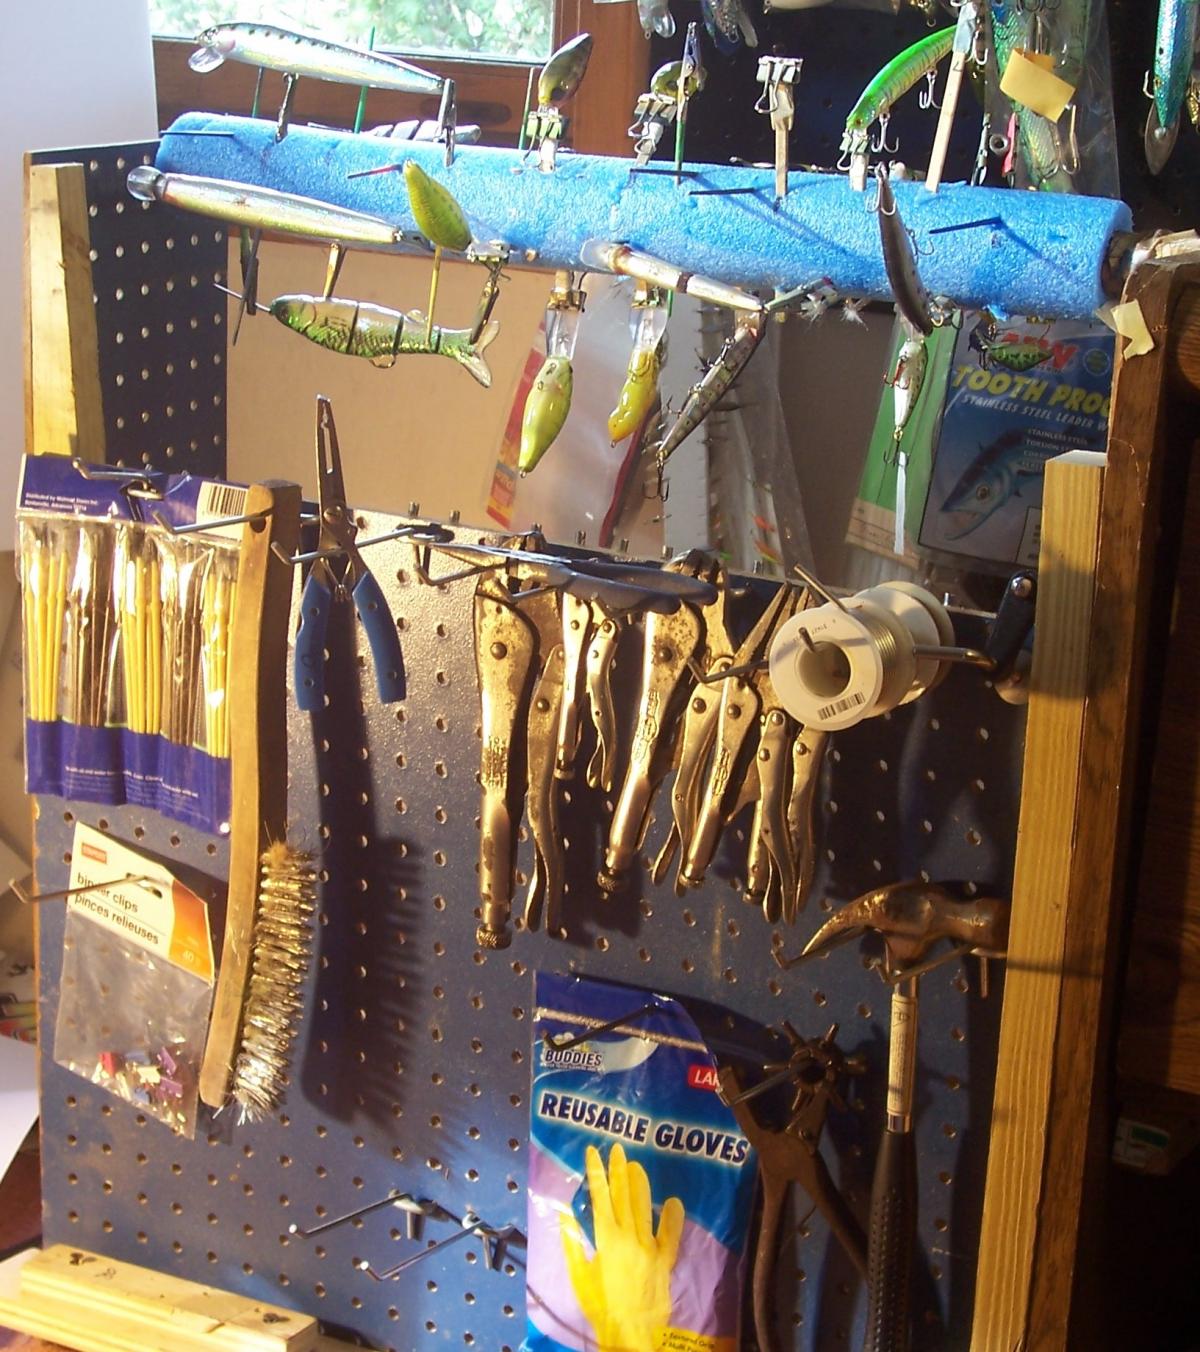
Lure turner: build a pegboard L frame on 1-1/2 by 1-1/2 frame. Make it about 30" high on the end and 20" high on the front(pic3). Mount microwave or similar geared motor (plenty in the dump) to work desk about 28" high. Cut a section of swim noodle cut to fit in between motor and end of box. Glue an old bicycle wheel hub with inside end ground down to fit inside noodle to far end of noodle(pic 1). Attach shorter plastic pipe to motor with tape and E6000. Slide pipe into noodle. This gives you a friction fit to the foam. Build up with tape for more grip. I use this method so I can just grab the foam to insert another lure - no need to unplug. Mount the bearing to the far end of pegboard frame. Now you can insert lure holders through the foam. Make the slots miss the pipe on the front side - so they will pass all the way through the noodle. Balance the holes by placing them every 90 degrees. You can see that I mounted over 20 lures on my 2 ft long turner. It turns great, no belts to slip while your back is turned. It is capable of mass production. I think the motor has enough torque to turn one 6 feet long.
Lure holders #1(pic2): medium and small size binder clips lined with 1/16" adhesive foam on one or both sides. If you put the foam on the part of the clip next to the stick, it holds the lure at an angle. Attached pic shows how this can maximize room at your bench or on your turner. Tape and glue with e 6000 to ¼” popsicle sticks. These hold most lure lips well enough to turn them.
Lure holders #2: cut off end of cheap, or even used, paint brushes and insert into alligator clips. These have some spring in them for stretching out swimbaits.
Note: Binder clips (in mini, medium, and large) with 1/16" adhesive foam (but without the sticks) make great scale netting clips which will not scratch lures.


-
Is your line connection going on the flat forehead? I am also curious about the rattle chamber placement. Not being critical, just trying to learn.
-
This is from stripers online
VMC 9626PS
#4 - .66" from point to point -- .88" tall -- about 1gm
#2 - .75" from point to point -- 1.01" tall -- 1.4gm
#1 - .80" from point to point -- 1.09" tall -- 1.8gm
1/0 - .92" from point to point -- 1.15" tall -- 2.2gm
2/0 - .99" from point to point --1.23" tall -- 2.9gm
3/0 - 1.10" from point to point -- 1.38" tall -- 3.3gm
4/0 - 1.19" from point to point -- 1.55" tall -- 4.7gm
5/0 - 1.39" from point to point -- 1.88" tall -- 6.3gmI really like VMC trebles!
-
Mckenzies has swatches on their site. Colors like lite, med, and dark bass, trout and musky green. Check out their site.
-
Thanks fishon-son,
A jitterbug would be great and like you I think a spook with a motor would also be a fun lure to fish with. In fact, I've been working on a spook like lure with a softbait swim tail attachment.
As for going the China rout, I will not be doing that, although, that is what most large lure companies do. The truth is, there are some very good China manufactures. There are also a lot of companies in China that make junk. I think the biggest problem in dealing with companies in China is the theft of intellectual property.
Since I started the Buzzin Baits thread, I have decided to change directions and go the way of custom bait design and sales. It won't make me rich but it is something I really enjoy doing. There is a lot of room in the marketplace for people that like to create and sell their products. I am really glad to share what I've learned and look forward to seeing what others might do with this idea.
My next project is larger lures, not topwater but one that can be used for pike and saltwater fishing. I've just completed testing with different batteries which provide much longer run time. When I complete the first one, I'll be posting pictures and how-to information in this same thread.
Thanks again fishon-son
I think the vibrating concept will work even better under water. Fishermen detect the vibrations on the surface visually. Fish detect them through their lateral lines. The ripples on the surface represent wasted energy to fish outside of 10 yards. You have indicated that a fish 50 yds away come to investigate. It has to be underwater vibration that is attracting them.
-
1
-
-
I can see it now...accepting the Award for best sound track in a fishing lure....
The big question will be, Academy Awards, Grammys, or Country Music Awards?
Definitely the CMA. "I'm gonna miss her" comes to mind. This is a fascinating post. Yeah, some of us in NH listen to country music.
-
1
-
-
I practice on plastic pipe. But I have found that blanks with scale textures add even more depth. Try practicing on some cheap blanks too.
-
What die do you use to die them and what colors ? What colors do you find you cant die?
Dharma Acid Dyes has several fluorescent dyes including flo yellow and flo chartreuse. I think they have 82 colors in all.
-
Hold it in place with your fingers. the tape was for photo reasons only.
-
I make my gill stencils like this: Find a small piece of transparent plastic and punch a hole in the corner. This marks the eye position. Position plasitc over the eye and gills of your favorite lure or a fish picture on your computer. Mark a second reference point (lateral line, top of bait, etc) Trace the gill line with a fine sharpie, cut and spray thin paint at low pressure with most of the paint hitting the plastic. To do the other side, flip and repeat. Do the same with the cheek line.
-
2
-
-
Dale,
I cut my joints almost through on the tablesaw while the blank is still rectangular. I leave 1/8" to hold the bait together for shaping.
Once the profile is cut out on the bandsaw, I drill my ballast holes on the drill press, so I can keep the blank square and keep the holes centered. I also drill a small through hole at my eye location so the eyes will line up later.
I do all of my rough shaping on an oscillating belt sander.I add detail with a dremel and it's sanding drum, and an exacto knife.Then I cut the joints completely through with a drywall knife after my shaping is done.I clean up the pieces on the belt sander, and do the final joint shaping.I install my screw eye hinge parts, mark where I want the slots on the next section, and cut/shape the hinge slots in the front of the next section.I have a drill press table with a small centering pin that lines up with the center of the bit. I mark where I want my hinge pins to go, use an awl to mark the holes, and then put the right size bit in the drill press. I put one side of the piece down so the awl hole is on the centering pin. I drill half way down from one side, then flip the piece, put the starter hole onto the centering pin, and drill down to finish the pin hole.If I do it right, the two holes meet at the center. If not, because I have the hinge slots already cut, I can see where the holes miss each other, and can use a hand held drill to correct the alignment. It's not hard to do.Having a process has made it easy for me to make a new jointed bait, or multiple baits, if I want to.I hope this helps.This will save much trial and error when i make a bigger swimbait.
-
My observation of fishies indicate that the orient themselves nose down when swimming toward the bottom. So I wouldn't be opposed to a slightly nose heavy bait.
-
Porkmeatballs (why do I love that name),
I've never made a resin swimbait, but I've made lots from wood and from PVC.
I've found that the lighter the actual lure body is, even if I have to add more ballast to get it to float/sink the way I want it to, the better/more lively the action of the bait.
I also found that making the bait thicker on top, in the back and shoulders, than it is on the bottom (a V cross section for my baits from 1/2"+- at the belly to 7/8" at the shoulders) makes the bait more stable and less prone to roll on a fast retrieve.
Since you're pouring your baits in a mold, you can play around with everything until you come up with what you really want.
Good luck!
I love that reverse V idea. Thanks for sharing!
-
 I don't know a lot about swimbaits, but on the crappie I'm developing I flattened the top of the head and put two attachment points. One is 3/16" from the front. Second is 1/2" from the front. It is 4" long, sinks level and slowly, and swims with 2 different actions. I think the flat head(5/8 x 1) keeps it down and helps the action.
 -
1
-
-
The profile pic still looks better than mohawkman's
-
2
-
-
Way to funny, I guess we all need to look more closely at dates , but hey it was in the new content, but it is a good thread even if we are having a bit of a time delay(6 yrs) haha

David J
I watch for recent posts. Looks like someone else brought it up from the dead and I gave it a face lift. Lazzarus, buddy, come on out!
-
hey there i am new also i got a book and it said do a poxy on it after you sanded your piece then after that dries do another light sanding on it . i did that and it worked great , i am hand painting my pieces i cant afford a airbrush either , after i paint my piece i mix the poxy again and brush it on let dry add hardware thats it has a great finish . I seen on here alot talk about using deft sealer that you can buy at your local lowes i was going to try that also. good luck i am learning still myself.
Christina
Welcome to TU. Good to see a good looking profile pic. Check out mohawkman's! I'm not very photogenic myself - so I used one of my lures. I bought my airbrush (badger 150) along with a compressor and some paint for $90. It is by no means top of the line, But it is sooo much better than spray cans. And the paint (createx and com art) can be heat set in seconds rather than 24 hours for laquer. Watch for deals on craigslist. Lots of suggestion on this site on DIY projects like spray booths, lure turners, etc. Check out the homebrew tools forum.
-
So im thinking about buying a wooden popper from jannsnetcraft.com And a block of basswood for making my first cranks. I'm a complete noob when it comes to custom lure making so bear with me haha.
How do i seal the lures before painting? Another guy told me rub super glue on it with my fingers, but i have used super glue and touched it with my finger and it pulled some skin off, unless he is talking about some other glue?
I was gonna use stainless steel wire for the hangers and line tie but, what gauge wire should i use to make them? 20? 21?
Split ring for a crankbait? I was thinking size 3?
Once sealed, do i need to put primer on it or can i just paint?
I dont have an airbrush but i was looking at buy some spray paint. Anybody got some pictures of lures done with spray paint? I don't have enough money to buy and airbrush and a compressor.
Much appreciated!
Harbor freight sells 1lb spools of .041 stainless for around $9. Watch the you tube video
So im thinking about buying a wooden popper from jannsnetcraft.com And a block of basswood for making my first cranks. I'm a complete noob when it comes to custom lure making so bear with me haha.
How do i seal the lures before painting? Another guy told me rub super glue on it with my fingers, but i have used super glue and touched it with my finger and it pulled some skin off, unless he is talking about some other glue?
I was gonna use stainless steel wire for the hangers and line tie but, what gauge wire should i use to make them? 20? 21?
Split ring for a crankbait? I was thinking size 3?
Once sealed, do i need to put primer on it or can i just paint?
I dont have an airbrush but i was looking at buy some spray paint. Anybody got some pictures of lures done with spray paint? I don't have enough money to buy and airbrush and a compressor.
Much appreciated!
Harbor freight sells .041 stainless wire 1lb spool for around $9 At least one guy on this site uses it. Watch his video... very educational. Hope the link works
BTW welcome to TU! -
When spreading Super Glue onto your lure, place your finger in to a Ziplock sandwich bag. The glue spreads easier and you don't wind up getting the glue on your finger.
Gene
Any reason we can't use a cheap throwaway brush to spread it? 1/30th of 99 cents seems like a small price to pay. Also for Newbies - watch those superglue fumes. use a booth or fan to direct them away from you. They form sharp crystals in your lungs - very bad.
-
2
-
-
I don't know what you're fishing for, but I make an automatic fisherman for ice fishing. It uses an ice fishing jig rod with a lot of spring to it. There is a rod holder on the rear of the base that holds the rod at about 45 deg. Yhe front of the base has a hinged piece of plastic pipe with a trigger attached. The trigger is a piece 1/16" of copper coated steel welding wire that pivots on the end of the plastic pipe. About 1-1/2" up from the pivot is a 90 degree bend cut off at about 1".This is the loading point. The rest of the wire extends about 5-6" and has a V bend in the end of it. This is the trigger. The rod is placed in the holder. The tip of the rod is bent over and the tip is inserted onto the loading point. DO NOT LEAN OVER THE ROD WHEN IT IS LOADED. The line is let out to depth with bait or a jig. The line is then laid ove the V on the trigger and the reel is closed. When the fish takes the line the trigger is pulled and the rod springs up, setting the hook. I don't see any reason why you couldn't adapt it for use on a boat as a second rod... If it is legal in your area. I will post a pic in the gallery.
-
So far I have had no problem spraying directly onto a clean clear blank. If you did you could always spray the blank with Createx transparent base. Adding the base to your paint will make it more transparent if needed. Adding reducer allows you to spray thin controlled coats at a lower pressure. Pearls and fluorescents can also be used to a limited degree on ghost patterns.

Looking To See Who Makes These Glitter Blades
in Wire Baits
Posted
Looks like thin epoxy (envirotex?) with the glitter sprinkled on after the epoxy is applied. Another coat on top or mixing glitter into epoxy would be more durable. Too much or doing both sides is likely to inhibit the action of the blades - especially with willow blades.