


All Eyes
-
Posts
690 -
Joined
-
Last visited
-
Days Won
30
Content Type
Profiles
Articles
TU Classifieds
Glossary
Website Links
Forums
Gallery
Store
Posts posted by All Eyes
-
-
The Devcon 2 ton may be your problem on these larger baits. It has a fast set up time and the brush may be dragging and pooling up a skim of partially dried epoxy in spots. I would suggest cleaning your baits with denatured alcohol and trying a long set epoxy such as Envirotex. Let it stand for 10 minutes after mixing to help reduce any bubbles. Blowing on it also pops bubbles as the carbon dioxide in your breath helps them rise to the surface.
-
1 hour ago, Brick Steel said:
Interesting comment by All Eyes, concerning white Createx. I’ve been using opaque white as a base for most baits and have had problems with consistency - much more than any other color. I just threw out a bottle because it was so thick, I couldn’t reduce it to useable. I got another bottle and it’s fine. When I got it from Hobby Lobby, I shook it to make sure it was liquidy (new word - you saw it here first). Also appreciate BBK’s comment on the eye dropper. It’s much more controllable and less waste. I usually reduce the paint in the airbrush cup. A couple of drops of reducer first then add paint. My thinking is that I don’t want a blob of un-reduced paint at the bottom of the cup to clog up the airbrush.
The Createx white seems to be very inconsistent for some reason. I've used it as a base coat for years before switching to Wicked. One bottle seems to be fine, and the next is pasty junk. They pass the "liquidy" shake test but you can't tell before using them. I've wondered if some of what I bought were old stock or just bad batches. Either way, Wicked white flows and covers much better, especially at lower PSI for closeup detail work.
-
 1
1
-
-
Much of my paint is Createx, but their Wicked brand flows much better with certain colors. Especially white. It is refined with smaller particulate and is a huge upgrade over the regular Createx White. I also use the 4011 reducer depending on what I'm spraying. The metallics and others can give you fits without thinning it a bit.
-
1
-
-
Thanks for the links Anglinarcher. I have bought things there in the past and was always satisfied. Next week I will be placing an order for several items that I'm running low on, so will probably just get everything from them.
-
On 9/28/2017 at 5:41 PM, ddl said:
imo zinc are the best,they have a lot of memory
Any split ring that's strong enough to withstand heavy fishing for a couple of years without corroding is a good one in my book. I don't mind swapping them out but some are less reliable than others. It seems to come down to the quality of the metal and finish. I know from experience that not everything marked stainless steel is of equal quality. Not sure about the zinc ones, but assume it's the same way. It may not matter that much for smaller baits and fish, but musky class baits are where I want max durability. I really like Spro stainless rings but usually pick up packs of them at the local big box stores where available, and they are really expensive in those places. Just wanted some opinions on comparable quality with other brands and sites to buy in bulk. Thank you guys for the opinions and recommendations.
-
Thanks for the help guys. I have been to the Worth site before and liked their prices. Looks like I will be placing an order with them.
-
1 hour ago, MT204 said:
Been buying mine from these folks, been treating me very well.
https://chuckanddeb.com/split_rings.htm
Thanks!
-
Recently, I ran across some defective split rings that fell apart just by rigging them onto my baits. I can't narrow it down to a supplier because I buy them randomly here and there. All the ones I buy are supposed to be stainless, and they are not very old. The problem is that I open multiple packs at a time and dump them all into a bin. There's a lot of them in there and no way to know for sure which ones might fail. I can't have that.

So- after I dump all of my split rings in the trash, where might you guys suggest I find a good deal on quality stainless split rings? Any suggestions would be appreciated.
Thanks!
-
26 minutes ago, mark poulson said:
Does Createx still sell the 4011 reducer?
Yes. I buy it at Pat Katans.
-
1
-
-
My advice would be to very lightly lay down some gold pearl mixed with a drop or two of transparent brown. Then go over it with transparent green mixed with a little transparent brown. Add a very small drop of black to that and hit the darkest areas. The lighter you spray the better.
-
To make a not so bold prediction, you are going to be producing some exceptional baits in short order. A person can only get better at this, and your new stuff already looks dynamite. I'm really looking forward to watching your progress.
-
All common problems Mark, and ones that you will learn to resolve before long. First off, like others have said, try the thinner made for the airbrush. For water based paint, I use Auto Air 4011 reducer. The consistency you want is like 2% milk. You learn to get an eye for it. Some paints and colors require more, and others may not need any at all. Opaque white, for example, is one that I find needs more thinner to flow just right.
If you are experiencing splatter or chunks with sporadic paint flow, your nozzle and needle probably need cleaned. Nozzles can get a film built up on them even with constant flushing.
A great way to practice is to get an inch or so away from the surface, and write your name or whatever with as thin a line as possible. Keep doing that in different colors and experiment with PSI and ratios of reducer. At that close distance, you will learn to control the amount of both paint and air so you aren't blowing pools of paint all over the place.
Judging by your baits, I'm a bit surprised that you are struggling with it at all. Looks to me like you have a very nice touch with your fades and detail.
-
Glad to hear it was salvageable. Those baits look very nice.
-
1
-
-
TY! Good stuff guys. I have used the twisted wire method on a limited basis in the past, and went back to the way I learned from the start. Like Rayburn Guy said, there are a lot of different ways to skin a cat. Any tunable line tie that's durable and lets the bait move freely is a good one in my book. After that it's just personal preference.
I also drill a small hole thru the back of the lip and rough up the material to help the epoxy bond to it. My line tie hole and lip slot are drilled and cut on the small side, so that it takes a bit of pressure to fit them into place. I use 2 ton epoxy, and shove a lot of it into the hole with a piece of wire before installing them. After testing on some mock ups to the breaking point, I am positive that no fish out there is going to pull the lips out. Especially before the line snaps or the hooks fail. That epoxy is no joke.
-
1
-
-
3 hours ago, Lurenerd said:
Appreciate the response All Eyes. The line tie in the photo looks great.

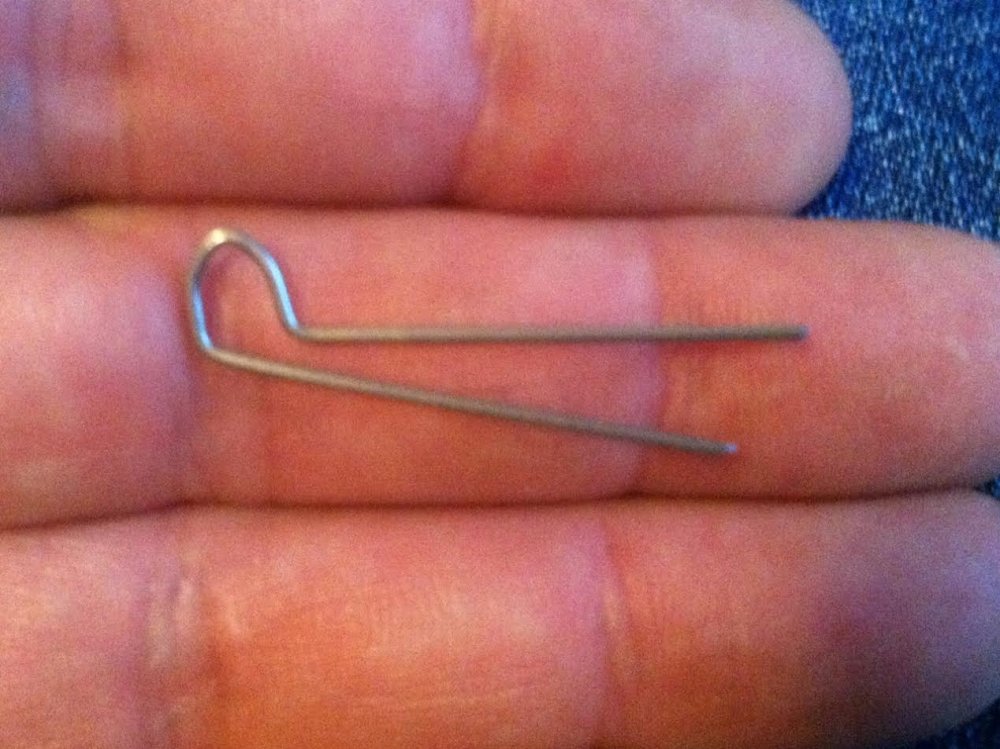
Hope it helps. Here is what the end result looks like. I like to drill the hole for the line tie before cutting the lip slot. Too hard to drill that close to the slot without blowing it out.
My line ties are usually longer than the one shown in the picture. I also like to put a slight bend at the very ends of them to grab a bit better.

-
As Jigginpig pointed out, symmetrical profile is very important. Even good eyes can be fooled. One way to check during the shaping process is with templates that you can make in different sizes. Some use C-shaped templates that check one side at a time. The way I go about is is to fold a piece of plastic masking film, or cardboard, etc. in half and cut out half of an oval (on an oval shaped bait) so that when you unfold it, you have a hole that is perfectly even on both sides. Slide your bait into the hole you cut and line the top and bottom centerline up to the fold in your template. (Hope this is making sense- I'm terrible at explaining things sometimes)
With different sized templates, you can check the bait from head to tail. What you are looking for is daylight on one side but not the other. It's just easier to tell where more material needs taken off.
-
Thanks a lot for the kind words Mark! Your baits are looking great also. Very clean work.
-
First off, your baits look fantastic!
Jigginpig summed it all up rather nicely. Lots of trial and error. Lip size, shape and angle, wood type and bait shape/size, ballast and line tie placement all work together to create a specific action. Sometimes just adding a bit more ballast will stabilize a bait enough to keep it from blowing out. Easy enough to test by adhering weight before drilling into them.
-
.35 is what I use, but I drill two holes in the lip and shape the wire before inserting it thru. Trying to get a proper bend with the lip attached is a pain in the butt. Here is what my wire basically looks like before installing it. It takes a bit of manipulation to push through at the bends, but I do this with both polycarbonate and circuitboard lips. Both tag ends go into one hole in the bait body, which force the wire tightly together and also acts as a bit of resistance against pulling out.
-
1
-
-
dpalinsk-
I use reduced Auto Air Sealer White on my homemade wood baits with an Eclipse HP CS, and also have experienced trouble with particulate spatter. I now stretch a doubled up piece of nylon hosiery over the bottle top as a filter and it makes all the difference in the world.
-
1
-
-
My normal method is Envirotech Epoxy thinned with a couple drops of denatured alcohol for sealing. After paint I use at least two coats of the E-Tex without thinning.
-
You should be able to resize your pics with Paint. Be sure to maintain the aspect ratio when resizing so it doesn't distort the picture. Like I mentioned above you can make duplicates of the photos you want to save and do the resizing on the copies.
It's normal for the picture size to change with the file size. The picture IS the file. Paint uses a "percentage" when resizing pictures. You may have to play around with it to get a feel for it. Resize a picture and if it doesn't suit you just hit the undo button and your right back to where you started. No damage done.
hope this helps,
Ben
Still need more time to mess with it, but was able to change the pixel size in Paint without reducing the image size so severely. I'm old and confused and not real computer savvy.
 I changed and uploaded a couple of pictures, and now I need a nap.
 -
2
-
-
Old lurker and new member here, and couldn't agree more. Pick a topic and search it. The info and education here is like going to bait making college. Why I didn't join this site years ago I'll never know.
-
3
-
-
Thought about buying stock in 3-D Systems tech years ago and never did. I just can't see this not becoming a bigger manufacturing player every day. It's too slow and has issues now, but as the tech progresses, I can easily see it taking over many industry standards. Very cool to see this bait you've printed. Thanks for sharing this.

Deep Diver Deep Dive
in Hard Baits
Posted
Lots of good info and advice given here. It would take me a week to put my thoughts down on the subject in such a way that would be helpful. I have a tendency to talk in circles and am much better at building than explaining things. I don't have a physics degree or any knowledge other than what I've learned through many years of screwing up.
My advice for any new builder is to try to duplicate an existing bait that is a known producer. Templates for different styles are out there if you look around online. My first builds were a Shad Rap profile that I was able to find this pattern for. By duplicating the dimensions both in body profile and lip, the angle of the lip, line tie placement, and the ballast weight placement, it took a lot of the guess work out of trying to start off with my own unproven design. If nothing else, it's a confidence builder when you see promise in your very first build. (This bait is a mid diver but just using it as an example)
Keep in mind that the materials used are a big factor also. In other words, if you are replicating a plastic bait, you can't necessarily expect it to behave like a copied wood version. The same goes for different types of wood that all have their own weight, buoyancy, etc. I began with balsa wood, as the original Rapala's are also Balsa. Since then, I've been able to learn the characteristics of some different wood types and bait designs. Most all of what I use now is red cedar.
One things for certain, there is no such thing as being "learned out" when it comes to building baits. It's a never ending process of trial and error and why I enjoy it so much.