


exx1976
-
Posts
212 -
Joined
-
Last visited
-
Days Won
7
Content Type
Profiles
Articles
TU Classifieds
Glossary
Website Links
Forums
Gallery
Store
Posts posted by exx1976
-
-
10 minutes ago, eastman03 said:
Again, this is just what I do. There might be better or easier ways to do it.
Understood. I always make that same disclaimer as well. But at my learning stage with doing foils, it's still helpful to hear other methods - whether they are the "best" or not. As far as I'm concerned, "best" is subjective anyway. Depends on what your goals are. Some guys put quality first, some put speed first, others put cost effectiveness first. Judging my your process and your results, you are putting quality first - which is exactly what I'm doing, so I think I'm going to try that route. Thank you much for your insights, and I'll be sure to come back and let you know how it turns out!!
-
 1
1
-
-
3 hours ago, eastman03 said:
Usually at least a day between each step. Mostly because I'm never trying to get them out fast. Honestly it is probably more like a few days between each step. The polycrylic layer that I spray dries quite quickly. That one could be epoxied or painted over over in the same day. Paint too. If I paint a lure in the morning, I have epoxied them in the same day as well.
Wait, I'm confused - Are you doing polycrylic then paint then epoxy, or are you doing polycrylic then epoxy then paint then epoxy? Looking to finish the head on this lure today, then do another that's just one big piece of foil, and then get all of them either basecoat or paint by tonight, depending on how I do this.
Thanks!
-
4 hours ago, eastman03 said:
Ahh got ya. I sprayed over the foil with polycrylic to make help get a good surface prep for epoxy. Then epoxy. Then paint. I don’t usually scuff anything up. I don’t know if it’s totally necessary. I haven’t seemed to have any issues.
How long do you let the epoxy cure between the base coat, paint, & top coat?
-
54 minutes ago, eastman03 said:
Yea, it is a pretty cool way to foil a lure. I got the idea from engineered angler on youtube.
The head transition was very tricky. Again, I've only done this a few times, so there might be better ways to do it. Basically I foiled the scale pattern right up past the area where the gill plate would be. Then I made a quick stencil for the shape of the gill that I wanted. I carefully traced it onto the foil scales, then using a very sharp knife, i cut out that shape, and peeled the cut offs of the foil scales. . Then I cut a flat piece of foil to fit in that spot using the stencil and carefully fit it into the cutout spot on the lure. It is a pain, but can look super cool!
Here is another one that worked out good too. I ended up using two separate pieces for the gill, then the head. You can kind of see the overlap, most of which i was able to hide with that black paint to accent the gill. You can see better on this one too, how I highlighted the scales with black paint, then wiped the foil scales down, leaving just the edges black. Then I epoxied over the whole bait, before adding any more paint.
Looking back at it in hindsight, I really left the head/eye area blank. lol. Should have added more detail. There is still time to I guess. haha This is my version of a Manitoba "greenback" walleye.
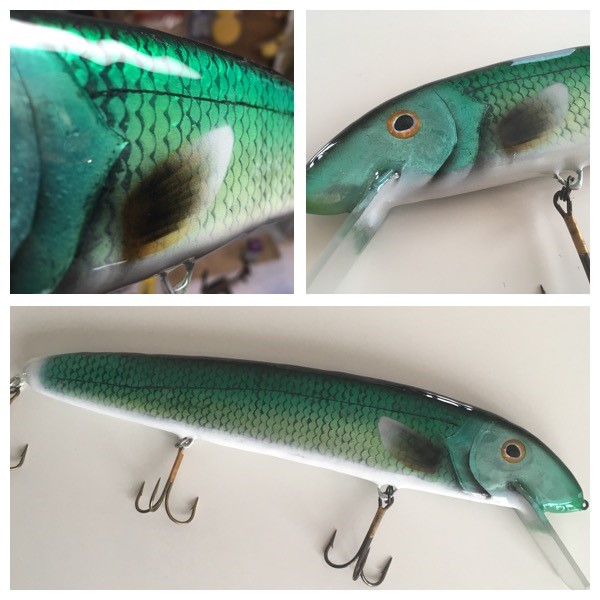
That looks great! Thank you for the quick reply, but I guess I was more interested in how you applied the epoxy on top of the scales, and then did you scuff it before paint, etc, stuff like that.
-
2 minutes ago, eastman03 said:
I’ve done scales out of foil as well. And other types of foil with pattern and smooth. Usually I epoxy over the foil to ensure the top/bottom is completely smooth. Helps hide any seems.
if you want a thin “seal” over the foil that won’t be as think as epoxy I have sprayed/airbrushed a few very thin coats of polycrylic (cut with 1/3 water) That stuff is great. I’m no expert. Just letting you know what I’ve tried. I have painted right over foil, but it doesn’t seem to adhere great.
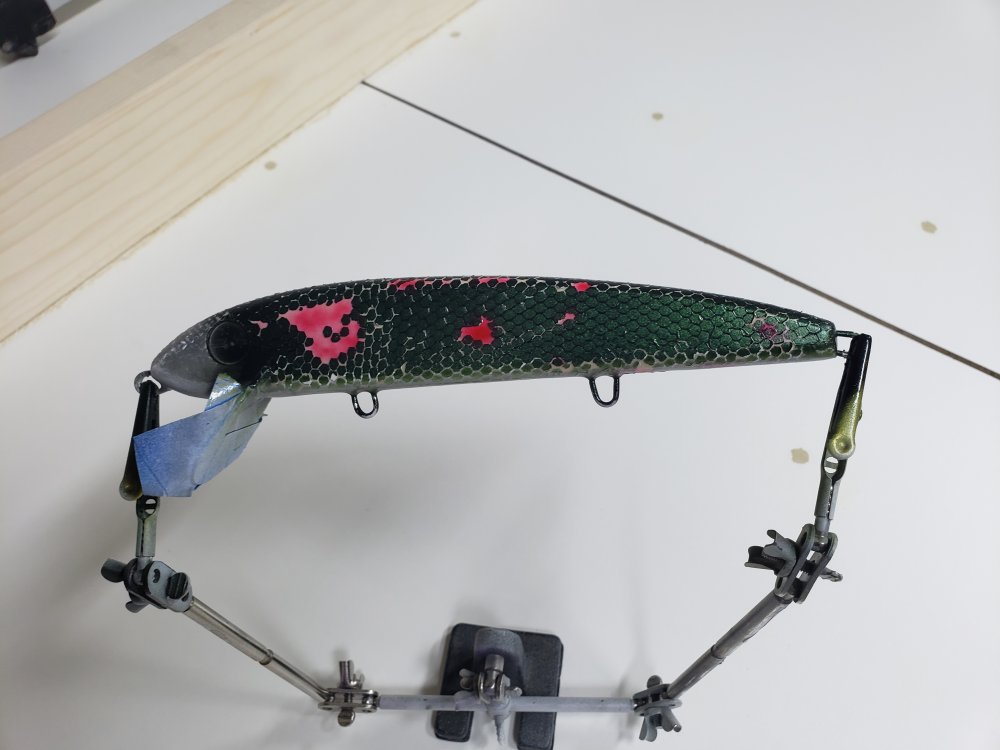
sometimes I’ll paint a layer at an angle against the scales, then wipe off the paint to try to “highlight” the edges of the scales.
Here is an example of one that I tried. I’m not exactly sure how you are going yours, but I wasn’t too concerned with preserving the texture to the touch. Just for a visual effect.
That is EXACTLY what I'm going for. Looks like you even used the same method that I did. I'm more concerned with the visual effect of the 3D scales than I am the touch - I expect the lure to be flat, like any other lure, so as not to create undue turbulence in the water.
Can you walk me through exactly how you did that one? I've got my scale application completed, just need to foil the head/gillplate and then I'm ready to move on. I want the finished product to be exactly as I see yours there (different colors, but same basic idea. I'm planning to leave the belly "naked", and then do either a bass or maybe trout pattern on it. Or maybe walleye, or even cisco. Haven't QUITE nailed that part down just yet. LOL)
Thanks!! -
55 minutes ago, Travis said:
I have always epoxied before spraying over foil.
Can you elaborate on why you do it that way? My thought is that epoxy before paint would flatten the 3D effect of the scales? And I'm sure you have to scuff the epoxy coat over the scales before paint and topcoat, so what kind of effect does that have on the transparency of the paint underneath and the scales showing through that seal coat? I'd hate to do all this work and have it hidden or have only the belly be visible...
-
I, too, drill holes through my lips so there is a mechanical bond through the lip itself. My lips are epoxied in when I fill the slot from running the thru-wire. I fill it with epoxy and West systems 404. I do the initial epoxy curing at a somewhat cool temperature, so the epoxy sets up more slowly. This allows me to check when it reaches sort of a "clay-like" consistency, which makes it very easy to trim excess epoxy using an exacto knife. The blanks are then moved to a warmer area, where they very quickly finish curing rock-hard.
I'm not sure that I'd recommend *any* of my processes to anyone, though. They are all rather time consuming, and likely even somewhat convoluted - but I'm pleased with the results. I'm sure with more experience I will continue to refine them to reduce the time investment.
-
On 3/18/2021 at 12:07 PM, InterPalssz said:
Epoxy resin clouded
Turbidity occurs when water enters the mixture, or there is moisture on the treated surface. Therefore, before pouring the epoxy, make sure that the surface is completely clean and dry. Another reason for turbidity is the acceleration of the drying process using a hair dryer.Depending on the type of resin used, he could also be looking at amine blush. This is common with many types of marine-grade resins used in ship building/repair. Since I don't recall that he specified what resin he was using, I wouldn't rule this out. Some of the West Systems stuff will do this - however, it's not a big deal. It comes off with soap and water.
Google "amine blush" for more info.
-
1
-
-
On 3/31/2021 at 7:38 AM, ravenlures said:
4030 to mix with pigment and 4012 to reduce it to spray that is what I am reading to use. So it looks like it is up to me to try this out. Any more help would be great but it might be me telling the story on this paint, good luck to me.
Wayne
I've also been thinking about using the candy colors on some baits, but with everything else going on in life right now, I'm thinking that will be a next winter project. I have watched a number of YouTube videos about the candy colors, and if memory serves, they do recommend specific base colors under the candies to get the effect that they advertise. In at least one of the videos, they shot two different base colors on two different pieces to compare the outcomes. It appears to be a fairly straightforward process in terms of actually shooting the color, though (again, if memory serves) they recommend many, many thin layers to achieve the effect. Fewer, thicker layers of paint will not do near as well.
The results certainly are sharp, and I think that a candy green or candy purple or even a candle apple red musky lure would certainly catch fishermen, if not fish.
Please do keep us posted on your findings, I'll be watching this topic closely.
")
Best of luck, I'm sure you'll do fine!
-
1
-
-
House hunting, writing offers, and hand-laying foil scales on a blank. Holy time consuming, batman!
-
So... Before I get right to it, a wee bit of an update: I've been met with encouraging success in selling my lures. So far I've done two runs of lures (10 in total), and of those, 7 have sold. In fairly short order, I might add. Some within minutes of listing online, and several were custom pattern requests that turned out absolutely gorgeous. One was so beautiful I was sad to see it go. Then life has gotten in the way (house hunting, demands of my day job, etc), so I haven't sold anything in a couple weeks. But, I've still been working some behind the scenes. I have a batch of 10 that's ready for their seal coat epoxy, which leads me to my question:
One of the lures, I have spent HOURS upon HOURS of time, very carefully hand-laying foil scales onto. To cover ~6" of an 8" lure, moving approximately 1/8" at a time, including cutting out all the foil, it's quite a time-consuming endeavor. I'm not sure that I'd do it again, but I suppose it depends on what it fetches when I list it online for auction. In any event, my question is: When you guys foil a lure (this is my first one), do you paint directly on the foil, or do you do an epoxy coat first, then paint on top of the epoxy, then topcoat? I can't decide which route I want to go with it, so I'm looking for advice from more experienced builders, and pros/cons of each option (or if there's some other option I've not thought of?). Given the amount of time I already have in this lure, I'd hate to "wing it" and screw up what is shaping up to be quite the work of art.
Thanks!
-
1
-
-
On 3/23/2021 at 9:22 AM, SlowFISH said:
without putting so much paint down that you make a mess.
J.
Like this? Lol I'm calling it "zombie perch". I bet I get $100 for it at auction.
-
On 3/22/2021 at 11:36 PM, Bdnoble84 said:
Misdle hook hanger is too far back imo. That and back hook will probably tangle pretty easily
Only if you cast like a girl.
-
 1
1
-
-
3 hours ago, bogdan_alex said:
Something is not right...even if it kicks in, the pressure should be steady. This means the pressure regulator is not doing its job properly or the compressor starts too late when the tank pressure is below the working pressure. I have a 3 liter tank (less than a gallon) and although I'd love to have one bigger, it's working really nice and steady .
I'm totally, like WAY amateur with an airbrush. I'm sure I'm spraying at too high of a psi.
-
I have a Paasche with a 1 gallon tank. It's super quiet, but it's nowhere near large enough. 10 seconds of spraying and it kicks on, which causes a pretty regular change in output PSI at the nozzle, resulting in difficulty painting.
I just ordered a 6 gallon DeWalt pancake compressor, should be here next week. It was on sale, and comes with an 18ga brad nailer, which I'll use for other projects around the house as well, so win/win.
The Paasche is for sale if anyone is interested... LOL
-
7 hours ago, ravenlures said:
Now that we seem to keep talking about the lures of one color or another we seem to forget the packaging that really is the first look a fisherman sees. The brand is second then color he has maybe a minute or less to decide which lure he wants. So what order would you say is #1 color #2 packaging,#3 brand. This could start another page.
Wayne
I don't know about most guys, but when I used to go to Rollie & Helens (prior to making my own, I don't intend to go there at all anymore now), I skipped the stuff in the packages and tried to stick to stuff that was hanging on a peg by the hook. I tried to pick colors that mimicked forage where I would be fishing, or colors that I knew were good for that water - no matter how attractive some of the other lures may have looked.
But, then again, I'm not exactly winning any tournaments either, so take from that what you will. LOL
That said, now that I *AM* making baits, I will certainly have my fair share of colors that are designed to "catch fishermen". But hey, if they're confident, they'll throw it more, and will eventually catch fish on it. So there's that.
-
1
-
-
1 hour ago, Anglinarcher said:
no
That's what I was needing to figure out. Thanks!
-
1 hour ago, Anglinarcher said:
As soon as the epoxy is cured, normally overnight, you can sand with fine sandpaper or steel wool. (Epoxy cures, not dries, so it will continue to "cure" after it is painted). A wash can be done, but don't use a solvent that cuts the epoxy or you undo the benefits of sanding.
This does not answer my question. Sanding can be done as soon as it is sufficiently hard. However, if you paint too soon, and the epoxy is not yet cured, offgassing would destroy the paint, yes?
That's what I'm trying to figure out.
-
Now that I have my lure design all nailed down and it swims how I want, the time has come to really focus on the finish - and by finish, I mean the cosmetics.
I've made the difficult (for me) decision to use an epoxy seal coat. It seems that is what the vast majority of other high-end builders are doing, so if I want to play the game, I need to at least keep up in that department. C'est la vie.
Question for those who do epoxy base/seal coats: How long do you let the epoxy cure prior to sand/prime/paint? Also, is there anything else you do with it besides sand/prime? I know when doing epoxy on boats, you need to wash it thoroughly to remove amine blush, but I'm not sure if that applies to the type of epoxy we are using here... I'm certainly not using vinyl esther for baits.

Thanks!
-
I think I've finally done it! The lip slot is deep enough that it's MUCH more sturdy, and the action is still how I want it. This lure is also now a thru-wire lure, so no more worries about strength.
What do you guys think? Anything you'd change? I'm not sure how crazy I am about the middle hook hanger being so far back, maybe center it a bit more? Pic of lure and action for feedback. The lip obviously isn't in yet in the photo, but it's .061" G10.
That was also my first attempt at painting fins. Pretty happy with how the fin came out, but learned a lesson about the tape (see the bald spot up on the back?)
Action video:
-
1 hour ago, Big Epp said:
I've tried using old CDs to make lips for smaller lures, as they are made (were made?, does anyone but me use CDs anymore?) from poly-carbonate. It's pretty tough to snap a CD, but once you start cutting it up and making lips with it it gets pretty snappy. I've made some 2" jerkbait style lures and the CD lip was probably 1/2x1/2" and it snapped pretty easily. So DON'T use CDs.
That's because they are a layered material, and one of the layers is acrylic.
-
2
-
 1
1
-
-
36 minutes ago, eastman03 said:
I blows my mind watching these tournaments how intelligent and knowledgeable those anglers are. They know the difference between all the grasses and weeds and movements of the fish and tiny ledges down 20 feet deep (or maybe they are just bs'ing me, but it worked).
What is more amazing often is that in the same day on the same tourney, guys fishing with plastics in 1 foot of slop can slay bass at the same time as a guy fishing a 20 foot ledge with a rattle trap slaying bass. I need to take that fact and apply it more to muskies and all other fish. There is often a 'trend' or rut that you get stuck in - in july fish are only shallow (for example). When in reality, on any given day, there are active fish in several different depths and ecosystems.
While on the surface that sounds a fine plan, I'm less certain it holds true in practice. The density of bass in a given body of water is FAR greater than the density of musky - especially at the sizes we are usually looking to catch. Not to mention their different size, tolerance to water temperature changes, metabolism, feeding habits, etc...
-
2 hours ago, ravenlures said:
exx1976
Just remember a lot of the good lures were made by mistakes along the way.
Wayne
Oh trust me, I've made a LOT of mistakes thus far. Unfortunately, none of them were good. LOL
-
 1
1
-
-
Update: Got the table saw crosscut sled back together, and installed a Freud 60T thin kerf fine crosscut blade. Rearranged the shop to make processes flow a bit better.
Kicked out a dozen blanks tonight, should be able to start paint tomorrow.
I'll do a video of my current shop setup and the tooling that I'm using this weekend perhaps.


Do you do foiled lures? If so, please step inside...
in Hard Baits
Posted
I'll have to go look for his.
I just shot the black back up against the scales, and then shot clear over it. It looks sharp already!! Also did another one in just plain full foil. Shot clear over that as well to help the Epoxy adhere. On that one, I left a strip down the belly and a strip down the back without foil. That'll level off with epoxy, and there will be solid color paint there. I figured it was easier than trying to make a clean joint. We'll see how they turn out.