Kasilofchrisn Posted September 4, 2014 Author Report Share Posted September 4, 2014 Would something like this work? http://www.jigskinz.com/index.htm I ordered a fewof these to try. Still they don't off the holographic foil finishes many of us are looking for. 1 Quote Link to comment Share on other sites More sharing options...
Kasilofchrisn Posted September 4, 2014 Author Report Share Posted September 4, 2014 Rain. I'm so jealous! I live in SoCal. It's been so long since it rained here we've forgotten what it looks like. I am at work now and we have a snow storm. Slushy snow is blowing sideways and making a mess of things. First snow was August 28th. Can I send some snow your way? Quote Link to comment Share on other sites More sharing options...
mark poulson Posted September 4, 2014 Report Share Posted September 4, 2014 I am at work now and we have a snow storm. Slushy snow is blowing sideways and making a mess of things. First snow was August 28th. Can I send some snow your way? We'll take all we can get! Seriously, if the Feds can build an interstate highway system, can't they build an interstate water system, to pump water to where it's needed? Heck. the oil companies can pump oil anywhere. Let's hire them to build the system. Just don't let them control it, or the water! Quote Link to comment Share on other sites More sharing options...
Slammingjack Posted September 4, 2014 Report Share Posted September 4, 2014 (edited) I am at work now and we have a snow storm. Slushy snow is blowing sideways and making a mess of things. First snow was August 28th. Can I send some snow your way? Hehe First snow always melts off. by Sept. 9 Will snow and will stay Untill late April or early May. Spent a few years in Fairbanks. Don't know about your neck of the woods. Live in Flordia now ain't seen snow in 25 years. Don't miss it!! But that truly is God's country up there. Edited September 4, 2014 by Slammingjack Quote Link to comment Share on other sites More sharing options...
Kasilofchrisn Posted September 5, 2014 Author Report Share Posted September 5, 2014 Hehe First snow always melts off. by Sept. 9 Will snow and will stay Untill late April or early May. Spent a few years in Fairbanks. Don't know about your neck of the woods. Live in Flordia now ain't seen snow in 25 years. Don't miss it!! But that truly is God's country up there. I'm at work on the slope now. Here in the Arctic things are different then where I live in Soldotna. Yes it melts off several times before it finally sticks. I actually love the snow. I wouldn't trade it for the Florida heat EVER. Hopefully I can find time this R&R to get some experimenting done on this foil jig project. More stuff I need to do keeps popping up all the time. Quote Link to comment Share on other sites More sharing options...
Kasilofchrisn Posted September 17, 2014 Author Report Share Posted September 17, 2014 We'll I got to playing with this today. Third try I got it to work. I used a liquid foil bonding adhesive. My laptop is in the shop and I'm posting from my phone. If we had tapatalk I would post some pics now. The jig does need a clear topcoat. The process does need some refining but I'm confident I can make it work better in the future. At least for my personal needs. Production runs would require more/better equipment. I'll post a better write up later. Quote Link to comment Share on other sites More sharing options...
Kasilofchrisn Posted September 17, 2014 Author Report Share Posted September 17, 2014 (edited) Ok so here is the foil bonder I used. I applied a light coat to the jig then heated it using my adjustable heat gun at ~400* seting. I applied the foil and pressed down on it with a rag and smoothed it out. After it cooled I removed the plastic overlay that the foil comes on and was ready to do the other side. The foil I used I bought on EBAY. It was for a Kingsley foil machine for paper foiling I assume. It came on a long roll about 2 or 3 inches wide. Here is the result. Sure it needs refining but it is bonded completely and only needs a topcoat to seal it on. I have some carpet samples and I am going to try using those in a vise to secure both sides with foil at the same time. I am thinking the carpet will conform to the jig and help it bond properly. The foil wasn't that expensive for 6 rolls. and The foil binder with shipping was $30 for a quart tub. That's enough binder to do hundreds if not a thousand or more jigs. I used an 8 ounce jig for this test as a bigger canvas was going to be easier to work with for the first time. I will work with other sizes later as I get to improving this technique. I may eventually buy an inexpensive heat press but that comes much later as they are expensive to buy new. I will also be applying paint with an airbrush for the head and the seams of these jigs. I hope this helps you guys out. Edited September 17, 2014 by Kasilofchrisn Quote Link to comment Share on other sites More sharing options...
mark poulson Posted September 17, 2014 Report Share Posted September 17, 2014 That came out great! Thanks for sharing. Quote Link to comment Share on other sites More sharing options...
JSC Posted September 18, 2014 Report Share Posted September 18, 2014 Lookin Good .. Thanx for the good information Quote Link to comment Share on other sites More sharing options...
mark poulson Posted September 18, 2014 Report Share Posted September 18, 2014 Maybe you could make some slightly oversized bondo mold sides, and line them with something soft, to use to press the foil. If you pour them in a rigid container, like a small wooden box form, you would have something to clamp. Or maybe I'm overthinking it...surprise! Quote Link to comment Share on other sites More sharing options...
robalo01 Posted September 19, 2014 Report Share Posted September 19, 2014 I have some carpet samples and I am going to try using those in a vise to secure both sides with foil at the same time. I am thinking the carpet will conform to the jig and help it bond properly. In similar application, I have found that wrapping it with strips of rubber provides very even pressure and is easy to apply. One word of caution: Apply pressure when unwinding. Don't just let it loose or it will drag on the foil and rip it. If you stretch it as you release it comes off very nice. I have thought about putting a layer of kitchen wax paper between the rubber strips and the foil to further protect it, but so far that hasn't been a problem. Quote Link to comment Share on other sites More sharing options...
Kasilofchrisn Posted September 19, 2014 Author Report Share Posted September 19, 2014 (edited) The carpet worked awesome. The wood vise helped a lot. It appeared as though the foil was vac sealed to the jig when it was done. I am really liking this foil jig look. I just need to do the paint on the seams and an epoxy topcoat and see how well they turn out. Edited September 19, 2014 by Kasilofchrisn Quote Link to comment Share on other sites More sharing options...
mark poulson Posted September 19, 2014 Report Share Posted September 19, 2014 The carpet worked awesome. The wood vise helped a lot. It appeared as though the foil was vac sealed to the jig when it was done. I am really liking this foil jig look. I just need to do the paint on the seams and an epoxy topcoat and see how well they turn out. Good for you! Quote Link to comment Share on other sites More sharing options...
goodtimesfishing Posted September 19, 2014 Report Share Posted September 19, 2014 More pics of the progress! Quote Link to comment Share on other sites More sharing options...
Kasilofchrisn Posted September 19, 2014 Author Report Share Posted September 19, 2014 I'll get some more pics soon. It's going good overall. I picked up some silver with metal flake rc paint from my local hobby shop to paint the seams. Then I need to epoxy the eyes and the entire jigs as a topcoat.. I'm guessing the pics will not do this foil justice. I am working on wrapping a smaller jig in the foil to eliminate one seam. Wrinkling is an issue there though. One piece of foul on each side works pretty good. I have small and large jigs and they all seem to be working fine with this. Quote Link to comment Share on other sites More sharing options...
goodtimesfishing Posted September 20, 2014 Report Share Posted September 20, 2014 Well if the pics aren't going to do it justice, suppose you will have to send one to everyone. Better make a bunch! Quote Link to comment Share on other sites More sharing options...
Kasilofchrisn Posted September 20, 2014 Author Report Share Posted September 20, 2014 Well if the pics aren't going to do it justice, suppose you will have to send one to everyone. Better make a bunch! Yes I will get them made to send out. I'll put you down for a half dozen 24 oz jigs? I normally get $20 each for them. You can all mail a check to Roust-A-Bout lure company P.O. box.................. On a Serious note have you ever tried to photograph reflective foil? Not the easiest task to get it to look like it does holding it in the hand. Quote Link to comment Share on other sites More sharing options...
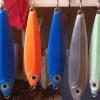
Kasilofchrisn Posted September 20, 2014 Author Report Share Posted September 20, 2014 (edited) Here are some more pics. As you can see the carpet in the vise makes the foil conform to the jig really well. Almost as if it was vacuumed sealed to the jig itself. Since I didn't want foil in the 3D eye socket I left the glue out of the eye socket and there was no foil there. So where ever you put foil binder you will have foil and wherever you don't put binder the foil won't stick. I start by measuring out the foil so it is as long as I need it. I cut 2 strips one for each side. On small stuff I can cut the strips I have in half or even smaller to conserve on foil. I have found locking the jig in a pair of hemostats for smaller jigs and needle nose vice grips for larger saltwater stuff really helps. I lock the jig in then use that to hold it as I paint all sides with the foil binder. I then heat all sides to at least 325*F to set the binder using my Heat gun. I apply the foil to each side loosely then clamp in the carpet lined vise hemostat and all. When I feel it has cooled I remove the jig holding on to the hemostat so the jig doesn't fall. Remove the plastic foil covering and voila you have a foiled jig. I then [paint the seams with metallic silver paint. I topcoated some with D2T and it worked well and was clear enough the foil easily shines through. I have added 2 sided tape to hold the carpet in the vise for ease of use. In between jigs I re fluff the carpet fibers. It only take a couple quick finger rubs on each side. In the pics the larger jig is 8 oz and the smaller one is 5/8 oz so this works well for all sizes of jigs big or small. My next experiments will involve using my powder paint airbrush to add other colors or to color other parts of the jig that are not foiled. If we can get some more forum members doing this technique I am sure we will all be making some incredible foiled jigs in the future and come up with some amazing designs.. This is after adding 3D eyes and a D2T topcoat. As you can see it is hard to get a picture that does the foil justice. It's just that reflective. Edited September 20, 2014 by Kasilofchrisn Quote Link to comment Share on other sites More sharing options...
goodtimesfishing Posted September 21, 2014 Report Share Posted September 21, 2014 How much pressure are you having to use with the vise? I was thinking if once you had the foil on the jig could you place it in a foodsaver bag and vacuum seal it?? Then remove from bag. Would that have enough pressure?? Just a thought. Keep up the great work. Quote Link to comment Share on other sites More sharing options...
LimpNoodle Posted September 21, 2014 Report Share Posted September 21, 2014 Those look awesome. I might have to try that with some slabs for sand bass and hybrids. Quote Link to comment Share on other sites More sharing options...
Kasilofchrisn Posted September 21, 2014 Author Report Share Posted September 21, 2014 (edited) How much pressure are you having to use with the vise? I was thinking if once you had the foil on the jig could you place it in a foodsaver bag and vacuum seal it?? Then remove from bag. Would that have enough pressure?? Just a thought. Keep up the great work. I'm putting quite a bit of pressure with the vice. Probably more than I really need to. The first one I did I just rubbed the foil on with a round metal brush handle.it worked but not as well and was hard to press into the detailed areas. Really what I am accomplishing is the poor mans heat press. Key points heat and press. A food saver bag isn't going to hold up IMHO to the 325*f needed to kick the binder over. I haven't tried it cold but the binder does require heat and i'm assuming it requires heat while the foil is binding. I have to use hemostats to hold the jigs 1) to keep the binder from getting rubbed on my fingers but mainly 2)because of the heat. I'm not sure how it would work getting the hot jig coated in foil into a bag and then sealed anyway. The hemostats get pressed in my vice with the jig out of convenience. But It is also very quick to go from heating the jig with the binder on it to putting on the foil and right into the vice. While the jig and binder are hot the foil gets pressed on. When it is cool the foil is bonded. My vice was $21 and that's AK prices lower 48 should find one a few $ cheaper. The carpet was $2 as an old sales floor sample. I am sure I could have found some free scraps if I looked hard enough. A heat press new is $300 for the cheapest model. I haven't looked for a used one but maybe a guy could find one on EBAY. Shipping would also be a killer on something like that as heat presses are quite bulky. So for now this works for me and is a "poor mans heat press". Edited September 21, 2014 by Kasilofchrisn Quote Link to comment Share on other sites More sharing options...
LimpNoodle Posted September 21, 2014 Report Share Posted September 21, 2014 I see heat presses on eBay under $160 with free shipping. Not sure if they are the right type or not. There are tee shirt presses with bids starting as low as $35. If a tee shirt press will work for flat jigs/slabs then I'll be getting one. Quote Link to comment Share on other sites More sharing options...
Kasilofchrisn Posted September 21, 2014 Author Report Share Posted September 21, 2014 I see heat presses on eBay under $160 with free shipping. Not sure if they are the right type or not. There are tee shirt presses with bids starting as low as $35. If a tee shirt press will work for flat jigs/slabs then I'll be getting one. Possibly. I have checked into heat presses but not super seriously. What I have found is the ones I have looked at are flat with hard surfaces and one sided on the heat. My jigs are not completely flat sided and I would like to do both sides at the same time. If you watch the original video I posted they do both sides at once and their heatpress is not flat it has some sort of covering over the heat platens that molds to the shape of the jigs. You also need to make sure the one you buy opens far enough to accommodate the jig you have. Some of them open just far enough to accommodate a t-shirt or a ball cap yet others do objects over an inch thick. So make sure you buy one that will work for your application not just because it is cheap. Quote Link to comment Share on other sites More sharing options...
Kasilofchrisn Posted September 22, 2014 Author Report Share Posted September 22, 2014 I tried a powder paint clear over a foiled jig today. It didn't turn out so well. The D2T was a much better option. The powder clear didn't harm the jig but it dulled the foil seriously enough to make the effort of foiling a mute point. I also tried powder painting the jig in addition to the foil and that did work out fine. So the foil will hold up to powder painting. I didn't cure it but I predict it will go over fine in the oven. I used my powder paint airbrush to add the powderpaint. We need to get a few other members playing with this foil so more ideas get flowing and experimented with. Quote Link to comment Share on other sites More sharing options...
Kasilofchrisn Posted September 25, 2014 Author Report Share Posted September 25, 2014 So I decided to do a breakdown on the costs of this project. The foil cost me $21 for 3 rolls shipped to my door.Each roll is 3" wide by 100' long enough for a ot of jigs. A quart of adhesive foil binder was $29 shipped to my door. This is enough for hundreds if not a thousand + jigs depending on size. The vice was $22 picked up at the local hardware store. Carpet sample was $2 at the local carpet shop. They would have given me a free cut off piece but they throw small scraps away and I didn't want to wait so bought the sample piece. I had the D2T and 3D eyes in my shop already.But they did cost a few $$. On the other hand a powder painted jig also uses some 3D eyes and epoxy. So maybe an extra few dollars in epoxy, epoxy brushes,and mix cups for the prototypes. Hemostats,needle nose vice grips,paint brushes,heat gun etc. were all items I had on hand in my shop anyway and are reusable. The binder is water based so you can simply wash and dry your binder brushes and reuse them. So I have roughly $80 invested and have lots of foil and binder left to make a lot more jigs in the future. Quote Link to comment Share on other sites More sharing options...