m_vandorn Posted November 15, 2015 Author Report Share Posted November 15, 2015 I have a great deal more information to provide for those that are interested. tomorrow and In the days that follow, I will be providing the following information: 1. How to make the molded plug that holds the contact springs and motor. 2. How to make the spring(s), for those that don't already know how to do it. 3. How to make a small lure that floats even with a motor and battery in it. 4. How to make Solar Powered vibrating Lures such as my Shake 'N Shad and Solar Popper 5. I will provide source information on where and from whom I buy my parts. 6. What the dimensions of the motor chamber should be to get the best amplification of vibrating sound from the motor. 7. I will show the tool, tricks and methods I use to mold, paint and clearcoat my lures. Additionally I am hoping for any suggestions people might have for improving my processes. For now, I need to get some sleep. 1 Quote Link to comment Share on other sites More sharing options...
m_vandorn Posted November 15, 2015 Author Report Share Posted November 15, 2015 Hello Dave / Vodkaman, I took a moment to look up information on the hearing aid type batteries. They are called zinc air batteries. It appears they might not work for this purpose because they require 1 cubic centimeter of air per minute per 10 mA of output. Inside the airtight chamber, there is not that much air available. For more information on various batteries I have provided a link. I think it is a good like to save this link. There is a lot of good information on many different batteries. https://en.wikipedia.org/wiki/List_of_battery_sizes 2 Quote Link to comment Share on other sites More sharing options...
m_vandorn Posted November 15, 2015 Author Report Share Posted November 15, 2015 Here is a cool note: The plastic vials can also be used to hold batteries in your pocket when you go fishing. Doing this give you quick access to fresh batteries and you can also start with a second empty vial to keep used batteries. When I'm fishing and working for fast battery changes, I usually have an open slot in my tackle box to quickly dump the used battery in. After a while when things slow down, I'll pick out the used battery and put them in a vial with a different color cap, so I don't confuse it with a vial of fresh batteries. Here is a challenge for anyone interested: There is a way to make a larger lure with where battery life is about 30 minutes using an LR44 button cell. In the case of the larger battery one could use a 5 ml plastic vial. The LR44 battery is 11.5 mm in diameter and a 5 ml vial is 13 mm in the inside diameter. So, the battery could be placed in sideways, thus making it easier to make the contacts. In that case the contacts would not have to be shaped like a spring. I believe the molded piece would also be a bit easier. To using this same motor with the LR44 battery, a small resistor would be required to reduce the output current, as the maximum current for this motor is 45 mA. So using ohm's law V/I=R 1.5V / 45mA = 33.3333 Ohms. The battery has an internal resistance of 8 ohm, so a 25 - 30 ohm resistor would do the trick. The cost for the LR44 button cell battery is also very cheap, about $0.08 each. So, anyone interested in doing this, I'd love to see it. It is something I'm going to do in the near future. I plan to make a crankbait with a softail, a softail similar in design as the picture shown below in this post. You will be surprised, 30 minutes is a good amount of time. Even the 12 -15 minutes I get with the smaller batteries feels like a good enough amount of time. I recently purchased some 5 ml vials and I have purchased LR44 batteries as well, both on eBay. A link to the items on eBay are below: http://www.ebay.com/itm/251911315067?_trksid=p2057872.m2749.l2649&var=550792693163&ssPageName=STRK%3AMEBIDX%3AIT http://www.ebay.com/itm/100-x-AG13-LR44-SR44-LR1154-357A-AWIS05-SR44SW-1-5V-Alkaline-Button-Cell-Battery-/261339752008?hash=item3cd9102648:g:MLMAAOxyzi9Sk~Lq 1 Quote Link to comment Share on other sites More sharing options...
mark poulson Posted November 15, 2015 Report Share Posted November 15, 2015 How does your construction hold up to a strike by a 2lb+ largemouth? Has one gotten it down between it's crushers yet? Quote Link to comment Share on other sites More sharing options...
m_vandorn Posted November 15, 2015 Author Report Share Posted November 15, 2015 I caught one just shy of 7 lbs and there was no problem. There are 4 layers of strength, first the motor assembly provides structure, the inside of the lure has a strong expandable 610 foam from Alumilite. The outer skin of the lure is Alumilite White Resin and after painting, the is a strong Devcon 2Ton clearcoat. Then, because it has a through wire, there is no added torque or stress on the lure when the largemouth is pulling and trying to get away. I hope that provides what your looking for. 1 Quote Link to comment Share on other sites More sharing options...
fishon-son Posted November 16, 2015 Report Share Posted November 16, 2015 i hope it works out for you but like the rest it dosent really go anywhere...i hope your bait isnt a cheesey one like the others..it just seams that fisherman like the hunt..i for one wouldn't want to watch a bait moving around by itself and wait for the bite..i want to make the fish bite by what I have worked so hard at to learn...that to me seams to be the best part...my dad and grandpa took me out and showed me the way to catch fish..i showed my son and grandkids.....see how that works.....if I was to buy your lure and show my kids your way I think I would be on the couch playing video games....my son and his kids don't and didn't play video games...we learn them the outdoors ......just my thought ..but please don't put all your eegs in.....good luck... Quote Link to comment Share on other sites More sharing options...
m_vandorn Posted November 16, 2015 Author Report Share Posted November 16, 2015 Since there has been a question about the structure strength of the lure body, I will start there and show the process steps used to make the cicada body. Molding the body is done in two steps. First: The trough wire is put in place and Alumilite White resin mixed with microballoons is poured into the body mold and the second have of the mold, let us call it mold part 2A is pressed together with the first half, thus forcing the resin to the side walls of the body (See the first picture), until the resin has cured. Note: in the picture you will see a body with yellow die added making it easier to see. Second: Mold part 2A is removed, a small amount of Alumilite 610 foam is poured into the body and Mold part 2B is secured in place. Mold part 2B has a small relief hole to allow excess foam escape. I want to point out, however, that because the relief hole is small in size, it causes the 610 foam to be firmly compacted inside the body, thus assuring strong body structure (See the next two picture). After the 610 foam is properly cured the body is removed and cleaned up in preparation for paint. The fourth picture shows what the body looks like after the first step. The next step is paint: I use a process similar to the copic sprayer system to paint the cicada. I've not take any pictures of the process but I will because it is something I've made that is much less expensive than Copic. I purchased a Tim holtz Distress Marker Spritzer. I removed the squeeze bulb on it and modified the Nozzle / marker holder to work with my air gun attachment for my air compressor. It works with Just about any marker and it only costs about $17. I decided to use this method to paint to keep the weight down. After trying it I was really impress and I'm likely to use for other lures too. There is a picture of the product below. Next, I clear coat with Devcon 2Ton Epoxy: (A picture is attached showing the bodies curing) 2 Quote Link to comment Share on other sites More sharing options...
Vodkaman Posted November 16, 2015 Report Share Posted November 16, 2015 m-vandorn - Your thinking on the motor requiring a resistor is incorrect. The motor draws current, it cannot be overloaded with current so no resistor is required. Consider a 12V car battery, capable of delivering 200 Amps. Take a windscreen washer motor which draws around 1 Amp. The motor can be wired directly across the terminals of the battery and not come to any harm. The motor has an internal resistance of say 120 Ohm. By adding a 30 Ohm resistor in series, what you are doing is dropping some of the voltage across the resistor (25%), so the voltage available to the motor is reduced to 75%. So no resistor required. Dave Quote Link to comment Share on other sites More sharing options...
alsworms Posted November 16, 2015 Report Share Posted November 16, 2015 I, for one, had no idea these kinds of lures even existed! Seems with all the work involved, you'd have to ask a pretty penny for each bait? Then again, I was surprised at how low the prices were of the competitors buzzers. 1 Quote Link to comment Share on other sites More sharing options...
m_vandorn Posted November 16, 2015 Author Report Share Posted November 16, 2015 Thank you for your comment, Fishon-son, I don't mean to make anyone thing skill is not required. I tried but clearly didn't explain well when I stated the action and the lure design is still very important. By that I mean, you still need to work the lure. In the case of the cicada, simply letting it sit will attract fish but it is the added twitching an sporadic movement on the water that will cause fish to strike. In other words, it helps that it looks and vibrates like a cicada but it's also important to make it look distressed the same way a cicada does when it lands in the water. Basically skill is still required. You still need to find where fish are and know their habits. 2 Quote Link to comment Share on other sites More sharing options...
m_vandorn Posted November 16, 2015 Author Report Share Posted November 16, 2015 Thanks Vodkaman. I was assuming by ohm's law that current was reduced by resistance. Anyway what you say is great because it make even easier. As to the cost of the lure. I'm not sure the price you are referring to, alsworms. Have you, by chance, gone to my website to see what I sell them for? Is that the price you are referencing? I'm also not sure which other lures you are talking about. If you are talking about the Livingston lure, those are produced in China for just over $1 each, including packaging. It does cost a bit more to make them one by one in my shop. I'm not being defensive at all. I'm just not sure what products you are talking about. 1 Quote Link to comment Share on other sites More sharing options...
Vodkaman Posted November 16, 2015 Report Share Posted November 16, 2015 The vibrations attract fish in the same way that the lip of a crank attract fish. The problem with a crank, is that to generate the vibrations, you have to pull the lure through the water at a minimum speed. The beauty of this battery operated vibrating lure, is that it can stay out there in one place. I like it and my local fishing pond is a perfect application. The pond is a concrete rectangle. Maybe 25 meters long and 10 meters wide. Down the center is an aeration pipe which drops a stream of water every couple of feet. The fish tend to gather near the aerated water and so that is where the bait must be thrown. Using a lure, you only have a casting distance of some 15 feet. After 3 or 4 turns of the handle, you are already out of the fish. Casting once a minute is going to drive the other competing anglers crazy, it is no wonder they complain and lures are banned. With a battery operated lure, I need only twitch the bait occasionally - perfect. Dave 2 Quote Link to comment Share on other sites More sharing options...
Vodkaman Posted November 16, 2015 Report Share Posted November 16, 2015 Thanks Vodkaman. I was assuming by ohm's law that current was reduced by resistance. Anyway what you say is great because it make even easier. Close, the Voltage is reduced by resistance. Some of the Voltage is dropped across the resistor and the rest across the motor. This link gives a good explanation and the use of Ohm's law. The motor data sheet will give you the internal resistance of its coils. Dave Quote Link to comment Share on other sites More sharing options...
m_vandorn Posted November 16, 2015 Author Report Share Posted November 16, 2015 Dave, Is there a way to reduce current? I've held the LR44 battery between the leads of this motor and it really makes them scream. I've not burned out a motor with it yet, but the rating of the motor says max 45 mA and the LR44 says its output is around 170 -180 mA. The reason I know the battery last about 30 minutes with this motor is, I have tested it. I'd hate make a lure with it and have the motor burn out. What do you think? Quote Link to comment Share on other sites More sharing options...
m_vandorn Posted November 16, 2015 Author Report Share Posted November 16, 2015 OK, I shall continue: I've attached a picture of the molds I use to make the cicada head and the molded part for the motor and spring connectors. I use small mixing cups as the mold blocks for these items. It so simple to do and I believe use less mold making materials this way. I have also made quick claps to secure the molds together. I've attached a picture of the clamp. This one has a mold for my Shake 'N Shad in it. To apply pressure on the clamp I use large rubber bands. I can increase pressure as needed by adding more bands or reduce pressure by lifting the bands off. When I use the 610 expandable foam, as I do for the cicada head, I have to assure enough pressure to keep the mold halves together thus allowing the excess to weep through the small relief holes. Note: The picture with the small head mold and yellow molded part, the head is not freshly molded. That one has been painted and clear coated. I also put the small battery in the picture to remind me to let you know I use batteries in the molds as registry keys. 1 Quote Link to comment Share on other sites More sharing options...
Vodkaman Posted November 16, 2015 Report Share Posted November 16, 2015 m-vandorn - the motor is racing because either there is not enough load (which we do not want to change) or the Voltage is too high. Have you put a Volt meter across the battery to check the numbers. It may be that a new, fully charged battery is putting out slightly high Voltage. If you are concerned, then your idea of adding a series resistor will work. But if the motor is rated at 1.5V then it should handle the slight increase in voltage. Motors do heat up with constant running. This is not a problem, unless you are getting a burning smell. If you feel the motor is too fast, then put the resistor in. Do you have a meter, if not, might be worth getting one, I find then quite useful. Even though I haven't done any electronics for many years, my meter still gets used several times a year; checking fuses, light bulbs, batteries etc. Dave 1 Quote Link to comment Share on other sites More sharing options...
m_vandorn Posted November 16, 2015 Author Report Share Posted November 16, 2015 Great to know Dave. I do have a meter and I've checked the voltage. They show right at 1.5V. I've not checked the current though. I'll need to do that. When it comes to the smaller LR41 battery, it is rated right at 45 mA. There is a noticeable difference between the two batteries when connected to the motor. I think what I'll do, is run a possible destructive test. I'll run a motor continually through as many as 10 of the LR44 batteries to see if it causes a problem. I can say, though, I did not smell any electrical burning when I tested the full life of the larger battery. Quote Link to comment Share on other sites More sharing options...
Vodkaman Posted November 16, 2015 Report Share Posted November 16, 2015 (edited) I was going to suggest a destruction test. No need to use up the batteries, use a regular AA battery or any 1.5V supply. Dave Edited November 16, 2015 by Vodkaman Quote Link to comment Share on other sites More sharing options...
m_vandorn Posted November 16, 2015 Author Report Share Posted November 16, 2015 I have actually done a destructive test with a AAA battery and it burned up the motor very quickly. The link I provided with data on the different battery types show the AAA battery at 1200 mA. The AA battery is rated at 2700 mA. When I tested with the AAA battery, the motor froze up after about 10 seconds. Quote Link to comment Share on other sites More sharing options...
m_vandorn Posted November 16, 2015 Author Report Share Posted November 16, 2015 When I said I was going to do a destructive test with 10 LR44 batteries, I did not mean all at one time. I am going to test them one right after the other in succession to see if the motor burns up, a total of about 5 hours of run time. 1 Quote Link to comment Share on other sites More sharing options...
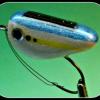
m_vandorn Posted November 16, 2015 Author Report Share Posted November 16, 2015 OK, for those that believe there is too much involved with the battery powered lure. I'm going to show how I do the solar powered units. There is no worry about contact springs or other molded parts. all that is needed is to have the motor compartment molded into the top of the lure. As you will see in the picture, there is a recess in the top of the lure for the solar cell to rest in. To seal around the solar cell I use a product called Apoxy Sculpt. I blend a small amount together and form it around the solar sell, thus creating a seal. Apoxy sculpt is pretty easy to form. I roll up little pieces between my finger, lay it around the edge and use a little bit of water to smooth it in place. Then I paint the lure and clear coat. In the case of the lure I show in the picture, there are some additional operations because I add the weedless hook as a secondary operation and I lay the legs in the cross groves on the bottom of the lure and a small bit of Apoxy Sculpt to hold them in place. Then I paint and clearcoat. I need to add, however, that because these lures are so small, I mold an insert out of 610 foam with one mold and place it in the other mold and pour alumilite white in that mold and press it together allow the excess resin to flow out then I quickly place the mold in the quick clamp and let is cure. You can see the lure it makes in the picture and in the other picture as well. One more thing, I show the materials I use to make mold blocks. I use precision milled poplar 1.5 inches wide by 1/4 inch thick. I find using this material is easy because the wood is perfectly square. All I do is glue to side to a base, then the other two sides can be put in place with a rubber band. If you use a good miter saw all edge will be square and there is no need to seal the edges when you pour mold materials inside. It will not leak. Doing this also assure a uniform shape of your molds making it easy to use the quick clamps. I buy the poplar wood at Home depot and I've seen it at craft stores such as Michaels and Hobby Lobby. By-the-way, I am no expert. I've developed these methods in a vacuum. Mostly I've learned things on Youtube and came up with my own methods. So, if anyone has of better ways to do things, please joint the conversation and let me know. I am always open to learn. 2 Quote Link to comment Share on other sites More sharing options...
Vodkaman Posted November 16, 2015 Report Share Posted November 16, 2015 You are still thinking about the current wrong. The capacity of the battery (mAH) and the ability of the battery to put out Amperage, has nothing to do with the failure of your motor. The motor 'draws' current, or think of it as, the battery supplies the current that the motor asks for and no more. The current is determined by the Voltage and the coil resistance of the motor, using Ohm's law. If the Voltage increases, then the motor will ask for more current and the motor burns. It is a difficult concept to grasp. Yes, it is the current that burns the motor, but it is the Voltage that controls how much current the motor demands. A note about battery current - with small batteries, the manufacturer usually supplies a mA number that the battery can safely deliver. This does not mean that the battery cannot deliver more. If your motor asks for more, the battery will deliver, but will overheat to destruction and possibly explode. A note about measuring current - NEVER try to measure battery current by putting the leads across the terminals. This is the equivalent of shorting the battery. It will possibly destroy the battery or your meter or both. Measure current by breaking the circuit and placing the meter in series, just like a resistor. Tedious, but that is how it is done. Dave 1 Quote Link to comment Share on other sites More sharing options...
m_vandorn Posted November 16, 2015 Author Report Share Posted November 16, 2015 OK, I think i've got it. The current rating of the motor is the same as its demand. So it it demand 45 mA, the battery supplies only the current the motor demands. I guess my confusion comes from the fact that the AAA battery, also at 1.5V caused a motor to freeze up. I'm thinking a test with one motor is not enough. I will say, however, when the AAA battery was connected, the motor really screamed or to say it better it ran much faster even than with the LR44. Like I said, one motor test is probably not enough. I did not smell that motor over heating. It just froze. I am glad to know the current is a demand thing. I'm far more optimist about making a large, longer lasting battery life lure, some time in the future. Quote Link to comment Share on other sites More sharing options...
Vodkaman Posted November 16, 2015 Report Share Posted November 16, 2015 (edited) It does sound like the motor is over rated at 1.5V. Does the motor data sheet give the expected motor speed, though this would be almost impossible to test. I suspect because the motor current demand is close to what the battery is capable of putting out, that the voltage of the battery may be dropping under the load of the motor. You can measure the load Voltage by putting your leads across the battery terminals while the motor is running. With the AAA battery, which is capable of delivering more current, the Voltage is not dropping under load and so the motor runs faster or more correctly, seeing as it is designed for 1.5V. If the motor data sheet states that it is designed for LR44 batteries only, then it may be expecting a Voltage drop. Companies often claim the limits with components, particularly with motors, as customers want the strongest, fastest motor in the smallest package. Dave Edited November 16, 2015 by Vodkaman Quote Link to comment Share on other sites More sharing options...
m_vandorn Posted November 16, 2015 Author Report Share Posted November 16, 2015 It might well be that the data she is incorrect. I got the data information off the alibaba website for the solar cockroach toy. It might be that the motor is really rated at a lower voltage due the the fact that the solar cells only produce about 1V. I appreciate your input. I had basic electricity in high school way back in 1969, when we were still using vacuum tubes. Not to say that is the reason for my confusion. I actually learned what you are telling me about current, but assumed I must have got it wrong when seeing how the motors ran differently with each 1.5V battery. I understand now about the voltage drop and how that can affect the speed of the motor. I can tell you the motors have been pretty consistent in the way they run. So, for now, I think I'm going to test them with the LR44 battery to see how they do. This has been a good discussion for me. I'm hoping we have not lost others that are reading this forum because the discussion about the larger battery is a future idea and not really related to the work I have already completed. Dave, I'd love to see any work you might do on something Like this. You appear to be very involved on this site and I'm guessing you have lots of ideas on lure designs. Quote Link to comment Share on other sites More sharing options...