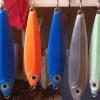
Kasilofchrisn Posted December 4, 2017 Report Share Posted December 4, 2017 (edited) Here is the vibrating fluid bed I built that people have asked for pictures of. I started with a flat ABS end cap from Home Depot. I used ABS because my local store has much more ABS than PVC. Cost was something like $2.69 each iirc. I then drilled a small hole as close to the bottom as possible and hot glued in an aquarium valve from Petco. These valves come in a pack that was less than $3. The cups are made using 3" ABS cut to 3.5" lengths, knockout test caps and filter membranes. In this case for membranes I used Tyvek from free USPS envelopes. Place the cut piece of ABS on a hard surface. Place one knockout test cap in it. Knock out the center with a hammer and discard. Remove the outer ring and save. Place a piece of Tyvek over the ABS and replace the test cap ring making sure the outer Tyvek is facing up into the cup. Another test cap makes a lid for the cup when not in use. Test caps cost me $.82 each. ABS was left over scrap from a plumbing project but isn't that expenive. Probably $1 each for the ABS. This completes the fluid bed portion of this build. For the vibrating base I start with a piece of Aluminum C channel I got for free from someone else's project left over. I used a drill press to drill holes on the edge and tapped them for screws. I ordered tapered compression springs for feet from McMaster Carr. These are about $1 each or less iirc. Some screws from the hardware store secure the feet. These are a few cents each. The Vibratory motors came from eBay. Yes they are made in China but so are all such small motors. These cost me ~$5 or less each with shipping. These as well as the fluid beds are secured using hot glue. Time will tell if it holds up but if not it will be easy to replace. The wires have alligator clips on them that cost ~$1.50 I run this using a spare 12v battery I had for the vibration and a whisper 30/60 aquarium pump from Walmart. Aquarium pump is roughly ~$15 So far it works well. I probably have about $40 Total in this project. I did order a speed controller for adjusting the vibration which cost ~$15 from eBay. Not sure it's neccessary but I felt it might be a worthwhile add on. To make it a 2" add a 3"x2" push in adapter from Home Depot and make 2" cups. Same for 1.5" cups. This way you can use either size cup just by pulling or adding the adapter as it doesn't need to be glued in. Edited December 4, 2017 by Kasilofchrisn Added prices 1 Quote Link to comment Share on other sites More sharing options...
Saugerman Posted December 5, 2017 Report Share Posted December 5, 2017 Pretty, good idea. looks like it should work fine. Quote Link to comment Share on other sites More sharing options...
Apdriver Posted December 5, 2017 Report Share Posted December 5, 2017 Thanks for sharing the pics and build detail of your fluid beds, Chris. Are they working satisfactorily with the plate and springs? Quote Link to comment Share on other sites More sharing options...
Kasilofchrisn Posted December 5, 2017 Author Report Share Posted December 5, 2017 33 minutes ago, Apdriver said: Thanks for sharing the pics and build detail of your fluid beds, Chris. Are they working satisfactorily with the plate and springs? So far yes. But that is with only one use. I will be using it again later this week and will test several problem paints. I will also be building another single that vibrates. Originally I had added a T piece of the same C channel. Bolted to the center of the main piece with spring feet also. On this sat an electric palm sander. But I just wasn't happy with the way it preformed and the excessive noise it generated. I think it was too much vibration and vibrating too fast for what I needed/wanted. The hot glue does help keep the noise down a bit but still vibrates enough. Plastic straight on aluminum without some sort of buffer is a bit loud. I do want to try the speed controller. These motors may not need to run 100% all the time. Maybe there is a sweet spot somewhere in the vibration speed for some of these paints? Then I need to try it with my 2" x 12" tall cups. Quote Link to comment Share on other sites More sharing options...
Apdriver Posted December 5, 2017 Report Share Posted December 5, 2017 Awhile back, I ran into some small pot stirrers that I just tie wrapped to my fluid beds. Saves you from fiddling with different media. I just use three or four sheets of newsprint. Set it and forget it. These work well and are pretty cheap but your setup is much more elaborate. I like it. Sending you a PM. Quote Link to comment Share on other sites More sharing options...
mark poulson Posted December 6, 2017 Report Share Posted December 6, 2017 Your vibrating platform makes me wish I'd saved my kids' vibrating football game. Hahaha Quote Link to comment Share on other sites More sharing options...
cadman Posted December 6, 2017 Report Share Posted December 6, 2017 Hey Chris, thanks for sharing your info. I could use your idea on one powder paint that I am having a problem with. Quote Link to comment Share on other sites More sharing options...
Kasilofchrisn Posted December 7, 2017 Author Report Share Posted December 7, 2017 I started this project to fix the problem paints I have without having to mess with trying different membranes or other possible fixes. I hope to be able to just turn on the vibration for any problem paint. I'll be certain to post up some progress reports. Quote Link to comment Share on other sites More sharing options...
Kasilofchrisn Posted December 8, 2017 Author Report Share Posted December 8, 2017 Well I have a couple of updates. The speed controller is in and mounted. I really like it. It serves as an on off switch as well as adjusting the vibration speed. Turn on the air and the paint begins to volcano. Turn on vibration and it instantly settles and fluidises like it should. Running below 4 on the dial is too slow and the vibration motors make annoying squeaky sounds. But above that they run good and easily speed up and down. My hot glue attaching the fluud beds to the base failed. No biggie though. I scratched up the Aluminum a little bit which I should have done the first time anyway. Then I scraped off the glue, put D2T on it, and used a bit of hot glue to hold it in place until the epoxy is cured. Thats the update so far. 1 Quote Link to comment Share on other sites More sharing options...
LimpNoodle Posted December 11, 2017 Report Share Posted December 11, 2017 I use a pot stirrer. I picked up mine from Amazon a while back. https://smile.amazon.com/gp/product/B00LGBMUUU/ref=oh_aui_detailpage_o08_s00?ie=UTF8&psc=1 They were almost half that price when I purchased mine. They work great. Have three speeds. I just zip tie them to the fluid bed. Quote Link to comment Share on other sites More sharing options...