CatchingConcepts Posted November 14, 2004 Report Share Posted November 14, 2004 Someone a while back was asking about gill paterns so I thought I would try and come up with something. Will try and take some better pics of the detail when these are done curing. Paint on these is done with thinned clear lacquer, then I add anything I can find to get correct pigment. In anything I mean anything! from pearl and metalic powders for worm pouring to rattle can paints to auto pigments and high tech color changing and chameleon pigments. I have found regardless of paint type or brand (enamel, lacquer, acrylic, etc..) it all "melts" into the lacquer clear base. This way I can control the opaqueness and get really good depth and transluscent effects. I havent had any problem with the mixtures drying if applied in thin even coats with airbrush. Taxadermy, worm pouring and auto paint suppliers all have a wide variety of pigments available in powder forms, with some experimentation the colors and effects are endless. Controling the variables has helped my technique and end result out greatly. Quote Link to comment Share on other sites More sharing options...
Tuff-Tackle Posted November 14, 2004 Report Share Posted November 14, 2004 Good job Herman....I especially like the bottom row. Tuff-Tackle Quote Link to comment Share on other sites More sharing options...
kellure Posted November 15, 2004 Report Share Posted November 15, 2004 Nice... It still amazes me how you can accurately cut the lip angle after the fact. Quote Link to comment Share on other sites More sharing options...
Husky Posted November 16, 2004 Report Share Posted November 16, 2004 [q] Someone a while back was asking about gill paterns so I thought I would try and come up with something. Will try and take some better pics of the detail when these are done curing.Paint on these is done with thinned clear lacquer' date=' then I add anything I can find to get correct pigment.quote'][/q] CC, can you pleas post a head on shot of these puppies? Quote Link to comment Share on other sites More sharing options...
Skeeter Posted November 17, 2004 Report Share Posted November 17, 2004 I'm not sure that I completely understand..... are you saying that you are adding pigments to thined lacquer clear to get your colors and therefore getting your depth? I am getting ready to try some pigments in pearl lacquer. I have never used the pigments before. I am anxious to try it. Couldn't you use candies or translucents in multiple layers to get the same depth effect? I have seen the depth effect. It is extremely cool when done right. By the way.... I like all of those baits. There all really beautiful. Excellent work. Skeeter Quote Link to comment Share on other sites More sharing options...
RiverMan Posted November 17, 2004 Report Share Posted November 17, 2004 Beautiful baits Herman...the pigment concept sounds very interesting! Looking forward to seeing more of what you and others come up with. jed Quote Link to comment Share on other sites More sharing options...
CatchingConcepts Posted November 17, 2004 Author Report Share Posted November 17, 2004 Skeeter, I first started mixing the powdered pearls into clear semi gloss lacquer to shoot over solid colors to get desired effects, but found with some experimentation that I can get far better results by actually mixing the tinting color in the base lacquer with the pearl and metalic powders. I use just about anything as a tint, even cheap stuff from rattle cans. I stole these techniques from taxidermy books I bought off ebay and ordered from www.vandykestaxidermy.com then adapted the learnings to my own styles. As I better incorporate the layering effects and use of templates and stencels as the use in fish mounting my paint style has greatly improved. Just the knowlege of layering and how laying one paint over another and color change effects you get is worth buying the books. I believe depth is achieved not in paint build up, but in how you layer the colors so that pearls and metalics show thru from "under". which means re-learning some techinque, and actually laying down stencil detail first, then using transparents to tint over the details. I am far from the effects I know I can achieve. Thats the fun, always learning! Quote Link to comment Share on other sites More sharing options...
Lure--Prof Posted November 17, 2004 Report Share Posted November 17, 2004 Yes! this is good stuff. I've been experimenting along these same lines, using transparent colors over pearls, foils, glitters and pigments--I've been mixing some of Michaels' rubber stamp pigments with epoxies for some nice effects; interference violet over black produces a beautiful pearl purple for example. And it is like building a 'glass bass boat, i.e., from the inside out. There is a lot to be learned here for sure, it is like opening a new door. Herman, I can see for sure you're a step ahead here, thanks mucho for sharing!! Dean Quote Link to comment Share on other sites More sharing options...
CatchingConcepts Posted November 17, 2004 Author Report Share Posted November 17, 2004 Dean, you are on the right track! its all what shows through from underneath that gives the effects, just like a real baitfish with shimmering scales and distinct markings and tints, its a special blend. The plastic worm pouring guys have a lot to offer us, not only great metalics, micas and pearl powders, but also the liquid colors can also be used to tint or pigment your clear lacquer for an endless aray of transparent colors. The taxidermy effects in fishing lures I think can be best seen in what Bagley's did with their small fry series, they used the pearls and transparent colors blended with detail print brilliantly. Take a very close look at like the bream on chartruese color small fry crankbait. it is pearl chart shot over pearl base (all good paint jobs start with pearl white base) then they shot a stripe of copper pearl metalic down center of bait, then shot through a stencil of small squares the pearl white accent, then added green gold pearl shoulders and shot spots of pearl blue violet metalic, chartruese pearl and orange pearl on front of bait. finishing up with black stripe down back All those color steps were done with an airbrush, then they printed the fish patern over that for the detal. very much like what a taxidermist accomplishes. The only color printed is black detal scales and stripes, fin and gill, and touch of red in eye. this could be accomplished by water slide decal also. or even with good stencils if you are good at cutting out fine detail. all in all it is just a matter of using transparent effects with heavy pearls, and now there are the color changing pigments available to add even more dimension to the effects. Stuff like Harlequin pigments by PPG auto paints can create just unreal effects. They are rather expensive at about 20.00 or more an ounce, but that goes along way when mixed into the clear and the colors have to be seen to be believed! 1 Quote Link to comment Share on other sites More sharing options...
KcDano Posted November 17, 2004 Report Share Posted November 17, 2004 Catch, those are some nice looking finishes! Staging pearls in candies has been done forever in auto finishes. You can make a candie color from virtually any tinting base, this was how it was done back in the day before House of color and other custom finish suppliers were around. I also enjoy tinkering with blending lacquers, enamels, urethanes and anything I can get my hands on. In addition, to the techniques you have described. Different results can be obtained by employing wet sanding between coats and with the use of a naturaL sponge. I have been laboring to achieve a sponged base pearl finish on a lure, but have yet to find a sponge with correct porosity to look correct on a lure. However, I have a friend who did this on a boat in 70's and there ain't enough O's in cool to describe the look and I am confident it would be a winner for a lure finish if done correctly. It was accomplished by shooting a white lacquer base, then applying murano pearl suspended in very thin clear lacquer with a sponge. There are many variations one can do to add to the effect like a sponge applied coat then spraying a coat of a contrasting pearl which once dry is wet sanded to leave only small areas of contasting pearl in the pattern. Something else I want to try is graining or cello wrap jobs (some of the prevelant paint schemes on custom van's of the 70's) Where a light colored lacquer basecoat is applied then when dried a contrasting dark enamel is misted on and while still wet taking a graining tool or brush moving the wet enamel around to acheive the desired effect, once dry, cover with lacquer candie or tinting base candie of the brown variety or whatever color. Same works for the wrap job except after the enamel is applied you wrap wrinkled wax paper to imprint a pattern. Pflueger had a finish they made years ago called "scrambled eggs" which I have posted a picture of. I interested in hearing opinions from everyone as to how this finish is acomplished, I have a idea that it might be done retarder and fish-eye eliminator, but can't say for sure. Thanks! Quote Link to comment Share on other sites More sharing options...
Skeeter Posted November 18, 2004 Report Share Posted November 18, 2004 CC, Thanks for explaining... I'm starting to get it now. This is all extremely interesting. I am not much of a mixer. I do love the translucents though. I am about to really start playing with this before it gets too cold for me to shoot outside. Skeeter Quote Link to comment Share on other sites More sharing options...
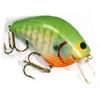
CatchingConcepts Posted November 18, 2004 Author Report Share Posted November 18, 2004 Heres a pic of the 'gill paterns, but it is nothing like how they look in natural light, the flash just sucks out all the subtleties of pearls and hues, plus you cant see any of the color change Harlequin pigment that makes these things just come alive. Quote Link to comment Share on other sites More sharing options...
Travis Posted November 18, 2004 Report Share Posted November 18, 2004 Some beautiful paint schemes, very impressive you guys have some amazing skills and make some very beautiful baits. But who are we trying to catch here fish or anglers? A lot of the baits I see I would buy and place in a frame for display. I find a lot of the baits presented more of artwork (honest complement) but when it comes to catching fish aren't a lot of these details lost? I am a hard sell on this manner just wondering if the detail and time spent in these beautiful baits is warranted on the basis of catching more fish or just in distinguishing a product. Quote Link to comment Share on other sites More sharing options...
CatchingConcepts Posted November 18, 2004 Author Report Share Posted November 18, 2004 Travis, I absolutely agree with you, and you are exactly correct on your presumption: You must catch the fisherman before the fish... As I continue to sell more and more baits I realize the importance of catching the fishermans eye! The 'gill patern here was just an attempt to see what I could do with colors and pearls, most of my baits for sale online are much more simple color patterns, yet they still have attention to shading and contrast. In painting stuff for many anglers I now realize that if a guy has more confidence in a particular patern he will fish it more intensly and catch more fish, thus re-assuring his confidence. More importantly I feel is action and presence of the bait in the water, how it reacts to anglers retrieve and method for that given bait and fishing situation. Sight is only a small part of triggering a strike, but then again, I sell probably 10 times as many intricate baitfish paterns as I do basic color schemes... So first off I make a good quality crank, then paint it in colors that both sell well and hopefully catch the fishes eye too. I have had quite a few guys just buy my cranks to hang up, and that is ok, but I get much more satisfaction knowing they are being put to use as they were intended to be. Quote Link to comment Share on other sites More sharing options...
KrawdadBill Posted December 2, 2004 Report Share Posted December 2, 2004 Very impressive paint jobs. I like, I like. Yes we do sometimes get carried away, but hey isn't that what this hobby is all about? Making and painting lures to our own hearts content, then sharing them with others. Several of my friends have made displays of my work, others are fishing with them. My younger brother works for Triton Boats and he likes to take my lures to work and show them off. Afterwards they go into his tackle boxes for field testing and fishing. Either way they are being enjoyed by others. Bill Quote Link to comment Share on other sites More sharing options...
nova Posted December 3, 2004 Report Share Posted December 3, 2004 The scrambled egg finish is really easy. It's done with oil-based paints. No two lures will be alike. You fill a can with water to a depth depending on the length of the lure you want to paint. You then gently pour several different colors of oil paint into the water. It will float on top of the water. You then, in one motion, dip the lure all the way into the mixture and pull it back out.( You have to do this gently and smoothly.) Your lure will then have the "marbled" effect. Hang it up to dry and then clear coat it. Good luck. If you master this; post some pictures. Quote Link to comment Share on other sites More sharing options...