


MstormC
-
Posts
27 -
Joined
-
Last visited
-
Days Won
1
MstormC's Achievements
")
Newbie (1/14)
13
Reputation
-
Look like check valves to me
-
So I came across some baits that I hadn't got to putting a clear coat on. Would I be able to apply an intercoat clear on it and not end up getting fish eyes after I apply etex?
-
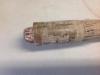
 This crank bait will be used for Muskie. Markings were done with a paint pen
 -
10" Jake blank before eyes and clear
-
really wish I would have saved the link but you all know how a Google search goes.....Start out looking for ways to apply ETEX and next thing you know you're buying a motorcycle helmet. 100% positive it was ETEX. Seems like I always end up with fish eyes when I apply ETEX and was thinking it may be that I apply it to thick, hence the search for thinning it. I think on the next baits I do I'll put some DA in with the ETEX and apply a couple more coats if needed. Thanks for the input!
-
Read something a couple of days ago and didn't save the link
-
you are going to want a base layer paint that will "bite" into the plastic. Bulldog makes a primer for plastic that I've used when painting plastic duck decoys and works great. As Ray stated, your top coat may be a little trickier. I would think an automotive clear, put down in multiple layers may be your best bet. I've used the rattle can clears before but have had mixed results......some good, some not so good. You may want to stop by a local body shop and see if they would put a clear coat on for you. Hope that helps and let us know what you find. I've often thought of doing a couple of my older reels but other "projects" always seem to take precedence.
-
the other night while out fishing my partner managed to break the rear handle of a custom Tackle Industries rod. Any suggestions on how to repair it is appreciated.
-
Mark, I've often had top water prop baits have their bodies spin, mainly on mass produced baits. The easiest way to correct it, that I've found, is to take a bell sinker and fasten it to the hook hanger on the lure body. You might have to experiment with the size of the bell sinker but 99 times out of 100 it works.
-
If you're looking for a crank bait that runs shallow do a search for SS Shads. Super buoyant and run really shallow. Otherwise do what Glenn said and run some spinner baits. I've had really good luck this year with overheads and most years I can't buy a bite on overheads.
-
me three, except I use a heat gun first to make the paint bubble.....careful or you will have a flaming wiggle wart if you're not paying attention.
-
Musky Lure Painting (and Other Hard Lure Applications)
MstormC replied to Cloud7's topic in Hard Baits
Removing JUST the clear coat I don't think would be worth the hassle. As RaPpSodlq said you could try a very very smooth sand paper but I would be afraid of going to deep and sanding the underlying paint. The wood baits you can use a heat gun and basicly burn the paint off, light sand the remaining paint and then go about your normal prime, paint and seal. I have had varied success with using brake cleaner on plastic baits to remove the paint. My biggest concern when doing what you are asking is if the paint I am using will have some strange reaction to the current paint/top coat. I've had this happen to me before so now I just strip the baits and start from scratch. Hope this helps! -
Hello All! Usually when I can't come up with a pattern for a bait I jump on here and look at eveyone else's baits and can come up with something. Except this time I'm drawing a blank and thought it might be interesting to see what you all might think the below bait needs to be finished. It is a 8" Jake with foil. Any input is appreciated.
-
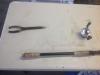
I used a 3/4" solid nylon rod that I drilled out one end to fit the OD of the motor shaft and the other end to fit the OD of the threaded rod. Just make it fit a little tight so you have to thread it into the nylon. It also makes it easy to take apart if need be.
-
copy and pasted from another message board


