


Ed Brabant
-
Posts
129 -
Joined
-
Last visited
-
Days Won
1
Ed Brabant's Achievements
")
Newbie (1/14)
13
Reputation
-
I thought that Elaztech is a TPE. Thermo Plastic Elastomer. Not the PVC that we normally use.
-
Way way too much money! If you want to work for less than minimum wage you will need a bunch of molds. Pouring by the cup will not make you any money. I have a specific bait that I love to throw. I have 11 molds 2 cavity open pour. That's 22 baits per cycle. And I would still not make any money if I sold the baits. It's a great costly hobby. I also paint hard baits and that's bigger money pit.
-
 Can this be poured with Bismuthth?
 -
I have a 4 cavity hand pour senko mold. I took the mold to work and talked to one of the guys in our machine shop and had him cut a slot in the mold faces .50 wide and .010 deep right in the middle of the bait. Then before I pour I cut fine nylon screen just a bit under .50 and about 4" long. I then place the cut screen in one half the side with guide pins up then place the other side on clamp and pour. When I demold the baits the look like ammo on a belt. Cut the screen close to the bait. Then when I fish them wacky it's almost impossible to rip the hook thru. Because it's a hand pour no flash at all. I can even pour them with out the screen. Some I have to trim the little bit of flash off.
-
I am just pouring for myself and a few friends. My son says i pour to slow the boat down. He may be right. Weight adds up fast.......
-
SI have tried to pour some larger swimbaits. The tails are soft not uncured plastic soft but more like the plastic is too soft. Hardner or just order harder plastic. Salt water or a bit softer?
-
I made a 2 piece mold of a live target trout. Mold came out ok. But the plastic i use is out of the jug. I noticed that they are too soft. If i use 2 cups at a time how much hardner should i use. I want to try and make larger baits too. I am going to try to use the big guys to make the molds. I dont sell any thing i have ever poured give them away but no sell. Does any one have a 3D swimbait file? We have 3d printers at work and i would like to try having molds made on them.
-
Not a frog but it is the same principal.
-
If the bait is designed with 3D software such as Pro Engineer or Solidworks there should be no problems. the 3D model has to be good meaning no unattached segments. For example you can't create a box with out the end points meeting.
-
I went crazy when i got mine. Was ready to chuck them up against the wall. Pre heat the injectors. Thats the key. If you do a search here and on bears site you will find great tips. But for me it was pre heating that made the big diffrence. Are you using the 2 color adaptor?
-
I did the same thing. It is a twist lock now. I also changed the nozzle as well. I brought it to the machine shop where I work and took a 1/2" end mill and went down either 1/2" or 3/8". I am at work and the injectors are at home. I then took a dremmel tool and blended the transition from the 1/2" to the hole the hole that comes out of the end. What I tried to do is get a larger amount of plastic as close to the exit point as I could. I have a medium injector that I put the twist to lock pin in as well. Some people can do the hold it up agaist the bottom of the cup thing but I find this real easy to use. When I return the plastic to the cup if I hit the end of the stroke the tip stays on. And to remove it I just take a glove and turn the end. The pin sticks out a bit and the glove catches the pin and off it comes.
-
I put mine on my hot plate and all the problems went away. With out heating the injectors I was ready to throw them in the trash. You may want to look a bears site there is quite a bit of information there as well as there is here.
-
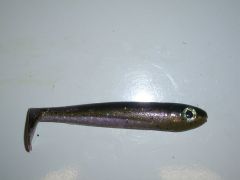 Rainbow Smelt
 -
I took mine to work and had one of the machinists drill into the nozzel and press in a 1/16 pin about 3/32 from the shoulder. Then he milled a slot in the tube 3/32 from the end and .078 wide. Then a right turn for about 3/32. So when i have my gloves on I can push the nozzel and twist to lock in place. I had him leave the pin sticking out about 3/32 so the gloves can get a grip on the nozzel to turn it to the remove position. I also took my 2 color injector and bored a hole on the center line of the insert 1/2 diamater and 1/2 deep. I then took a dremmel tool and blended in the transition from the 1/2 diamater to the .135 hole where the plastic comes out. It made the plastic flow better. Any time you can make a smmoth transition from one surface to another the plastic wil flow much better.
-
I have been fooling around with the timing of the injectors. I did a rainbow smelt that looks great. I increased the rainbow by pushing the injctor with the rainbow in it a bit sooner. You are right its a great mold. I will try and put some pictures up. I have been fooling around with the timing of the injectors. I did a rainbow smelt that looks great. I increased the rainbow by pushing the injctor with the rainbow in it a bit sooner. You are right its a great mold. I will try and put some pictures up.

