


djhaddix
-
Posts
24 -
Joined
-
Last visited
Recent Profile Visitors
406 profile views

djhaddix's Achievements
")
Newbie (1/14)
3
Reputation
-
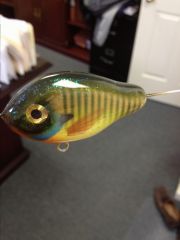 Zev11, the top of the bait is painted with Createx Wicked Moss Green Detail, as are the dark stripes. I left my laptop at the office over the weekend so I am just now seeing this, so I don't have my materials handy, but the glitter is, I believe, a glitter glue that I got at WalMart. I think its probably the "White" glitter color, but basically I put a couple drops of glitter glue on the back and start spreading with my finger (after I am positive my paint is good and dry of course), pushing the glitter and glue where I want it on the bait. After I am fairly satisfied with where the glitter is, I get out my hair dryer and start drying the glue, which as long as you don't go crazy, dries away to basically nothing, leaving only the glitter. I coat with D2T and haven't had any issues. I have the glitter in this "White" (which I think of more as just holographic), Silver, Gold, Green, and Red I believe. I used it all the time, allows me to get the glitter more or less just where I want it. Thanks for the positive comments, I appreciate them, and thanks again to the community here!
 -
First attempts at topwater prop baits, all handmade from balsa. Obviously this gill just got clearcoat and doesn't have the props installed yet, but I am not unhappy with the paint job considering it is only the third bluegill pattern I have ever tried to paint. Any and all constructive criticism is appreciated. Thanks.
© Denver Haddix, Jr.
-
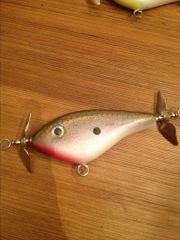 First attempts at prop baits for bass.
© Denver Haddix, Jr.
-
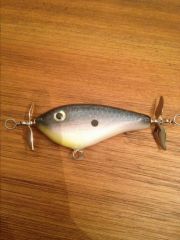 First attempts at some topwater prop baits for bass. Nothing earth-shattering about the paint jobs, all handmade from balsa. Float tested them and I am pretty excited about the way the float, hopefully once we get some warmer weather I will be able to test them and see if the bass like them. Anyway, just wanted to share, any and all constructive criticism is appreciated. Thanks to everyone on here for sharing your knowledge, definitely shortens the learning curve!
© Denver Haddix, Jr.
-
A-Mac, are you adding any texture to your Lexan tails? If so, are you scoring the Lexan, shaping with a Dremel, what? Just curious how I can add detail to the tails. Up until this point I have been using D2T exclusively as a top coat, but in my reading and researching it appears that it may not be optimal for swimbaits. Would GST concrete sealer be a viable option (anyone feel free to chime in on this question please). Sorry for all the questions, but newbies have to learn somehow, eh?
-
Hey guys. I have a question regarding Lexan tails on swimbaits. I have tried to read all associated posts regarding putting tails on swimbaits using the search function, and while I have gleaned some excellent information, I am still a bit confused. So, if I want to make a swimbait with a Lexan tail, I cut a slot in the back of the rear-most piece of the swimbait and then cut the Lexan tail to shape, and I am assuming I pin it in. I guess the question I have is how do you go about painting the tail, and also adding detail such as the fin spines and such? Is this simply painted on and then topcoated before adjoining it to the swimbait? Painted and then attached and then clearcoated? Hopefully you guys can see the jist of what I am getting at. I think the tranlucent looking tails look fantastic, and without pouring a soft tail, Lexan seems to me like the only viable choice, unless you use a Plano divider or a margerine tub top or some other piece of pliable plastic. In each case, just curious how to attach them and get them painted to match the rest of the swimbait. Thanks again in advance for taking the time to read this and share your knowledge. I would still be on Step 1 of any lure making procedure without the help of the knowledgable folks on here.
-
Not to hijack this post, but I have a question for BobP. After you add all of your hardware with the exception of the lip, and then undercoat the lure, are you concerned about getting D2T into the lip slot when there is no lip? Is this something you have worked out where you know that a certain width of lip slot plus the D2T makes for a snug fit for the final lip installation, or do you just not put D2T into the lip slot on your initial basecoat? I would love to start doing lures without installing the lip when I do my hardware for a cleaner presentation, just never could figure out how to go about doing it. Thanks and sorry for the hijack (if any!).
-
BobP, I agree and have used painted eyes the entire time I have been making lures. The results have been fine and I haven't had any complaints. Like most of us on here, I just wanted to tinker a bit and really liked the look of the 3D eyes...as for whether the fish will find them more attractive, that remains to be seen. I suspect it won't make much of a difference. I appreciate your comment about adding some super glue into the raw sockets and will take that advice.
-
Great ideas guys, thanks so much for taking the time to give me some thoughts. I guess I am showing how "green" I really am at making lures, as I thought it was kind of a no-no to drill through the D2T after you had sealed the bait. If I were to redrill out the eye sockets after D2T and had bare balsa exposed before painting, I was afraid any moisture from the paint would soak into the balsa...of course, I guess there is so little moisture that it is basically negligable? Like you, Ben, I tend to do mark the eyes on both sides, but as I don't have a drill press to run the bit straight through, I use a piece of sharpened wire to make holes on each side of the bait using my template (which I have the eyes drawn on to), simply flipping the template to do the opposite side. I do this while the blank is still square and I insert the end of the wire into the wood and route out a small hole that I can easily see. Anyway, this gives me some good stuff to go off of. Thanks again to the great members of this site for sharing your experience and knowledge, it is greatly appreciated.
-
Hey guys. I have a question, haven't been able to find any answers using the "Search" feature, so thought I would start a thread about it. I currently am making balsa lures, and so far my build is to seal with runny super clue, then D2T, base coat, paint, and then topcoat with D2T. I have recently became intrigued with 3D eyes...only problem is, I can't figure out any way that I can drill a recess for the eyes and still be able to seal with D2T. I belived the epoxy will make any pre-drilled socket for the eyes too small after the epoxy has cured. I am sure that some of you have had this issue, and it has probably been discussed before, but I can't seem to find any information. Any help at all is appreciated.
-
I can't seem to find this information on the BSI website. Is the Finish Cure 20 min. epoxy waterproof like the 30 min. Slow Cure? EDIT - I did see that, according to one of the FAQs, that the Finish Cure is "fuel proof", which is nice to know. It also mentioned that the Slow Cure was also "fuel proof". No mention of the Finish Cure being water proof, though. I wish they would have said they were "fool proof"....
-
Don-Art, it would appear that I am only about 70-80 years behind on this design, lol. Hard to believe the ingenuity that some folks had so long ago, a real testament to the craft.
-
Diemai, Thanks so much for your insightful contributions to the thread. You have been an inspiration for me for quite some time now, and I appreciate your thoughtfulness in helping me. I must admit, however, that I am unfamiliar with counter-rotating blades. Obviously I understand the concept and the meaning of the term, but I am not familiar with whether this requires two completely different blades (i.e. - one clockwise, one counter-clockwise) or simply the same two blades oriented oppositely of each other? In my mind I had already addressed this issue, but didn't really know how to articulate what was in my mind. You have cleared it up perfectly. You mentioned in your video how the lower pressure underneath of the diving lip made your blade flutter and not rotate, which was something that I hadn't thought of. It would be particularly pertinent if I were to design the lure with the blade arm coming out of the body vertically under the diving lip but in front of the treble hook. And of course, there is always the issue of making sure the blade would not foul up with the treble, which is yet another thing to think about. I can't stress enough how much all of you have helped me in my luremaking journey, and sole credit to the members of this site should be given for allowing me to understand things enough to start thinking outside of the box, so to speak. Once I get moved in I am going to start fabricating these lures, and although I don't have any video capability other than my iPhone, I will post back with progress, but bear with me, it may take a while.
-
Wow, great stuff guys. Thanks for all of the input, I am filing all the information away mentally so that I have some things to consider when I actually get to start the build. The gears are turning now quite a bit (at least as much as mine can, anyway). I have recently began thinking that there may be a way to extend a wire arm and blad from under the base of the diving bill of the lure that runs vertically, in front of the front treble hook, which may act as a bit of a guard for that front treble. Hopefully my description makes sense. In my mind, at least, this could prove beneficial in a number of ways, and as it would hopefully be centered vertically on the lure, may not impede the side to side action of the lure as much as the horizontally aligned arms with blades. Although, however, I can see where the drag created by the blade could introduce some disturbance given the displacement from the CoG and/or pivot point mentioned above. Thanks again to all who have viewed this topic and taken the time to respond. I look forward to any future discussions we may have regarding this. I guess the whole "bait ball" type theory is in full swing!
-
Thanks for the replies gentlemen. Nathan, I am assuming that since you only made a few of these types of lures you weren't able to get the action out of them, or at least didn't wind up catching fish on them like you had hoped? Benton, I am curious as to why it would appear that this could work on a wake bait and not a crank? Not challenging you by any means, I am the pupil here so just trying to learn, and hopefully teach myself to think outside of the box a little bit more. I agree on the willow blades, and honestly that was my initial thought, but in the drawing I felt like it would be easier for folks to see the spinner bait blades as a colorodo style. I was honestly just thinking of using my standard wire that I use for thru-wire construction for the arms. I guess I was just thinking a lot about something I had heard Rick Clunn talk about quite a bit, and I belived he referred to it as a hydrodynamic signature (although that could be totally off base). Basically, just the way that bass receive "sound" through their lateral lines. Obviously these cranks wouldn't be ideal for fishing grass or anything, but may find some use in more open-water situations (i.e. - cranking the face of a grass mat). My initial thoughts were that the vortices introduced by the front portion of the crankbait would interfere with the water flowing over the blades, but I guess I will just have to use some trial and error to see how long the blade arms need to be to see if I can work this out. I am in the process of moving to a new house (with a small workshop this time, yay!) so hopefully I can begin prototyping soon. Thanks again for the replies, and to all of you who have taken the time to read this thread.
