Leaderboard


Popular Content
Showing content with the highest reputation on 06/30/2016 in all areas
-
The thing that makes me suspicious of "PUD" is that it's water based. Members have tried water based urethanes (me included) and found they turn milky, soften, and delaminate when immersed in water for long periods. Water based finishes generally do that. If "PUD" has an additive that prevents re-absorption of water after drying, maybe that isn't a problem. But i'd want to see actual testing before I'd believe it, and I didn't see any info indicating it being waterproof in the description cited. If the company offers a test amount, I recommend you try it over paint before you use it on lures. Just say'in.2 points
-
Reading in the first link it sounds like you mix two products together..The MCU's we use are a one part products.It doesn't mean this won't work..It's just different from what we use. https://www.kbs-coatings.com/DiamondFinish-Clear.html This is the product I've been using..Several guys from here told me about it. No problem with dipping..(I've probably dipped well over 100 baits in the same quart I have) If it starts getting a little thick you can thin it with a shot of xylene...Two dips is like one coat of epoxy..Nathan2 points
-
http://www.tackleunderground.com/community/gallery/image/15813-old-workovers/ Here is a link to the pic where I painted over old baits that I first made so the epoxy wasnt done right and they were quite beat up. I just removed the old eyes with a scalpel and gave them a little sand paper action, painted white on top, added stripes, new eyes and epoxy and I got brand new baits again. I did lose the detail in the gill plates etc but they swim fine and I've caught fish on them, well one of them at least lol2 points
-
I posted a tip a while back about getting a tough plastics mold to fill and one of the things I heard back was akin to, "If you know its going to be tough you just shouldn't make it." I disagree. I should make what the customer wants if I can and figure out how to make it work. So lets skip that silliness. If the first sound of difficulty sends you to somebody else that's ok. They may know a better way. Personally I think some things just take extra effort, but its up to the customer to decide if its worth the extra trouble to get what they really want. Often customers want me to make lead molds that I know up front are going to be a problem. Often I'll do some test cuts to just test those feature I know will be an issue. One of the big ones is long amounts of lead with minimal clearance around another object. Hook shank, wire core, pin, etc. I think there is a limit beyond which its just not going to be possible, but often the answer is graphite spray in the mold to act as an insulator to prevent the lead from cooling to fast, and get EVERYTHING HOT. Not just the mold, but everything that goes in it as well. Hooks, Pins, Cores, Screws, Etc. Obviously certain objects can't take it so that may be a limitation. In retrospect it seems obvious now, but it sure seemed to take me a while to get there. What got me to realize I should have just accepted it as the answer sooner is when a customer told me, "No problem Bob. I have a hot plate I use for heavy hooks when I am pouring jigs. I just shake out as many hooks as I'll be using and let them heat up on the hot plate on low while the lead is heating up." DOH! Seems to obvious when somebody spells it out for me. I was just testing one of those molds today. Super heavy hook acts as a heat sink and cools the lead before the "feature" can fill. I got out my old hot plate I used for lead melting before I got a lead pot and tossed some hooks on it. Then for efficiency since I only work lead with heavy insulated gloves on I used some needle nose to pick and place parts quickly. All cavities poured perfectly. Even the smallest tightest ones. I wasn't even using great pure lead. Just some salvage I've skimmed a bunch that a friend gave me. So, sometimes the answer may be as simple as just getting EVERYTHING hot. I'm sure this is just restating what's been said before, but I posted in the hopes that somebody might not resist the answer for so long like I did.1 point
-
Probably 2 different cups; one with light green pumpkin and the other with the same base color and lots of blue flake.1 point
-
on a single cavity side inject mold, pour the outside colour in the runner, then immediately inject the core colour into the mold, it will push the core colour through the outside colour1 point
-
Maybe, but that style is somewhat popular in the smaller size spinner baits (1/8 oz) and clip form spinners (beetle spin type) typically fished on lighter line. I used to like them for bank fishing because I could fish them with a clip and change baits quickly when only carrying one rod.1 point
-
1 point
-
Jonister, also consider "fuming", this is a process they use to remove layers of paint from old paintings, saw it done years ago when working as a picture framer-- You hang the object on a jar lid and add a small amount of solvent to the jar (attach the lid without the object being immersed in the solvent) until you find the right one to dissolve the top coating, start with turps and work through alcohol, thinners and on to acetone and MEK etc until you find something that will dissolve the coating-- Because it's only fumes attacking the coating and not a liquid, it's pretty mild (and slow). How much time have you got?? I often use this to clean out an air brush overnight---this is good to strip back plastic lures, BUT keep an eye on it. Pete1 point
-
copper pipe joints are your friend, sockets work well too. after the mold is filled, put the fitting over the sprue and top it off1 point
-
Instead of twisted or R bent to form an eye its wrapped around a post to form a spring coil. Maybe I have the name wrong.
 1 point
 -
I have seen Frank's setup, and he uses a hot plate, but it is some kind of a warming tray, not an exposed element. http://www.tackleunderground.com/community/topic/20895-two-color-ripper-baits-and-production-video/1 point
-
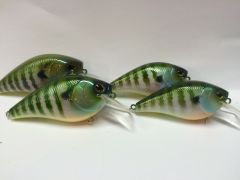
 These were old cranks that I painted when I started painting a year ago, the epoxy was coming off and they were quite beat up. I painted white over them then pearl white on top of that, added some stripes and I got new cranks to throw......1 point
 -
Someone posted a clever solution that has worked really well for me. Take the blade out of a coping saw and suspend the bait in the saw with wire (I use the green florist wire). Tighten it down like you would when putting the blade in and it pulls the bait perfectly straight. It's great for painting, and great for clear coating.1 point