Leaderboard


Popular Content
Showing content with the highest reputation on 04/25/2022 in all areas
-
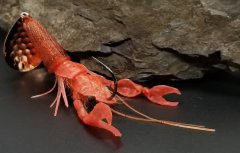
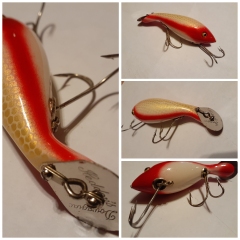
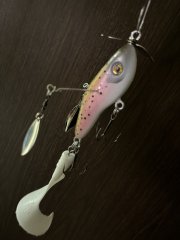
 This 8.75" trout glide has been a long time in the making, but I'm finally getting it to where I want it to be after years of testing and weeding through iterations that I wasn't 100% satisfied with. I actually started working on this particular model about a year and a half ago and only now have enough time on the water with it to feel comfortable pushing it into the final phases of prototyping. The master was carved completely by hand out of a block of basswood using only a utility knife, wood chisel, and sandpaper. I made a two-piece silicone mold of the bait so that I could pour duplicates out of resin. The tail was also carved out of wood and molded with silicone. The casting material is a flexible urethane with black glitter to replicate the trout dots on the body. The bait in the photograph is the first fishable prototype out of my new mold. It was painted with an airbrush and clear coated with KBS Diamond Clear. I did a semi sloppy job with the hand-tied Owner ST-36 feather trebles. Not sure how they will effect the swim, but they add a nice touch. Overall I am very pleased with how this bait came out. I'd love to fish the paint off this thing but will be donating it this week to support the Swimbaits for Autism fundraiser event hosted by Swimbait Culture. Check it out and thanks for looking! Dan2 points
 -
Wakebaits are one of the simplest of the swimbait category to make. As for lip angle, you don't want always want to use a 90 degree lip. I often like to use a lip from 75-85. Lip thickness is also a very important topic when it comes to making wakebaits. With a larger bait (say 6"+), you need a thicker lip and with a smaller lure (say 4-5") you don't need to go as thick. Your lip needs to be able to withstand the impact of hitting rocks, or wood without snapping. As for the joint segment ratios, I would just take the length of the entire lure and divide it's length by how many joints there are. I tend to go with a 45 degree angle joint on my swimbaits. You also need to consider joint spacing. This determines how much motion there is in the joint and could determine how wide or aggressive it swims. Weight and balance, I would weigh it similar to any other non glider swimbait, except floating and with a lip. Tails should be soft plastic or jointed Lexan tail.2 points
-
Thanks gentlemen!2 points
-
 Epic boss hand pour in electric trout2 points
 -
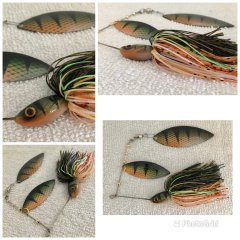 Airbrushed Yellow Perch Spinnerbait with a hand tied skirt, Hand twisted Wire form, poured by me with my modified mold! This baby took me a long time to make. Both blades, and the head I painted, and hand tied the skirt. That skirt alone took me almost a half an hour to tie! Hope you enjoy!1 point
 -
1 point
-
Great work! The level of detail on here is impressive! This is a great build, and the process was a great read on SU. It was really cool to see the whole process and all the steps that lead to completion.1 point
-
Thanks! I am hardly on Solar’s level, but I do my best to build baits that I can be proud of My basswood isn’t a good enough grade to carve every scale with a utility knife I think (I’ve tried and had lots of wood chipping), hence I use a wood chisel. The problem with the chisel is it’s not very sharp so the wood at the surface likes to crack and flake instead of cut. You have to gradually work it in so as to not damage the finish too much but it’s doable with much patience and concentration.1 point
-
Did you carve every scale!? Dude, that is SolarBaits level scale carving! The gills are fantastic too! Incredible!1 point
-
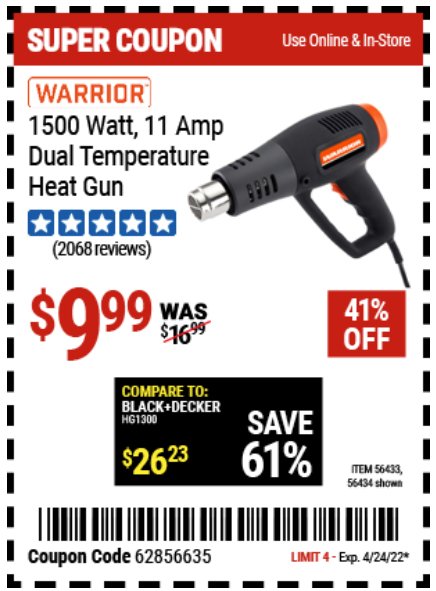
I have an older version of that heat gun, and it works great.1 point
-
I catch redfish in the surf using a standard Carolina rig and finger mullet. Seems to work ok. There are all kinds of rigs I see used in salt water. Most of them work if you are fishing with “live” bait. Some of them work well with soft plastics, depending on what the targeted species is.1 point
-
 Here is a heddon tadpolly that I restored. All original hardware and the original hooks.1 point
 -
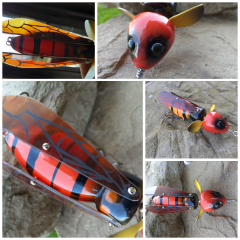 Here's my 4.5" murder hornet. Lathe turned using spanish cedar. 1/0 death grip hooks. Lexan wings with transparent burnt orange paint. It's a globe style topwater lure. It was alot of fun making this lure!1 point
 -
I have used the Harbor Freight versions for quite a few years, and I do give them quite a workout. I use to get maybe about a year out of the hot air gun. It was never a problem with the heating element, it would be the blower fan. They have cheap shaded pole blower motors and the floating powder would eat into the bearings. I have since used dryer sheets held on with a rubber band at the intake vent to filter the entering air. I now get 2 to 3 years out of the gun. Not bad for $10.00.1 point
-
1 point
-
 That's ridiculous and awesome. Nice job!1 point
 -
I was just suggesting he doesn't need to experiment on a finished or nearly finished lure. Anything with representative geometry and surface prep would work to test the process.1 point
-
1 point
-
I built a small vacuum table/box out of one of the plastic shoebox storage containers and a 1 gal shop vac. I put my small scale on top of the vac table while on and squirt/squeeze the MB's into a small cup on the scale and any excess migrant MB's are sucked into the vac. I'll also place the cup with resin on the vac table and stir in the MB's over that and it's almost eliminated any airbourne MB's. The scale on the vac table is surprisingly accurate if placed consistantly in the center.1 point
-
 Still a cool looking swimbait and would be interested in see some of your other work. But if I remember you won with this same lure last year1 point
 -
I don't have a ton of experience with foil but I think I can help. 1. Make sure that you are using the detachable side. 2. Just because it say heat transfer does not make it so. 3. You will need to use a lure with a flat surface first so you can get an idea if there is an optimal temperature and pressure. 4. If you can't get to adhere with heat and pressure .... use thin cyanoacrylate adhesive only!!! I can tell you if you go this direction it will work but there are several issues that go with this process!! 1. First and foremost be very care with the thin cyanoacrylate adhesive, you can easily glue unintended things together like your fingers to the bait or each other!! 2. Thin coat!! I can not stress this enough, if it puddles or creates drops you are using to much and will not adhere properly and will create a raised lip at the edge of the adhesive. 3. I use a soft towel to press the foil properly on to the bait 4. After putting foil and bait together let it sit for at least 1 minute...every second creates a stronger bond. 5. When removing foil it should be a quick single motion. 6. PRACTICE ON A BAIT THAT YOU DON'T MIND MESSING UP. My .021 point
-
Being as tin retails for $20 lb and lead at $2 or less(my last batch was $.95 locally) I doubt they did it to save money. Most likely for the weight as tin weighs 1/3 less than lead.1 point
-
Really been satisfied with a Porter Cable heat gun from Lowes. I’ve had it for quite a few years. It has variable heat adjustment and two speed settings which make a infinite adjustment heat gun. The previous was a Harbor Freight cheapo that spit its guts out the front. Think I went through a couple of those. The PC can be had for 35 bucks or so.1 point
-
Wagner dual heat from Home Depot. Never had a problem with it.1 point
-
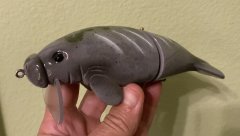
There it is! Bass beware the manatee bait!1 point
-
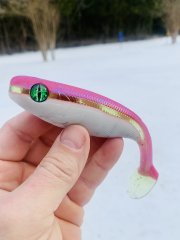
Love that gold strip!1 point
-
I have a corded DeWalt heat gun and I really like it. Especially like the infinite temperature adjustment on the back. When I make jigs out of tin or when I make bladed ice jigs that are made with solder it is so nice to be able to turn down the heat so it can't melt my jigs but heats them up hot enough to powder paint. It still has a high and low fan setting but infinite adjustment on the back. I don't think I will ever go back to a standard heat gun with only high and low settings. I've owned mine for several years so I'm not sure on the price but I think they retail for around $801 point
-
If I could make a recommendation... space heaters and heat guns get RED hot. They can set things on fire. Big, expensive things. I have had multiple heat guns end their lives by spitting out red hot metal chunks after years of use. They will all give up the ghost at some point, but whatever you decide on, at the very least least don't buy cheap tools. Get yourself a name brand that has a reputation and a warranty and wasn't assembled by 7-year old kids on the dirt floor of a hut somewhere. You don't need a $100 heat gun, but you don't need to be super cheap with a tool like this, either.1 point
-
I've owned quite a few different brands over the years and the one I have now is my favorite. For $26 from Home Depot, you can't beat it... and don't bother with the multi-tmp version for twice the price, it's a pain to use. Wagner 2-temp heat gun1 point
-
These last couple of years have been rough on everyone. Seems like everything has been in a shortage. I cant believe its been YEARS since this all started, doesn't feel like it1 point
-
Thanks. I’m going to check out the Hareline. I had someone else recommend Natures Spirit Fish Hunter so ordered a selection of that as well. Gonna give them both a try. Thanks again!1 point
-
Little late seeing this thread but I highly recommend "XSelect Marabou" from Hareline. I do a lot of fly tying and this is the only marabou I buy now. Lure looks awesome.1 point
-
opaque white1 point
-
 It got a test run at the river before I committed to painting and it looks good. The tail waves back and forth do to the freedom of the joint even. Runs shallow so should be good for burning weed beds. Also has a nice fall Honestly my only concern is how well the twin wires will hold up being T boned by a pike. If it experiences durability issues I will run one single blade off the back with the next one.1 point
 -
I apply the acrylic eyes before baking. It kind of bakes in.1 point
-
azsouth just gave a bunch to watch... and are usually the main culprits. If you are using fresh, new powder and still having issues.... then yes you'd have to start messing with your fluidbed. I use coffee filters for my "membrane" - seems to work well and is cheap as can be - you can double up if necessary to get the right amount of penetration - or even perforate the second (outer) layer in areas you'd want to "focus" the air a little more. I recently had exact same issues... first was old powder - it was "fluffy" to my eye, but when I got a fresh bag of it I noticed that it what I had was more sugar grain like instead of talcum powder like... made a huge difference. I also added "vibration" to my little 1 cup setup. Bought some vibrating motors off amazon for an X-Box controller. connected (2 AA) batteries and mounted the motor. Seems to shake the powder just enough to help keep it flowing. I'd probably get a bigger motor if I did it again to really shake it good, but it definitely helps to vibrate. From what I can tell it doesn't allow the "tunnels/chimneys" of air to form - as once hey do the shake/vibration collapses it. J.1 point
-
If you made them yourself then my first thought was how did you cut them to length? What kind of cutting tool did you use that would leave a sharp edge? can a grind wheel cutter on a dremel or rotary tool work beter ,if at all to cut to length with out the angle bevel, sharp edge of say a cutting plier, wire cutting plier? Sorry I have never worked with titanium wire as its properties seem limiting to my lure crafting. ie spinner baits ,wire forming. Burning the wire may be another side effect of grind cutting which may be undesirable. Just thinking out side the box a little. I thought people ordered titanium pre formed wire frames as bending and memory was an issue. Cutting would also be something to consider .1 point
-
I think people don't know what they are getting into when they say " I am making a glide bait" Hands down it's the most temperamental bait to make!! the bait characteristics will change with elevation, temperature, line size, snaps, no snap, barometric pressure...and folks there are many more considerations that can/will effect a glide bait. I am not saying don't try to make a glide bait but get ready to be frustrated at almost every turn to get a decent glide bait and not a paper weight.1 point