

LaPala
-
Posts
719 -
Joined
-
Last visited
-
Days Won
2
Content Type
Profiles
Articles
TU Classifieds
Glossary
Website Links
Forums
Gallery
Store
Everything posted by LaPala
-
Sad news indeed. My condolences to Coley's family and friends. Although I have never met him personally, back in the days, I carved a lure body and Coley molded them. I still have the molded blanks and some wooden lures he made sent back to me. Now they will go into a display cabinet as the legacy of Coley lives on. Will be missing you Coley.
-
Great work Nathan, KISS is king. I would only think of some gyro system and weight transfer channels to get that to work.
-
Thanks for the + guys. Fatfingers shoot em to lapalalures@gmail.com or you can find me in Facebook. Not too sure about the PM thingy, been lost since the new format change in this forum.
-
Will this help (click)?
-
Great to see you back Skeeter. And for those who are not aware, Skeeter is the Devcon God .
-
For just basic editing take a look at Photoshop elements, they sometimes comes free too with purchase of cams, graphic cards etc.
-
I did post a semi-tutorial about one such built: here
-
How about this to beat the A-Rig?
-
yes if the scratch marks are not too deep, for a reference 600 grit used wet/dry sandpaper marks. Any coarser you are pushing it. Look for plastic polishing compound too, you can buff with it till it shines.
-
Pete, we can work on the notion of we have the skills and know how (wink wink)
-
 Nice clean carving. Great job.
 -
I'll second that Bob. When we change lips on a lure body and keep all other factors constant then that would reflect what different lip shape's effect on that particular body and no more. When I am designing lures, I always treat each as a complete system. Although prior knowledge and experience with what particular lip shapes can do will influence the choice and act as a starting point; keeping an open mind is important to keep us from being stuck in the perceived function of a particular lure shape.
-
Dave, great effort there.However, you can't see very well on bare lures the wobble and roll the lures have and quantify them. Suggestions for ur future comparison videos or even for single lure. 1. Draw a nice clear black centre-line on the top of the lure. This will give a better indication of the magnitude of wobble and I bet you would stop frame and measure the deflection too ; the centre-line view from top will also indicate how much the lure rolls. 2. Side view can do with a centre-line and a vertical line in a different color. Your wheels turning already about what these lines will tell you?
-
The Japanese DIY lure makers actually cut the scale lines one by one on the foil with a blade,either before sticking the foils and doing it after the lure is foiled. There's some very good tutorials online but I do not have the links handy at the moment. Will post them if I remember to look for it when I get home.
-
Check these out: http://japanesehandmadelures.blogspot.com/2011/01/hotshot-by-isao-matsumoto.html
-
LOL Mark don't worry I will not mention ur part in it . Vodka, followed the link, seem the solution is coolant! Just like when I cut the acrylic, I used engine oil then but it's messy. Routing would be throwing chips further too. I'll stick to having fun instead of mass producing
-
Thanks for the comments guys. Maybe one day Vodka when I can find the slaves to do the mass production work BTW you have any idea of a suitable cutting bit if it were to be used on acrylic?
-
LOL... sounds like you might have just offended some ppl
-
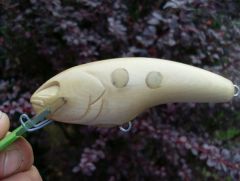
It's been ages since I have posted here. Now that I have stopped writing a hardbait DIY column for our local fishing magazine here (in Malaysia just in case you wanna ask), I have a bit more time to spare. SO here goes: Making a Vibebait from laminating Acrylic - weight distribution test trick. I won't be very detail in describing the process as I will assume a basic knowledge of lure making is at your disposal already 1. These are the components of the lure body that is needed to be cut-out, shaped then glued up together: Copper rods are used for aligning the pieces together. 2. To work out the weighting: Styrofoam sheet is cut and shaped to fit the chambers in the middle piece, this is the closest approximation of air(available to me) that will occupy the chamber once it is glued up. 3. Water test and balance: Just tape weight to the front to get the correct attitude for a vibebait. I'll assume those who will be attempting this has an understanding of how the weight distribution of a vibebait should be and how to get the desired action by varying the distribution. Anyway, this method is a great way to test them all without having to make lure after lure. 4. Weight used earlier on the head is hammered flat and shaped to fit in the head, acrylic cut out to fit head weight that is formed. Future contruction of same lure will just require the head weight be molded. So keep your notes 5. This is the end result: Fins are carved from 1.5mm polycarbonate sheet. and after some splashes of color. Comments, questions and suggestions for improvement most welcomed. (PS: Just to be fair, I participate in quite a number of lure making forums, so it's copy paste to all of them.)
-
Your are welcome, take a good look at how his bandsaw guide is constructed, would work well with ur jigsaw table setup too and get it to be exactly like that Rockwell Bladerunner. A well supported jigsaw blade will go a long way in assuring a clean cut plus act as a hold-down for your workpiece too.
-
Matthias Wandel's Woodgears.ca is my most admired wookworking thinkerer I have found on the web. I'm sure you will find lots of inspiration in his site.One that could immediately fulfill ur bandsaw dream:
-
Try searching for alternate trade name like Samba, African whitewood etc. This webpage has all the detail info on the wood and list of alternate names.
-
Check out (google) the Archy flask, dip and collect the displaced water in the graduated cylinder for measurement is pretty accurate, no water is stuck anywhere else.
-
Haha good ole days eh Vodka. I have changed to using an Archimedes flask coupled with a .5ml graduation measuring cylinder.
-
You can do this (see pic) to find ur sweet-spot for a tow-eye in-lip crank. The separate tow-eye insert can be taped to the lip from below while testing. Experimenting with diff tow-eye heights will just be making a few tow-eye inserts with different height. But for me, if the height of tow-eye needs adjustment, it means the lip angle need changing; if I cannot find a sweet spot at that particular lip angle.


