


borderbasser
-
Posts
270 -
Joined
-
Last visited
Content Type
Profiles
Articles
TU Classifieds
Glossary
Website Links
Forums
Gallery
Store
Everything posted by borderbasser
-
Works like a champ. No release is needed. TJ
-
I was just curious how a slower drying thinner will help things out with an airbrush? I use acetone with a cheapo single action siphon feed and I have no problems. If anything, it might help keep the clear from drying in the tip, but I would think that you would have to wait a little longer between coats. As far as being able to get a coat that is similar in depth and thickness as epoxy (assuming that is what you meant), I can't even see how you could achieve that with 2 coats of DN, even without any thinner. Don't misunderstand...I'm not trying to question your expertiece on coatings, I'm just trying to understand. Thanks. TJ
-
Riverman, I pretty much do it like CJ said. If you use more acetone, you can recoat faster, but it will take more coats. I recently coated a bait with only about 25% acetone (more or less) and only coated it with two fairly heavy coats and one light coat to finish off what I had in the jar and it coated the bait well. I waited about 15-20 min. between coats and I rotated by hand for a few minutes just to make sure that there would be no runs. Just a little note about bubbles. For many of you with slick baits like a typical crankbait, bubbles probably won't be that big of an issue if trying to coat the bait with a thicker coat. Where it does seem problematic are baits like my swimbaits that have a lot of carving detail in the head and body. These places tend to catch and pool a little more finish. Of all the baits that I have made where bubbles were an issue, it was in these areas and not the smooth areas. TJ
-
I have had this problem with brushing it on. The best results I have had thus far is spraying it. Get you one of those cheapo siphon feeds for like ten bucks and thin with about 25%-50% acetone and spray away. It will take several coats to get the desired finish (depending on how much acetone is used), but you will like the finished product and won't have any problems with wrinkleing. What you will have problems with though if you spray too thick or don't alow a little time between coats is bubbles popping up. I think that it is due to the solvents still flashing off under the last coats. TJ
-
Thanks Red, I'll give it a shot. TJ
-
Does anyone have any experiece using OOMOO from Smooth-on for pouring lead? I know that the platinum cure RTV is a better choice, but I already have some of the tin cure OOMOO. I am needing to pour some swimbait harnesses and won't be making a lot of them anyway. Will this stuff hold up to the heat of say about 20 harnesses? Thanks guys. TJ
-
Parrothead, AZEC sounds very familiar to me. That may be exactly what I am using. Next time I'm at Home Depot, I take a look. TJ
-
 Very nice. You make some of the finest baits I have seen. I too have been making my baits with the door type hinge inspired in no small part by your baits. I actually made one very similar to this one with three hinges and a lexan tail like the 3:16 baits. I would love to pic your brain some time and compare notes on this method of doing this style of hinges. Again, very nice. TJ
 -
The stuff I found at my local Home Depot in the trim board section is very easy to carve. It does have a hard "shell" around it like you describe J.R., but once trimed off on the table saw, It is very ease to work. TJ
-
I also noticed that you said that you had a crack down the middle of one of the cavities. I have had this happen before as well...especially after pouring several baits. One thing you might try to do to help this, is lay some strips of drywall mesh tape in the wet plaster to help bind things together like rebar in concrete. I have not actually tried this, but I would imagine it would help. Just make shure that it doesn't interfer with the cavites. TJ
-
Thanks Dave. I thought that was what you were talking about. I have a couple problems with that though. I have tried your method in the past, and it is very difficult at times to get the master back into the mold exactly as it was especially on moderately complex masters. To make things even worse, the bait has fins that are below the centerline of the bait that I would venture to say would be impossible to get back in place. The only option would be to cut that particular fin off before re-inserting the master back into the mold. The other problem is with the vaseline. Although it would work well I think, I have had problems with the POP picking up the brush strokes on the bait from brushing it on. Ofcourse, I guess you might be able to heat it slightly with a heat gun or hair dryer to melt it and smooth it out some. It would just take some experimentation. All and all, I think it is worth trying again. I think what I'm going to try first though is inserting a few wires through the center line of the bait and letting the wire extend out far enough out from the bait that the bait can be suspended over the mold box. Then all it would take is to fill the box up to the top with plaster and then lay the bait in. All should be well as long as the wires are straight and the pop is not so thick that the edges pull in, or not so thin that the pop rises up on the master. Sounds good anyway. And ofcourse if it doesn't work, I can pull the master and sand. Anyway, thanks guys. TJ
-
Dave, I am not sure I quite understand what your last paragragh means. Are you saying that you remove the master and sand the mold face? If so, how do you replace the master and re-establish the seal between the mold and the master so that the next half of the mold doesn't find it's way in between the first half and the master. Thanks all for the replys. TJ
-
I make mine for bass fishing. I have made them as thin as 3/4" to as wide as 1 1/4" with most being around 1". TJ
-
I would reccomend making your joint cuts while your material is still square and in block form. Just don't cut it apart completely. I would also reccomend drilling your pin hole at this point. It is much easier drilling straight holes and making square cuts when the stock is in a square block form. Then, cut your profile and shape your bait as one piece. Once this process is complete, finish cutting the joints all the way through and separate the sections and add your hardware. As far as the finish goes, you almost have to coat each piece individualy and rotate while drying. I will try to find a pic of my setup that will show you how i set them up to rotate. TJ
-
That is a good idea and it reminds me. One of the hard bait guys next door uses a block of wood and cuts out the profile of the bait in the center of the block. Then, he puts the bait in with the centerline even with the top of the block and then uses putty to seal the gap between the bait and block. I'm sure your method would have to incorporate a small amount of putty as well to seal the gap which really is not a big deal. The fins would probably have to be only in one side of the mold, but that wouldn't be any big deal i don't guess. Thanks for refreshing my memory Delw. TJ
-
I plan on making a swimbait mold and I am concerned that the fins will not fill well on their own. I would imagine that the syringe method will work for me since the mold will either be RTV or plaster and just due to the volume of plastic in each pour, keeping it hot enough to push plastic into the fins shouldn't really be to much of an issue if it is done in a timely fashion. TJ
-
Let me boucne this one off you guys. What if you poured the bait say 3/4 full and then used some sort of pressure source to presurize the mold a few pounds to fill the hard to reach spots. Seem likes if you vented the tails or legs or whatever the appendages may be and the plastic was hot, it would force the plastic into those places. Then, just top the mold off. A simple pressure source could be a larger syringe with a hollow rubber stopper on the end that would create a seal on the sprue hole. It does seem though that this method would be less succesful on alum. molds than the other alternatives, but that is just a guess. Any thoughts? TJ
-
Hey guys. It has been awile since I have posted over here. I have been hanging out over yonder with the hard bait croud for a while:eek: Anyway, I have a swimbait that I want to make some mods to, and then mold it in a two piece mold. I would prefer to do it in RTV since it doesn't have to be sealed, but am open to using plaster. I am not a stranger to making two piece molds, but I always seem to have a problem when it comes to pushing the bait half-way in for the first half and getting it exactly right. It always seems that the plaster is too thin and it sinks, or the plaster is too firm and the edges of the plaster around the bait pull in (if that makes any sense). I have seen in the hardbaits forum before the crash, where some where using a clay bed to push the bait into and then build up and smooth the clay up to the center line of the bait to pour the mold material on for the first half. Then, turning it over and removing the clay so that the second half can be poured. This seems pretty labor intensive and while feasable on a hard bait, it seems like it would be a little more difficult with a soft bait although I have never tried it with either. Do you guys have any tips for achieving a good perfect centerline for your baits? Any tips concering this with RTV molds would be most helpful, but tips for plaster would be more than welcome too. Thanks guys. TJ
-
Thanks for the kudos Mark. The hinges are not carved though. I may have to put together a little tutorial on how I do it sometime when I get a chance. As far as your method, I just drilled a hole for the eye to fit in and then used a chainsaw sharpening stone in my dremel to open the hole up like it needed it to be. It worked pretty well. TJ
-
Get the syringes and do exactly like Mark said with the hole in the cap. If you search, I have a picture somewhere here that shows what I mean. It is extremely fast and extremely accurate. You will have zero issues and almost no expense. I would however purchase the ones from flexcoat. Syringes from a medical supply store (ones with the rubber plunger) can be lubricated with silicone and WILL cause fisheyes. Better safe than sorry. Epoxies with a need to measure by weight need to be done obviously with a scale, but for a 1:1 by volume, the syringes are the way to go! TJ
-
Mark, I'm glad the expiriment worked out well Thanks for putting in the time and reporting back. Speaking of the hinge slots, I started to reccomend that method to you a while back after seeing some of your last baits but I didn't want to seem critical and rub you the wrong way. The baits looked really really good and those slots seem to look like an eyesore as I feel they do on all baits with that style of hinge. I tried it myself a while back on a few baits with 100% positive results. It would be the way I would do all my baits if I didn't like the door hinge method so much. The only problem I can see would be with the clear. It wasn't a problem for me though since I switched to DN's. TJ
-
 Nice paint job, but your color selection is a little different than what I am used to seeing on tilapia. Most of the ones I have seen painted are a little off though IMO. Do a search of tilapia in yahoo or google images and you'll see what I mean. Good job though.
 -
I have had the same problems and here is what I have found. I know that baits like the TT and BBZ1 have a small center section, but what I have found is that if you make the segments progressively smaller from head to tail you will have better luck. More segments help as well. Also keep as much weight in the front half of the bait as possible. I believe the original TT only actually has weight in the head section. Someone posted an ex-ray of a TT that clearly showed it. Not sure if it was a floater or sinker though. The problem I am experiencing now, is that I can make two identical baits (or as identical as possible...and I'm usually pretty good), one a sinker and one a floater, and the floater will have a difficult time swimming...especially slow. I am not sure if it is a weight issue, or if my floater is floating just a tad too high. Anyway, good luck. TJ
-
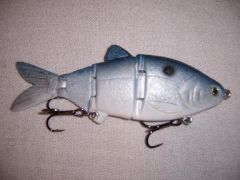
My 1st swimbait. any advice would be great.
borderbasser replied to newcastledrew's topic in Hard Baits
Glad I was able to contribute something of use. I totally agree with you Mark. TJ -
The dry spots yall are refering to are fish eys and 9 times out of 10 it will be a contamination issue either from oil on your hands or from some other source. I have seen this happen when measuring epoxy from syringes that have the rubber plungers like the medical ones. Many times these are lubricated from the factory with silicone and let me tell you, silicone and epoxy don't jive at all. Also, whatever you do, keep all aresols of any kind away from anything that may come in contact with anything involved in the finishing process from the brush, to the cup, to the bait. One time, I had just put a fresh coat of finish on one of my custom rods. I had it set up on the turner which was on the kitchen table. My wife soon came by within about fifteen feet of the table and sprayed some air freshener and boom! The decal area of my rod became all pock marked like the moon...little craters everywhere! It is important to note that the contaminate does not have to come in contact with the epoxy post application. I had a rod that was wrapped and set aside in the corner for a week before I was able to applly finish to the wraps and had the same problem as stated above. I asked my wife if she had again sprayed anything. She finaly broke that she had, but it had been several days before. I am not a chemist, but I'm pretty sure that letting the mixed epoxy sit a bit will not help things at all. After you mix it, it is either mixed or it isn't. If it needs time to sit and react, as far as I am concerned it should just as well sit on the bait and react. All you are goin to do is waste your working time in my opinion. The only other time I have seen something like this is when applying a second coat. The theory is, the previous coat is so slick from not being in a water break free condition, the the epoxy won't stick well and actually pulls away from an area or spot, but it generally won't be a "pock" or "crater" like is typical with contamination where the epoxy is repelled. As far as adding more hardner to the mix like Mark suggests, I would be very cautious. You are just asking for disaster with most epoxies. Some are VERY particular about getting an exact mix for a proper cure. Others not so much. As far as the Nu-Lustre stuff Mark is using, I have no experience. It is my understanding though that the more quality epoxies are generally more particular about exact ratios. If you are worried about the ambient temp, you can hit the bait just a little with a hair dryer before applying the epoxy. Also, if you put a desk light (the ones with a flexible neck) with 100W bulb pointed at the bait while it turns, the temp won't be an issue unless it is very cold. It will also help it cure a little faster than normal during normal temps. Just make sure you don't put too much heat on the bait, or you will cause the epoxy to "boil" and create a bunch of bubbles. Just test the distance from the bait to the lamp with your hand to make sure your not too close. Sorry to be so long winded here, but I know this can be a frustrating issue for some who may not understand exactly what is happening. Hope it helps someone. TJ