


Ed Brabant
-
Posts
129 -
Joined
-
Last visited
-
Days Won
1
Content Type
Profiles
Articles
TU Classifieds
Glossary
Website Links
Forums
Gallery
Store
Everything posted by Ed Brabant
-
I thought that Elaztech is a TPE. Thermo Plastic Elastomer. Not the PVC that we normally use.
-
Way way too much money! If you want to work for less than minimum wage you will need a bunch of molds. Pouring by the cup will not make you any money. I have a specific bait that I love to throw. I have 11 molds 2 cavity open pour. That's 22 baits per cycle. And I would still not make any money if I sold the baits. It's a great costly hobby. I also paint hard baits and that's bigger money pit.
-
 Can this be poured with Bismuthth?
 -
I have a 4 cavity hand pour senko mold. I took the mold to work and talked to one of the guys in our machine shop and had him cut a slot in the mold faces .50 wide and .010 deep right in the middle of the bait. Then before I pour I cut fine nylon screen just a bit under .50 and about 4" long. I then place the cut screen in one half the side with guide pins up then place the other side on clamp and pour. When I demold the baits the look like ammo on a belt. Cut the screen close to the bait. Then when I fish them wacky it's almost impossible to rip the hook thru. Because it's a hand pour no flash at all. I can even pour them with out the screen. Some I have to trim the little bit of flash off.
-
I am just pouring for myself and a few friends. My son says i pour to slow the boat down. He may be right. Weight adds up fast.......
-
SI have tried to pour some larger swimbaits. The tails are soft not uncured plastic soft but more like the plastic is too soft. Hardner or just order harder plastic. Salt water or a bit softer?
-
I made a 2 piece mold of a live target trout. Mold came out ok. But the plastic i use is out of the jug. I noticed that they are too soft. If i use 2 cups at a time how much hardner should i use. I want to try and make larger baits too. I am going to try to use the big guys to make the molds. I dont sell any thing i have ever poured give them away but no sell. Does any one have a 3D swimbait file? We have 3d printers at work and i would like to try having molds made on them.
-
Not a frog but it is the same principal.
-
If the bait is designed with 3D software such as Pro Engineer or Solidworks there should be no problems. the 3D model has to be good meaning no unattached segments. For example you can't create a box with out the end points meeting.
-
I went crazy when i got mine. Was ready to chuck them up against the wall. Pre heat the injectors. Thats the key. If you do a search here and on bears site you will find great tips. But for me it was pre heating that made the big diffrence. Are you using the 2 color adaptor?
-
I did the same thing. It is a twist lock now. I also changed the nozzle as well. I brought it to the machine shop where I work and took a 1/2" end mill and went down either 1/2" or 3/8". I am at work and the injectors are at home. I then took a dremmel tool and blended the transition from the 1/2" to the hole the hole that comes out of the end. What I tried to do is get a larger amount of plastic as close to the exit point as I could. I have a medium injector that I put the twist to lock pin in as well. Some people can do the hold it up agaist the bottom of the cup thing but I find this real easy to use. When I return the plastic to the cup if I hit the end of the stroke the tip stays on. And to remove it I just take a glove and turn the end. The pin sticks out a bit and the glove catches the pin and off it comes.
-
I put mine on my hot plate and all the problems went away. With out heating the injectors I was ready to throw them in the trash. You may want to look a bears site there is quite a bit of information there as well as there is here.
-
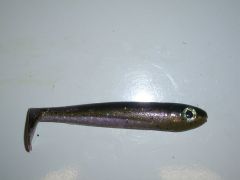 Rainbow Smelt
 -
I took mine to work and had one of the machinists drill into the nozzel and press in a 1/16 pin about 3/32 from the shoulder. Then he milled a slot in the tube 3/32 from the end and .078 wide. Then a right turn for about 3/32. So when i have my gloves on I can push the nozzel and twist to lock in place. I had him leave the pin sticking out about 3/32 so the gloves can get a grip on the nozzel to turn it to the remove position. I also took my 2 color injector and bored a hole on the center line of the insert 1/2 diamater and 1/2 deep. I then took a dremmel tool and blended in the transition from the 1/2 diamater to the .135 hole where the plastic comes out. It made the plastic flow better. Any time you can make a smmoth transition from one surface to another the plastic wil flow much better.
-
I have been fooling around with the timing of the injectors. I did a rainbow smelt that looks great. I increased the rainbow by pushing the injctor with the rainbow in it a bit sooner. You are right its a great mold. I will try and put some pictures up. I have been fooling around with the timing of the injectors. I did a rainbow smelt that looks great. I increased the rainbow by pushing the injctor with the rainbow in it a bit sooner. You are right its a great mold. I will try and put some pictures up.
-
With my stick bait I just pour a steady stream down the middle of the mold. I try not to hit the sides. And just fill to the top. there is an excess on the top top help fill any shrinkage as it cools. I find if i am too hot I get quite a bit of shrinkage.
-
Old School Pourer Considering Injection Molding
Ed Brabant replied to earthworm77's topic in Soft Plastics
If you go to a local machine shop and explain what you need to have done I can't see them charging too much. I would say under $20. I won't take but 10 minuets in a milling machine. Then you can establish a relation with the shop and who knows the little trinkets that you want to have made you now will have a source. -
Bears hinge is machined into the mold. I don't know where they got theres but mine aren't store bought hinges. Look at the web site. The only new hinge is from a new vendor they started to use last week. So I think your so called friends are puling your leg. Bear just as all the mold sellers will work with you if you have an issue. If your so call friends have a problem cal Bear direct. I have called him as well as Del and they are both great to work with. In the future you should not knock some one on what your so called friends say.
-
1/16 minimum. I will have to measure mine. Go to Bears site and ask that question. You will get an reply asap..
-
They swim great. I used them with the standard weighted head and the Gamagatsu one with the small willow leaf blade. Awsome baits.
-
Haven't used Bass Tackle's yet but my Bears hollow body mold came in Thursday and all I can say is WOW. Perfect baits with the single and dual color injector. "once the guys on Bears site explained how to use the dual color injector." Single worked just a good with the mold. And the BBCP plastic as well. I love that stuff now.
-
I have the 4 and 5. I converted them to injector style. I had a plate made that screws on the top of the mold with 2 openings. One is just behind the insert. That is where i inject the plastic with a Bears medium injector. The 2nd hole is on the top of the tail. It is smaller. It acts as a vent hole. As I inject the plastic in the cavity I lets teh plastic come out of the vent for a count of 5 then I put a cold butter knife over the hole to seal it off. Any trapped air comes out of the vent hole rather well. If I want a multi color I first pour the 2-3 colors as you would normally then I screw the top plate on and inject the final color. When the cavity is full I hold pressure on the injector for 45 seconds. This helps remove any heat sinks from the plastic shrinking. The plastic gets sucked out of the injector to make up for any shrinkage. I also did it as a colored tail. I first did the bait in the color tail I wanted. Then cut the tail off and put it back in the mold. Then shot the 2nd color. I quickly found out that the tail covered teh vent hole. So i added a vent hole next to the injection hole. I still have a few bugs to work out of tht part but it looks promising. I also use lead weights I modified the pins to position a 3/16 for the smaller mold and 1/4 for the larger mold. I used roll pins in the slot where the pins are to position the weight. After I demold the bait I glue the weight in place. With Grip Loc glue. The baits are completly filled with a nice square top. The tails don't have any holes "heat sinks" at all. I am thinking on the smaller one as well. What size hook are you guys using on the smaller one? I was stripper fishing Monday night in the flats on the Merrimac river with the 5' bait and landed 2 around 23". That is with my freshwater flippin stick. My son caught on last week 42 on his spinning rod "bass rod" and the 4" swim bait.
-
The cup dosen't shatter placing it on the heat source?
-
Look in the free stuff section first. i got one for $0.
-
Both molds work great. I bought both sizes. What really makes the bait swim is the insert that is moloded in the bait as added keel weight and for the line to slide through. They are pricy. i have tried mojo weights with OK results. The only problem with that style insert is when you set the hook it tends to push the weight out of the bait. I over came that with glue. After I pour the part i glue the weight in. I have experimented with pop rivets. I went to Home Depot and bought differnt size pop rivets with a domed head. I drive the pins out of the pop rivet and wind on about 2" of .062 solder on the barrel of the pop rivet. Staying away from the domed end about 1/8". When I put the pop rivet in the mold I put the domed end on the hook side. The mushroom shape of the end of the rivet makes it hard to be pulled through the bait. It also adds weight.If I get a chance I will post a few pictures. I want to try lead foil next. With out the weight of the insert these syle line thru swim baits don't swim as well as I thought. That's just my opnion. But you can make some awsome looking baits with this mold. Being open multi colors come out great. i use regular super soft plastic. I haven't tried hardner in the baits yet. That's on my to do list now.

