wchilton
-
Posts
194 -
Joined
-
Last visited
-
Days Won
2
Content Type
Profiles
Articles
TU Classifieds
Glossary
Website Links
Forums
Gallery
Store
Everything posted by wchilton
-
Possibly use a hole saw (like used for doorknob cut-outs) mounted on a drill press. You'd want some kind of fixture to hold the lure or blank at the right angle.
-
I have a MyWeigh i1200 that's worked perfectly for 8 or 10 years now. Price is higher than I remember at about $100 from saveonscales.com. If you don't need super accuracy no reason to pay for it. This i1200 is rated to 1200 grams with 0.1 gram precision. It came with a 1 kg calibration weight. They have models with lower total rating that cost less. The i500 has a 500 gram capacity (1.1 pounds) and 0.1g precision for about $60. 0.1 grams is only a couple of drops of water so plenty of precision for lures and components. If you need to weigh small parts (hooks, swivels, etc.) you can weigh 10 or 20 at a time to get down to 0.01 gram accuracy. One thing I like is the large, flat top so you can easily weigh parts, etc. that stick out way past the edges. Think a lot about what you want to be able to use the scale for. I use mine to measure food items, lures and components, RTV/catalyst, even my POP/water mixtures up to a couple of pounds of POP. If you think you only need precision down to about 1gram, you can go with a postal scale. Those tend to be less expensive and have higher capacity. I've got one of those that's good to about 30 lbs. The ultra-precise scales used for reloading top out in the 100 gram range. That's only around 4 oz...not enough capacity for things like RTV or POP for lure making.
-
Friction slowing things down would be my concern as well. If you already have the material and don't mind spending the time it's worth a shot, though. I think it might be possible to make a laminar flow nozzle a lot smaller than the whole channel size. Part of what got me interested in this post was I recently saw a DIY project to make a laminar flow fountain and was considering whether what I had gleaned from that could be used for lure testing. Just do a google search on "laminar flow fountain" and you'll get lots of hits. The project I was looking at was at makezine.com. So my thinking was to either put a laminarizing nozzle on the pump to create laminar flow before entering the main stream of water or to fabricate a small jet pump (powered by the sump pump) to pull water from the main channel and force it all through a larger laminarizing nozzle followed by smooth expansion back to the main channel. The trick, of course, is going to be minimizing friction loss so that you only need the small pump.
-
I've considered building some sort of test tank for a while so have "run the numbers" on a few configurations. Thinking about this one (today) I realized you may be getting some retained momentum because of the recirculation (like some wind tunnels) so velocity may be quite a bit higher than the .5 ft per second you'd get from pump output alone in a straight-through configuration. You could measure water speed by filming a small object traveling with the water through the test section. Something light like a piece of feather would be good, preferable have it suspend in the water rather than float on the surface or sink to the bottom. A couple of strips of tape can mark the distance and frame count will give you accurate enough time.
-
My estimate comes out at about 0.5 ft/sec... Using Channel water height = 4 inches Channel width = 3 inches Cross sectional area is 3*4/144 = 1/12 sq ft = .083 sq ft 1200 gph = 160.4 cu ft/hr = 2.67 cu ft / min = 0.04456 cu-ft / sec Velocity = 0.04456 / 0.083 = 0.534 ft/sec That is an average velocity through the channel. It's possible you've got faster flow in the middle and the bait is staying in that faster flow, much like a light ball will suspend in an upward air jet from a vacuume cleaner. It also looks to me like there's quite a bit of turbulence. Even so, this looks pretty encouraging.
-
Sounds like you're getting a process that works for you figured out. For future reference, since you are using a lot of POP for those big molds, check your yellow pages for a local "plaster supply" house and give them a call. They may have either a "molding plaster" or a "casting plaster" that is near or identical to POP. I think I paid about $20 for a 100 lb bag. There is also a category of materials called "gypsum cements" that are similar to the plasters but set up much harder. I've tried one called "UltraCal 30" that sets up rock hard but I didn't like the way it reproduces fine detail. If you do find you need something that sets up harder, you might look into those. There's info about various types of plasters and gypsum cements at www.plaster.com
-
It doesn't get rock hard. The more water you use the more porous/soft it will turn out. Max hardness would be if you had zero excess water but then it would be too thick to pick up small details and would be very difficult to thoroughly mix. I've seen some on-line tutorials where people add elmer's glue to the water to create a more plastic-like result but haven't tried that myself. Your surface treatment (sealing) will help with the hardness of the surface and I'd go with the 30 minute epoxy in your case. With a mold as thick as you are making, it's going to take a while to dry out. Don't try to rush it, I've had molds crack when I did that. You might want to try just leaving a fan blowing over it. When it's completely "dry" it won't steam or feel damp at all and will also be a bit lighter in weight.
-
I think I picked up this set of clay tools at Tuesday Mornings. Normally you'd find them at craft stores or art stores but they also show up at the discount stores on occasion. A few sources for "texture" I've got my eye on are the shower/bath door (random facets) and the bottom of a take-out food box (round pips) from the cafeteria at work. Second pic is the shower door texture.


-
MuskieBait, Something doesn't seem to add up. From what you described, using 4 cups plaster and 2 cups water, I would have expected your mixture to be too thick. I always go by WEIGHT and mix 70 parts water to 100 parts plaster...so 2 lbs plaster would be mixed into 1.4 lbs water. The best way to mix is by adding the plaster to the water slowly, usually "sifting" it into the water. When you do this, it will seem like there isn't going to be enough water to cover the plaster but it will be just enough when you finish adding plaster. The plaster will not start setting up until it is stirred, so once plaster has been added to water give it a little time to "soak" and the plaster will release air bubbles and get wetted throughout. After a few minutes of soaking, stir gently until it is fully mixed. Some people use their hands for this (with rubber gloves) because you can feel when the plaster is mixed to a smooth consistency. Do not let the plaster set on your hands, it heats up fast and can burn you. After mixing, tap the sides of the container (or drop it a few inches) several times to get air bubbles out and then pour. Right after mixing, the plaster should be like thick liquid. As it sets, it goes through a "plastic" phase that is similar to pudding (thick but can still be moved around) and then from there to hardened/solid (but still kind of soft) and will get very hard over the course of 30 min to an hour. When hard, it still has water in it (like a sponge) and needs to be fully dried. If you bake it (heat it up) to make it dry faster, just keep it to 250 deg F or lower. Above about 300 deg F the plaster can start to weaken. I'd suggest mixing a small amount just to observe how it behaves through the soak, mix, plastic, hardening phases. I use an inexpensive postal scale (digital) with a 30 lb capacity By the way, if you somehow got ahold of some type of "gypsum cement" rather than plaster, that may explain your problem with the mixture. If so, you'll have to look up the mixture ratio...gypsum cements use a lot less water than plasters. It would be the same process for mixing, just using less water.
-
Allowing the bearings to freely roll to the tail makes these baits cast a lot better (tail first). They will move up to the front of the bait for correct balance pretty quickly when you start the retrieve. With a little practice you can get these to cast really well and almost never "tumble" in flight. The trick is to keep the cast more of a smooth sweep rather than a quick jerk so the bearings stay in the tail through the lure's flight. We use these in ocean/bay so the longer casts are usually what we strive for.
-
A couple of thoughts come to mind. First is, you may be able to dye beads you already have to get your custom colors. I've used RIT dye to dye soft plastics. Plastic doesn't "take" the dye immediately, takes a little soak time, but it does work. This type of dye will bleed so keep whatever you create away from other plastics that you don't want to discolor. Second thought is you could make a simple mold using RTV silicone caulk and then pour either an epoxy or clear casting compound colored with your desired tint. There's a post in the soft plastics forum about making a mold with RTV silicone. Basically you just need to get a tube of 100% silicone caulk (the kind that smells of vinegar). This is a moisture cure silicone. In a thickness for a mold it would take a long time to set up solid if more than about 1/4 inch thick, but since it is moisture cure, you can cause it to cure pretty fast (15 min?) by mixing in a few drops of water to act as the catalyst rather than wait for water from the air to be absorbed and cause it to cure. I've tried this and it does work. I would form a bead out of modeling clay (easy), coat it with paint or floor wax to get it shiny, and use that clay "bead" as the model for the mold. I've used the clear "future" floor wax to coat clay models and it works great. Just apply in thin coats and let each coat dry before next coat if a next coat is needed. You'd have to either make sure to incorporate a hole or just drill each bead. Whatever you do, don't use a glass "marble" as a model, RTV silicone sticks really tight to glass! For colorant, try something dry or oil based. Maybe scrape color from colored pastel pencils? or you could just use fine glitter in different colors. Since this is a small item you could use a thin epoxy for the plastic. One I like is a finish cure epoxy I get from a local hobby shop. If you want to keep your mold simple, just make it a 1-piece mold with a small flat spot where plastic is poured in and "pop" your pieces out when cured. A two-piece mold will require a release agent between the two halves. In that case I'd start with petroleum jelly for the release agent first. Also, if you do a two-piece mold I'd make it a "squish mold" rather than one that you pour for these really small parts. Regards, Warren
-
I got some a while back but haven't tried dipping yet. It seems thick, but since it doesn't cure until UV exposure you "could" let it drip for a while. The heating also may work. The only thing I'd worry about if let to drip for any length of time without curing is that it may react with the paint underneath. I notice a pretty strong smell from it (styrene?) and wonder if something in it might act as a solvent. It works well for me as a patch / sealer for modified hard plastic baits so far and I'm setting it with a nail polish curing light.
-
I got mine in today but haven't tried it yet. I've used UV cure adhesives at work for a few years now and it's really a neat technology. Fast like super glue but it doesn't set up until you expose it to light, and it also fills gaps well. The one downside is you can't use it in places that cannot be exposed to light. That's OK for a topcoat but it may not work so well as an adhesive behind anything that's not transparent. I have a little unit for curing fingernail finishes that I bought on eBay to use for other projects so that's what I plan to use. There are inexpensive fluorescent UV lights that should work fine, have even seen full-size fluorescent tubes at Home depot. Always be really careful about eye exposure when using UV light. There are clear safety glasses that block UV if you have to work around it. I just put my light unit inside an opaque box.
-
The way I've done this is to inject/pour in a small amount of D2T, just a bit more than enough to fill the drilled out part, Then wrap teflon pipe thread tape around the outside of the bait to cover the hole and turn the bait over so the D2T flows down into the drilled part (against the teflon). In my case, I was adding rattles so I used a magnet to secure the BB's in a part of the bait that the glue never reaches. The teflon tape is non-stick so it peals away and leaves a smooth surface when the epoxy is set.
-
I've used Paint.Net for years. It was developed at Microsoft as a showcase application to show what can be done with the ".NET" developer tools. Not as extensive as PhotoShop but still plenty useful and pretty easy to use. It will crop , re-size, stretch, etc. just fine.
-
Small belt sander (one-inch) is indispensable. If you get one with a sanding wheel as well the wheel is great for faster rough cutting. If you ever start "looking" at rotary tools again I'd suggest a flex-shaft type with hanging motor and foot pedal. Try and get the handpiece that has a little drill-type chuck rather than collets. With that you can use just about any size bit and I chuck up a short piece of k-bob skewer in it when I want to mix epoxy (spin slowly to mix epoxy). Harbor frieght has about a $50 model, you don't need the expensive brand-name kind. Go with a small band saw before any type of scroll saw. Scroll saws cut way too slow for anything but super detail work. One thing I use that nobody mentioned is a drawing program... I've used Visio for years and find it indispensible for drawing up stencils and patterns of all kinds. This is a line-drawing app, different from a picture editor because you can move the lines around rather than changing the pixels. You can buy an older version (ver 2000 or 2003 are good) on eBay and it will do more than you need and cost a little less. I usually make up my pattern, print it, cut it out and stick it to the block of wood I want to cut with 2-sided tape and then start cutting.
-
If you're making a mold to cast a solid copy of a crankbait you don't need to cut in half. Just imbed the original in modeling clay, make the first half of the mold, remove clay, make the second half of the mold. That second tutorial mentioned above shows a lot of detail on how to do this and has a lot of nice tips. A one-piece mold is really the easiest if you can get by with it. No worries about alignment, mold release, etc. If you're determined to split a hard bait, I recommend some sort of clamp or fixture to hold it while you are cutting. Also, some cheap reading glasses help A LOT for fine detail work. It's surprising how a little bit of magnification helps.
-
goldenshinner, Duco cement is nitrocellulose disolved in acetone. I haven't used it for coating or sealing so can't speak about how well it works. You'd probably have to thin it down as it is pretty thick. You can find it at Ace Hardware and other places that carry a variety of glues. Best price by ordering from Dick Blick art mart (dickblick.com).
-
Diemai, The lure I posted a pic of does sit level at rest with the metal balls in the front. Many lures of this type have internal balls that shift front-to-back. I didn't specify, but we also use spinning gear almost all of the time. The resistance of the line during the cast actually helps to keep the lure flying straight. I know this because I have tried using lighter line and noticed a bit more tendency for the lure to tumble in the air. Also, when casting for distance I tend to throw rather high so the lure travels in an arc. At the top of the arc, the lure may be 20 to 30 ft above the water surface. There are no overhead obstacles like trees or wires in the ocean/bay where I fish but have to watch out for birds while casting like this. Regards, Warren
-
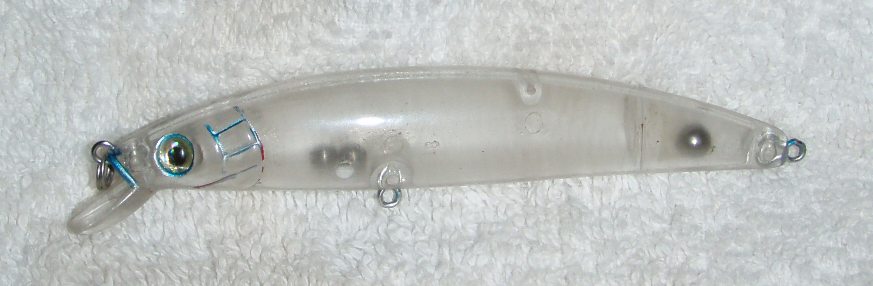
Diemai, The best casting distance is achieved when the lure flies straight, tail first, and does not tumble. I use the MaxRap and it is one of the best casting lures partly because it is easy to make it fly tail first. If you "whip" the rod too strongly, you can cause the lure to tumble in the air where a smoother cast will allow it to fly tail first and fly further. Also, the diving lip can cause enough air resistance to slow down a lure. I think it would be easy enough for you to cast a few times with your prototype without the lip to see this. Just be sure and use a nice smooth swing to get it to fly tail first, it does take a little practice and also helps to start the cast with about 2 ft of line between lure and rod tip. Of course, you won't want to change the diving lip if that is what you need to get the action and depth you want. I've attached a photo of a very inexpensive lure that we have found to cast exceptionally well. That is, it is easy to make this one fly tail first. This lure is 4.75 inches from tail to tip of the lip and weighs about 16 g with hooks and paint. I sanded the paint off of this one some time ago to study the internal construction so you can see where the steel balls inside are placed. There is one larger one in the tail that cannot move much and two smaller balls that can move all the way up to the nose. Best Regards, Warren
-
I use the Aeromarine also since they are local for me and I can just go in and pick up what I need. Their standard 10:1 (by weight) rtv is what I use. I've also tried their 1:1 (by volume) product and that is a bit easier to work with initially but produces a softer, less durable finished mold. All you need (for 10:1) is a digital scale (about $30 from many on-line places) to get proportions right. Another supplier mentioned in a previous post was "http://www.sunbeltmaterials.com/rtv-1556.htm". Have never bought from them but looks like they have a nice line of products. Try to stay with lower viscosity silicones. No need to use the "high temp" products for soft baits, those are for higher temperatures than soft plastic will ever require and can be really thick, and difficult to get bubbles out.
-
There's a nice little book on the topic called "Stand Alone Inventor" that I just finished reading a while back. He talks about patents, provisional patents, copyrights, and trademarks and how each/all can be worthwhile. ISBN-10: 0964383209 ISBN-13: 978-0964383203 Lots of good info. I thought it was worth the read.
-
You can get lower-powered heat guns that are made for "embossing" etc. I bought this one on Amazon for about $20. http://www.amazon.com/Multi-purpose-Stand-Perfect-Embossing-Drying/dp/B006Z9LUDG/ref=sr_1_5?ie=UTF8&qid=1338269561&sr=8-5 They get a lot hotter than a hair dryer but not as hot as a pistol grip type heat gun. I was looking for something for shrink-wrap tubing. You can probably find one at a crafts store in their "stamping" or scrap-booking section.
-
Did you shake the bottle of pearlescent really well? It may have settled. I agree about pearl powder being the way to go...that's what I've always used. Most of the soft bait suppliers like lurecraft, bearsbaits, etc. sell pearl powder and it isn't very expensive.
-
Getting Started, Cost Analysis Logistics Question
wchilton replied to ParkerFly's topic in Soft Plastics
There's a bit of learning involved in making molds. Since your supply of originals is limited I would suggest you practice on other, similar baits you can easily obtain and hold off on making the molds you really want until you are confident in your ability to make a good mold. You're going to find things like care in mixing to minimize bubbles, and even the way you pour your mold material can have an effect on the finished mold. Go through the whole process, setup mold box, fix masters in place, mix material, pour, extract masters, finish the mold, and pour a few baits. The mold material I've found easiest to work with is RTV silicone and even with RTV you'll occasionally encounter a problem. It's hard to say what, exactly, you might run into on your first few tries. Some guys here have been making molds for years and make it look easy, but there are a lot of little details you have to pay attention to and they have all developed a process that works for them.