


barrybait
-
Posts
397 -
Joined
-
Last visited
-
Days Won
12
Content Type
Profiles
Articles
TU Classifieds
Glossary
Website Links
Forums
Gallery
Store
Everything posted by barrybait
-
Nor did he/she invent it. There is an element of folks out there than will try to come up with something like this so that they may recover damages later by a maker utilizing a technique. I heard about one out there that posted multiple images of largemouth bass online. When a Bass Club utilizes an image, they go after the Club and settle for a fee.
-
I make wood wake baits mostly about 7" finished length. I use stainless steel wire from McMaster Carr that I buy in a spool that is 1/4 lb. in either 0.052 or 0.062. Mostly 0.062" for a 7 inch wake bait. Then I twist it into a hook or line tie. I do this because there is much more holding power with a twisted wire hangar that with the screw eyes. I drill my holes for a snug slip fit and all the way through the wood. Then I fill the hole with D2T until it comes out the other side and put my finger over the other side while I push the hanger into place that way I am sure I have 100% wood, wire, and epoxy. On holes that don't naturally exit the bait, like line tie, I drill a vent hole down from the top to accomplish the same thing. I find that if I use the 0.092" screw eyes with the size hooks and split rings I want to use, it is easy to over stretch the split ring over the 092 size wire. I do keep 0.092 screw eyes in stock though in 2" and 2-1/2" and now I use them for wood chopper type baits so I have plenty of hold even after holding the big chopper blades.
-
Like Mark, I seal my wood wake and top water baits with slow cure epoxy like penetrating epoxy of Devcon (D2T). After I have done my shaping and have epoxied the hook hangars and the lip in place. Then I can use needle nose vise grips to hold the bait while I work on it. I think it helps to heat the wood bait with my heat gun before I apply the slow cure epoxy. That helps it pull the epoxy in as the wood cools. You can't really get the sides of the wood grain to absorb epoxy but end grain will. This makes the end and tapered sections harder and on my 2 piece baits I get a really great wood knock like that. Of course you will end up adding or moving weights as needed and you have to be diligent about sealing each hole. Be advised that warmed wood will make the epoxy more fumey, use an extraction fan or I use a fan blowing across my bench to keep the fumes away.
-
I make the lower outside corners or sometimes the outside edges of the rounded lip slightly wider than the body of the bait. Probably 10 to 25% wider. I originally modeled it similar to the 3:16 Wake Jr. bait and also the AC Plug Minnow. It wakes well with a nice "V" wake in the water and makes a nice wood knock as it does so. My lips are made from lexan by hand. Sometimes with too much hard walk the bait is too clunky or mechanical. It seems best if you can reduce it and make it wake more fluidly if that makes any sense. If you get your bait all sealed up including the lip slot, you can test several different lips by taping the portion of the bill so there is a snug fit in the lip slot for testing. Barry
-
I like wake baits that I can wake, but that I can also pull down up to 18 inches on the retrieve. I generally use a slightly larger lip than most and a little more angle to help pull it down. Also, I like to keep the lip wide at the outside points of a short coffin style lip. The wide corners will catch a tule on the retrieve and kick the bait away from the tule. Helps me fish my wake baits thru sparse tules on the surface or under water.
-
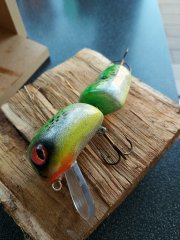
 Beautifully done. I don't know how you got that mottled pattern on the sides and back but it looks great! Congrats. Barry
 -
Very nice. I like the upright hook rigged from the top the best. The downward hook looks like it would come free then hang up but I guess that wasn't the case since it's one of your favorites. Both are easily the best application of magnets per this thread but also fascinating is your application of concave and convex bills/bibs. Are you heating and shaping these yourself?
-
That's astonishing Hazmail. Exceptional work! Did these lures ever make it into the ''Best Lure" contest? Good job, Barry
-
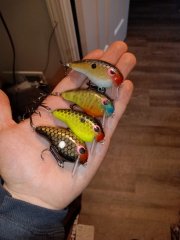 Good looking lures. Nice work! Barry
 -
I have one swim bait that uses a small disc shaped magnet to hold the treble hook up against the belly of the bait to reduce the amount of shallow weeds it will pick up by the hanging treble hook. The hook it still secured to the bait by normal hook holders but the hook trails back and the shank is held against the body of the bait with the magnet. Another method I have seen employed is to cut a groove in the bait and glue a short length of clear flexible plastic tubing in the groove. Slice thru the exposed side of the tubing and push the shank of the hook into the plastic tubing. It is quite secure but will certainly pull free by a fish. This could easily be employed on top of a bait. With this type hook holder, you can tie the hook with braid and connect it to a hook hangar or even the line tie of the bait.
-
It's been awhile but I used JRHopkins method. Once you fan out the brush fibers, I applied painters tape to the fanned out portion of the fin or tail to hold it all in position then I used epoxy to glue the base together. Let cure. Then later epoxy the fin/tail into a slot in the lure. Let cure. Trim to shape.
-
I like mthe Iwata Eclipse as well but I like the HP-BS because of the smaller cup size, less cup to clean with so frequent color changes but I'm usually only painting 1-4 baits at a time.
-
I have not had any problems with twisted wire eyes epoxied into balsa. I don't go quite as far as "kakuip's" excellent method in the previous post but I do fairly long twisted eyes and if not coming out the other side like with the hook eyes, I drill a pilot hole, put epoxy in until it comes out the vent, put my finger over the vent and insert the twisted eye. Beware the "various densities" thou. The balsa I bought at Hobby Lobby or Michaels craft stores ran about 7 lbs per cubic foot. The baits I made with it really caught the fish with flat side cranks and 7" wake baits but I have been unable to make them durable. No twisted eye failures but the top protective coating eventually develops cracks then finally a chunk comes out. Top coats were D2T and also Solarez UV. Since then I have ordered graded balsa from "Specialized Balsa" in Colorado. I have the 10-14 Lb. per cu.ft. I hope that is going to make my baits more durable and still catch fish as well. Also, since then I was lucky to get some western cedar which feels great when sealed with penetrating epoxy and makes a great wood knock on wake baits.
-
I use twisted eyes the more often than screw eyes and I believe they are much more secure. When I epoxy them into the hole, I first drill a vent hole to intersect the twisted wire hole. After mixing D2T I use the mixing stick to drip epoxy into the hole until it comes out the vent hole. Then I hold my finger over the vent hole as I "scew" the twisted wire eye into it. That way I feel sure that I have 100% wood, epoxy, and twisted wire contact. Barry
-
I use 2ton epoxy for securing lips in the slop on baits but I think 5min should be ok. I do a little more than "scuff up" the lip though. I do scuff it up with some sand paper but I also use a dremel with the small ball tip and ball tip out some groves on both sides of the lip for a key to lock it in. This is on wood baits and the slots are usually sealed with D2T. Since your baits are resin it might be a good idea to scuff/key up the slot too. I use the same method for both polycarbonate and fiber(circuit board) lips. Also, you may want to reconsider "really tight" lip slots. You may be scraping the glue off and it puts a load on your resin. I always try and maintain the back side and the top of the lip slot perfectly if possible. I have repaired broken lip slots on commercial wake baits for friends by using a hack saw blade down the front of the lip all the way to the top of the lip slot. Then I just push the bottom of the lip to break it free. That way I maintain the back and top of the lip slot making it easy to position the new lip as I epoxy it in using tooth picks at the front of the slot to hold it against the back and top of the slot while the epoxy hardens.
-
No sir. I mostly use the steel wool when recoating 2 part epoxy and when recoating or am going to repaint a hard bait to get coatings to stick.
-
 Looks like you nailed it.
 -
 Cool. Thanks for sharing.
 -
I like to use fine steel wool as opposed to fine sandpaper when I need to scuff up the surface for a second coat. You can get 0000 steel wool and I think that if you just get the shine off it provides enough "bite" for the next coat. Sometimes if I use fine sandpaper, it takes off more than I want and has damaged my paint requiring me to start over. After the steel wool I use a cotton ball soaked with denatured alcohol to wipe it down before applying the next coat.
-
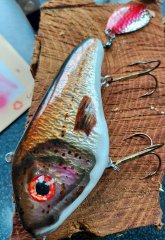
Catches my eye. Unique with 2 line ties so I guess you can vertically jig this one. Also note worthy is you unique foil job. Not sure how you achieved that mottled foil. Beautiful.
-
Very interesting bait. Looks like it will wake great and really move some water when it does. Nice work.
-
Have you googled "realistic 3D fish eyes" and also search ebay for same? There are some very good looking eyes out there in many different sizes. There are also videos out there for how to make your own by photo editing real fish eyes that you should check out if you haven't already. I have made some when I needed a specific color and size and they turned out ok but I also had the bubbles problem. Barry
-
Small Topwaters: Weight, Body Shape, Line Tie, Oh My!
barrybait replied to RiverSmallieGuy's topic in Hard Baits
Not sure what you mean by "enough weight .... to sit upright". I don't want the bait to sit vertical, I want it to sit nearly horizontal in the water. I add weights say 3 or 4 weights in a row along the back 1/3 of the bait until the bait sits just a little tail down from horizontal That is not for more drag but to help with the glide of the wide walk. -
Small Topwaters: Weight, Body Shape, Line Tie, Oh My!
barrybait replied to RiverSmallieGuy's topic in Hard Baits
I built some top water stick baits 5 to 7 " long modeled similar to Super Spook and got a basswood 5" to walk about 18" wide. I weighted them toward the rear of the bait but I did not weight it so much that the tail was down much, just sat low in the water. For a good glide, lighter front, heavier back end when you jerk-release, it yanks the front of the bait to the opposite side and the forward motion push of the weight drives the front around more due to unstable flight. Similar to shoot an arrow with the weight in the back see what happens, shoot an arrow with the weight in the front goes far. I learned about that repairing a friends Lunker Punker. So for a good glide, a nearly level bait, weighed on back half, and overall weight are all beneficial to a good glide. And I think if you want to do that and minimize forward motion, a shorter bait is better than a longer bait. -
I was lucky to learn that before I started making baits. I was throwing a Luhr Jensen Speed trap and took the snap off to try a different lure. Later I tied the Speed Trap on direct and it immediately blows out. With snap you can burn them, tied direct you can't even crank them. The answer always seems easy after you figure it out. Good job and congrats on a successful Glide Bait.

