


barrybait
-
Posts
397 -
Joined
-
Last visited
-
Days Won
12
Content Type
Profiles
Articles
TU Classifieds
Glossary
Website Links
Forums
Gallery
Store
Everything posted by barrybait
-
I agree with Gliders that the twisted eye is as strong and in fact probably stronger. However, in many of the large wood plugs these are used for, The wire goes thru the center of the bait so no matter what eye you form on one end, when you push the wire thru to the other end a barrel eye is the only option I know of. The Lordship Lures You Tube videos were very good. After watching, there were other lure maker videos as well.
-
Lure Parts Online is your bait making super store. Get on the site and search for "props" and the Chopper Prop will show up there, no. 4034. Left and Right.
-
I used Krylon Fusion when I first started out painting plastic crankbaits. Seemed like the perfect application, bonds to plastic and I used white for my base coat. I had some trouble with the baits failing at the seams and I asked the outfit I bought the blanks from and they had not heard of this problem. I suspected that it bonds to plastic but it doesn't get along with the glue that bonds the two lure halves together. I started priming with Createx and never had any more baits open up at the seam. Keep that in mind if you are using it for a basecoat on plastic cranks. I didn't think to try the clear for a top coat and I like that idea.
-
 That looks sharp. Nice work.
 -
 Very nice bait. Well constructed and finished. Quality work. Congrats! Barry
 -
 A really nice looking bait and paint/top coat. Great work! Barry
 -
Depends on how high your high spots are. Next coat will improve it but if there is a fair size bump you might want to improve the situation by using some fine grit abrasive paper on a craft stick. The reason to use a craft stick is to try and hit the bump only. Don't try and get it all the way flush you will wind up going thru and damaging your paint work. If you try to sand with a soft backing on the grit, it will touch the thinner areas and damage the paint right away. Next time you have to touch up the epoxy and it is beginning to cure just like when you could see a bump, take your heat gun and warm the lure a little and it will help the epoxy spread out evenly. Just like everything else...don't overdo it.
-
Mark, I haven't tried adding acetone to the solarez but it sure sounds like it would be helpful. Bob, I tried sealing with solarez but I wasn't comfortable with it because I use D2T to glue the bill in and the hook hangars in so it seems like I should continue with the D2T. What do you glue your bill/hardware in with and how much do you think we may be able to do multiple layers of different product. I haven't really seen the two disagree with each other.
-
I am making some balsa baits and I only have been using D2T and Solarez and Thin Super Glue. If I don't get a layer of Solarez in there somewhere, I just can't seem to get them tough enough. If I use Super Glue, then D2t, paint, and D2t they just don't hold up to the hooks even after multiple layers of D2T. It's like you can put a hook right through it. I top coat plastic squarebills with D2T and they are just bullet proof. If I use Solarez first then paint and D2T seems pretty tough but the Solarez always seems to get some lumpy to it I need to sand. So..currrently I am going with Super Glue, D2T all hardware and lip, D2T bait, paint, Solarez top and I am dealing with the Solarez top coat best I can. My latest is that I should probably order a mid grade balsa if I need them tougher.
-
I know this sounds contrary but I actually extend my application time of D2T with the same heat gun I use to dry paint between airbrush coats. Quite often after I finish coating my baits and of course my D2T is starting to get a little stiff to brush on, I give my baits one final look over and observe a blemish. I can pass the heat gun over my mixed D2T and make it flow nicely, brush some on at the blemish as best I can. There will be brush marks at this point so I his the bait with the heat gun, all over but especially where I brushed and everything smooths out just great. There is a point of diminishing returns of course but it is like you can re liquify it briefly or in the above case, may have been able to smooth it out on the lumpy application by using the heat gun.
-
 Awesome bait. From the scale pattern to gill plate to eyes and highlights, beautifully done. Has Wow! factor. Barry
 -
58de7e270c236_PaintedBassWakeBait.jpg
barrybait commented on TMatherne's gallery image in Hard Baits
 Beautifully done. Looks great!
 -
I would suggest that you use 3D type eyes only when there is a place made for one. When there is no eye socket, then I think they look much better if you paint (or dob) the eyes on.
-
Andy, you could use the search function and gather information on topics like this. I am making balsa crank baits also and the best procedure to date appears to be using thin super glue for initial sealing and to give the bait a sort of shell. Follow that up with a coat of Solarez Polyester Resin. Then after you paint it, can coat with Devcon 2-ton epoxy. I tried using multiple coats of D2T instead of the Solarez but it is not as tough and a hook will still easily damage the coating. Good luck, Barry
-
 Nice looking bait. Looks well finished. Scale lines stand out make for nice texture. Barry
 -
Good luck to you Keith. Give my regards to Bryan as well as wishes for a speedy recovery. Barry
-
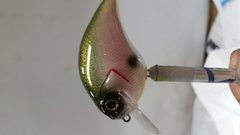
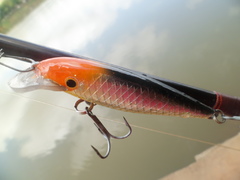
I am working on a luhr jensen Nip-I-Diddee and it has screw eyes. The ends look the same as in your pictures above. I don't know how they would do a thru wire without us being able to see the finished wire whip so maybe you also have screw eyes on the wood chopper. I am curious, is the difference between the nip-i-diddee and the wood chopper mostly the style of props and it also looks like the wood chopper is typically a larger bait ?
-
Don't put real hooks on it. Just a bad idea. Make dull "hooks" with easy to bend round stock of aluminum or steel or use brazing rod. Cheaper. Safer.
-
 Very nice. Clean crisp work.
 -
.jpg.725ef40334a60e19f736f9ea78d32d81.jpg) Very interesting. Thanks for the explanation how you achieved this result. Beautiful. Barry
Very interesting. Thanks for the explanation how you achieved this result. Beautiful. Barry -
 Beautiful work. Turned out great. Barry
 -
I have not seen or heard of anything like this. I am replying because I do actually custom paint some of these. The Zara Super Spook and the Jr. are great baits and they are priced reasonably so I never really figured it was worth pursuing. Later I found out that silent baits of this type are great when the water is very quiet so I made some wood baits in balsa and basswood that turned out great but have that limited opportunity when you need silent baits. Also, I could recommend that you buy the clear super spooks. I have also painted these in nice ghost patterns. And if you want to change the sound, drill in, change the sound, repair the hole, paint.
-
Rifle stock makers use water to raise the grain. That makes all the little hair fibers stand up. Wet the wood blank and let it dry or heat it with your heat gun. The hairy wood fibers curl up. Use steel wool to smooth again. It cuts the fibers off. Repeat if necessary. I don't think this would work out so well if you have scales carved into the wood but for smooth sided wood blanks it should work great. Makes the wood feel super smooth.
-
I repainted a couple of s-wavers. I popped the eyes out and used a small pot blaster with blasting grit. If you have one available the coating blows off very quickly and easily making for a real nice blank bait to paint. 21xdc's rubber band idea works great at the joint. I also stretch the bait inside an embroidery ring for painting and coating. Wire the nose to one side, remove the tail and use a piece of wire and rubber bands to stretch the tail section to the other side. Makes it easy to handle/hang. I used D2T for top coating and didn't have any problems. I may have posted a pic of one in the gallery. If you can blast the coating off, it works great with transparent paints for ghost baits. Good luck and no worries, it will turn out great. Barry
-
I use 30 minute but 5 min would be fine. I find that 30 minute starts thickening in about 10 minutes and holds the mesh well. If I am doing foil, or even better, foil over mesh, then I lay down the mesh then put foil over the mesh for a nice built in scale pattern. Doing one side at a time, i generally lay the bait down on my shop floor carpet or pad, cover it with clear kitchen wrap, put a piece of foam over it and set my tool box on it. That dries with the aluminum foil taking on the mesh pattern and gives it a scale pattern. The clear kitchen wrap comes back off, I just put it over in case a small crack appears in the foil and lets some epoxy out. Also the clear wrap will allow you to work on the other side while the epoxy is mostly cured but still a little sticky.

