


Tim2199
-
Posts
33 -
Joined
-
Last visited
-
Days Won
1
Content Type
Profiles
Articles
TU Classifieds
Glossary
Website Links
Forums
Gallery
Store
Everything posted by Tim2199
-
The urethane resin will not stick to the silicone, but a spray of mold release will make any detail on the silicone mold last longer. You will need some mold release if you plan on making a two piece silicone mold as well. Watch the makelure.com videos, and check out solarfall baits videos on YouTube. He has lots of great how-to's.
-
Luke1 I have purchased the Lexan available at Home Depot and Lowe's locally. All they stock locally is .093 thickness. I know you can get it thinner, but this thickness has worked for me on 3 to 8 inch cranks.
-
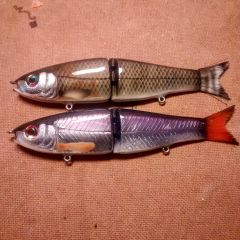 Very nice finish. Is that foiled or paint? Epoxy topcoat?
 -
I know in canada some of the regulations on lead are in line with what Mark had to say. Sometimes there is weight limit too for the size of lead (ie. Nothing under 1.5 oz), however it doesn't apply to the use of lead when it cannot be ingested by wildlife. Some alternate options are steel shot, and bismuth and tungsten powder/grain. The powder can be mixed with epoxy to create a solid weight in any way you choose to mold it. The challenge is finding something that is both dense and cost effective. Tungsten is super dense, therefore heavier than lead for a given volume, but you empty your wallet for it as well.
-
Yeah I have to give credit to JRHopkins. I tried this method after purchasing his DVD a while back. Really good resource for anyone starting out making pvc swimbaits. Like anything with bait making you can follow other builders advice and then adapt your approach based on what works for you and the materials you have on hand.
-
X2 on not fixing the lip. Recently I hot glued a lip in. Held the lip really well. Tested it in the water. Then I placed it in my toaster oven at 65 degrees Celsius for a couple of minutes and the lip slide out. the glue came off nicely too when it was slightly warmed (not sticky if it's not hot).
-
I have used the method of heating the wire and placing it along traced lines on the inside of the bait. Then I glued the two halves up with 5 minute epoxy and it worked great for me. Caught a couple 6-10 lb pike on that lure, and with even smaller wire than what you are thinking of using, I had no concerns with strength. Just glue the two halves together with hot glue in a couple spots, shape the bait, and then they can be easily separated with a utility knife to place the wire and glue them together with pvc glue or epoxy.
-
If it was noticed primarily on the rap style blanks, maybe the surface just needs a little extra scuffing with fine sandpaper to give the base coat a little more to adhere to.
-
Yeah I think I recall the same advice from an older post. Warming the MCU prior to dipping or brushing will allow it to flow easier, resulting in a thinner and faster curing initial coat. Might help.
-
Yeah I was pretty pleased with the buffing wheel, it's so quick and safe. Just have to clean the lips up with rubbing alcohol to get the polishing compound off. Word of caution don't use the higher abrasives polishing compounds like black or brown, or if you do use light pressure, as it can take too much off. Regarding the flame polishing, it's a very good solution on acrylic (plexiglass), but not so good on polycarbonate. I did a little research which was consistent with my own results when I noticed the lexan bubbling.
-
X2 I also finish them off by buffing the edges using a cheap polishing wheel on an bench grinder. Add a little buffing rouge to the wheel, and with a little light pressure the edges come out perfectly clear. Too much pressure and you can ruin the lip. The red jewelers rouge is best as it's the least abrasive.
-
Another one to look at is the Savage Gear Soft 4 play skull kit. Mounts over the head of the soft bait, and there should be some youtube videos of it swimming.
-
I have seen it stocked in several of our hardware stores in canada. Comes in both a can for dipping or an aerosol spray can. Whenever I have seen it, it's been stocked right beside other spray paints (kylon, rustoleum, etc). And the name brand is as listed above in "".
-
Good question. I have wondered this myself. I have used .5, .75, and 1.25 inch screw eyes. Segment length and overall weight of the hardware is a consideration. Naturally having more of the screw I'm bedded in the bait should provide more anchoring strength, but at the cost of adding weight. I too would like to hear some feedback on what length of scree eye is needed. I would think resin and hardwoods would hold a lot stronger than balsa or pvc.
-
I have used PPG two part clear on a few automotive jobs. Lays on pretty nice and wet ( motorcycle fairings) and was what our local auto body supply store recommended. They also carry other stuff but the manager thought it was my best choice. I put on three coats. How many coats are you used to applying Matt. I started with a light first coat, and then layed the second and third on wet (relatively speaking) so you could see it flow.
-
Try using the search tool. Select the softplastic forum and try searching airbrushing soft plastics, or Spike it, or VPI. Theres a thread called "airbrushing soft plastics", some discussions of products and a link to a youtube video demonstration. Once you figure out if you want to go the solvent or waterbase route, then you can track down a supplier. Good luck
-
I think you'll find that both the mixing of paints to get the shades just right, and playing around with the placement of the laying of coats will be an valuable experience. You learn so much by experimenting, and it gives you confidence when you tackle other projects. I know that's true from my experience, and I've heard it from more veteran lure builders as well on the site. Keep up the great work and thanks for sharing so we can all benefit. Tim
-
It looks good. Pattern is closer on the second bait. Maybe try a small amout of lime green tint to the yellow, if you want to be picky.
-
I have a 2 gallon dewalt compressor for general use. Since its loud and I do my painting indoors, I built an insulated box out of mdf and foam board insulation. Holes for the air and power line. Lid on top. The roar from the compressor is dialed down to a low hum. Since oiless ccompressors are cheap and work nice for airbrushing, this is a nice way to make them a little more civilized. I also have an inline moisture trap and ajustable psi regulator on the outside of the box for quick adjustments. The box has casters on the bottom so I can roll it around easily. Should be a few videos on youtube that show similar setups.
-
Im sure there are a few. This one I stumbled across the other day. Alumilite Both hard and soft bait starter kits http://www.makelure.com/store/pg/68-MakeLure-Starter-Kits.aspx
-
Nothing like a little inspirational art. Very nice lair
-
Lots of discussions that you can tap into by using the site search engine. Not sure about the airbrush application, but you can search: MCU (moisture cure urethane), automotive urethane/clearcoat, solarez, alumi-uv, and specific concrete sealers. To my knowledge all of which are thinner and lighter than epoxy. Do a little sniffing around with those topics and you'll be able to educate your self on the pros and cons of each. You'll be the best judge of which approach you would like to take with regards to your bait design and clearcoat application. I think you'll find most members suggesting the same as my post, theres just so much information contributed already. Then if you have specific questions that your research didn't answer, then the crowd will be able to give you some feedback.
-
http://www.badgerairbrush.com/Application_Chart.asp Here's the comparison chart
-
I have a badger 155 anthem, which is quite different as mine is gravity fed and dual action. So all I can say is im happy with the quality of Badger. The dual action and smaller needles allow for better control with fine details. From what I saw on the 350's description it is really good for larger volumes of paint, and depending on the tip it can shoot heavier paints. Which isn't a bad thing, just depends on your application. I believe Badger has a comparison chart on their website of all the models which shows the strengths and weaknesses of each airbrush.
-
Thanks Dave
